XDR GraphQL APIs Authentication🔗
To create dedicated API Client Credentials, follow the steps in the four-part Create Client Credentials guide. Alternatively, to use device authorization, refer to the Device Authorization section.
Part 1: Create Client Credentials🔗
In order for an application or script to access the Secureworks® Taegis™ XDR GraphQL APIs, you need to generate client credentials to allow it to log in. These are similar to a user’s username and password but are for automation use only, and should be protected like any other login credentials. This step should be performed one time only—if you have created your client credentials previously, reuse those and skip to Part 2: Generate an Access Token.
XDR client credentials can be created by XDR users who have a role of Tenant Analyst or Tenant Admin in the target tenant. The credentials are valid for that one tenant only, and only in the region they were created for. If your application needs to access multiple regions, you must create separate client credentials for each region.
Important
By default, client credentials are granted a Tenant Analyst role and are only able to perform the same actions that a typical Analyst user can. Some XDR APIs require additional permissions and fail when attempted with the Tenant Analyst role. In most cases, these additional required permissions are not documented: you should be aware that unexplained API failures may be due to insufficient permissions. If you need to create client credentials with more permissions than the default, see Create Privileged Client Credentials below.
Regions
The URL to access XDR APIs may differ according to the region your environment is deployed in:
- US1—
https://api.ctpx.secureworks.com - US2—
https://api.delta.taegis.secureworks.com - US3—
https://api.foxtrot.taegis.secureworks.com - EU1—
https://api.echo.taegis.secureworks.com - EU2—
https://api.golf.taegis.secureworks.com
The examples in this XDR API documentation use https://api.ctpx.secureworks.com throughout. If you are in a different region substitute appropriately.
Note
For information on how to authenticate using the Python SDK and related usage examples, see XDR Python SDK Authentication.
Note
The number of client credentials that can be created per hour for a tenant is limited to 10.
Adding API Credentials🔗
There are two options to generate API Credentials for your XDR tenant, through the UI or CLI. We recommend using the more streamlined process via the UI.
Managing API credentials in the Taegis XDR UI replaces the process of creating client credentials manually via the CLI method.
Note
Only users with the Tenant Admin or Tenant Analyst roles can configure API credentials. By default, API credentials generated using the method below receive the Tenant Analyst role permissions. See details on creating privileged client credentials, if required.
To add a new API credential:
- From the Taegis Menu, select Tenant Settings → Manage API Credentials.
- Select Add Credential from the top right of the page.
- In the Add API Credential modal, enter a name for the new credential.
- Select Submit.
After submission, the system generates a new Client ID and Secret.
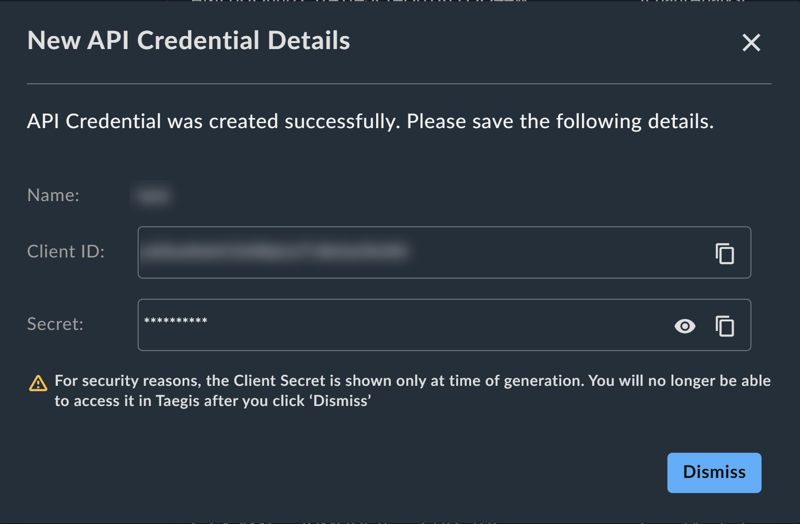
Important
The Client Secret is displayed only once, immediately upon creation. Make sure to copy and securely save the Secret, as you will not be able to retrieve it again.
The instructions immediately below are now considered legacy instructions for the process of creating client credentials. The newer process is detailed in the Via UI tab. Please note that the legacy process is still supported, but we recommend you use the updated workflow for improved security and usability.
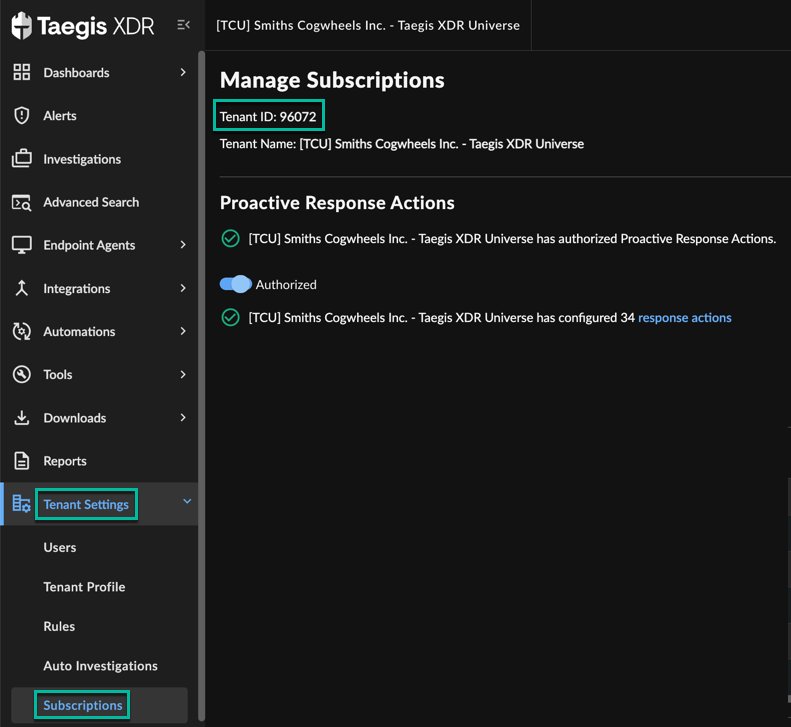
Find Tenant ID on Subscriptions Page🔗
To find your tenant ID, select Tenant Settings from the Taegis Menu and choose Subscriptions.
Manually Create Credentials🔗
To create your client credentials manually, do the following:
- Log in to XDR in Chrome.
- Open the Chrome Developer Tools.
-
Go to the Console tab and enter the following:
-
An
access_tokenis copied to your clipboard. Note that theaccess_tokentoken is not displayed in the Chrome Developer Tools Console, it is only copied to your clipboard. The command returnsundefined. - In a command line terminal, run the following commands to create your client credentials. Paste the
access_tokenfrom your clipboard into the commands in place ofyour_access_token. Also substitute your tenant ID in place ofyour_tenant_idand enter a unique name to identify your application in place ofyour_unique_application_name. - Your new client credentials are returned. Save the
client_idandclient_secretvalues from this response — your application needs these to login to the XDR system. These are equivalent to a username and password for a user, so please protect them as you would any other login credentials.
The following examples show you how to create client credentials with default permissions. If you require additional permissions, see Create Privileged Client Credentials (Optional).
Note
The examples on this page use the cURL command-line tool to issue XDR API requests. Any other tool or method for issuing HTTP requests may be used in its place, if you are more comfortable with something else.
Important
The CreateClient API call is rate limited. The number of client credentials that can be created for a tenant in an hour is limited to 10.
Credentials on Linux🔗
export ACCESS_TOKEN="your_access_token"
export TENANT_ID="your_tenant_id"
curl -g \
-H "Authorization: Bearer $ACCESS_TOKEN" \
-H "X-Tenant-Context: $TENANT_ID" \
-H "Content-type: application/json" \
-X POST \
-d '{"query": "mutation createClient($name: String!, $roles: [ID!]) { createClient(name: $name, roles: $roles) { client { id name client_id roles role_assignments { id tenant_id role_id role_name expires_at } tenant_id created_at updated_at created_by updated_by environment } client_secret } }", "variables": {"name": "your_awesome_app_name"}}' \
https://api.ctpx.secureworks.com/graphql
Credentials on Windows🔗
set ACCESS_TOKEN=your_access_token
set TENANT_ID=your_tenant_id
curl -H "Authorization: Bearer %ACCESS_TOKEN%" -H "X-Tenant-Context: %TENANT_ID%" -H "Content-type: application/json" https://api.ctpx.secureworks.com/graphql -d "{\"query\": \"mutation createClient($name: String!, $roles: [ID!]) { createClient(name: $name, roles: $roles) { client { id name client_id roles role_assignments { id tenant_id role_id role_name expires_at } tenant_id created_at updated_at created_by updated_by environment } client_secret } }\", \"variables\": {\"name\": \"your_awesome_app_name\"}}"
where your_access_token is the access token copied from Step 4 above, your_tenant_id is the ID of the tenant you want to access in XDR, and your_unique_application_name is a unique application name of your choice.
Tip
If you get {"error":["Existing client in tenant"]}, try changing the application name. The application name must be unique.
You should get something similar to the following:
{
"data": {
    "createClient": {
    "client": {
        "client_id": "<YOUR_CLIENT_ID>",
        "created_at": "2023-03-03T20:58:40.24986Z",
        "created_by": "0000",
        "environment": "production",
        "id": "<UUID>",
        "name": "your_awesome_app_name",
        "role_assignments": [
        {
            "expires_at": null,
            "id": "<UUID>",
            "role_id": "a4903f9f-465b-478f-a24e-82fa2e129d2e",
            "role_name": "TenantAnalyst",
            "tenant_id": "50530"
        }
        ],
        "roles": "tenantAnalyst",
        "tenant_id": "<TENANT_ID>",
        "updated_at": "2023-03-03T20:58:40.24986Z",
        "updated_by": "0000"
    },
    "client_secret": "<YOUR_CLIENT_SECRET>"
    }
}
}
Create Privileged Client Credentials (Optional)🔗
This section is required only if you need to create client credentials having a role other than the default Tenant Analyst. If you have already created client credentials with the default role, skip ahead to Part 2.
Refer to the table below to find the role ID required for these examples.
| Role Name | Role ID |
|---|---|
| Administrator | ba0fdcbd-e87d-4bdd-ae7d-ca6118b25068 |
| Analyst | a4903f9f-465b-478f-a24e-82fa2e129d2e |
| Responder | a72dace7-4536-4dbc-947d-015a8eb65f4d |
| Auditor | ace1cae4-59fd-4fd1-9500-40077dc529a7 |
Privileged Credentials with Linux🔗
export ACCESS_TOKEN="your_access_token"
export TENANT_ID="your_tenant_id"
curl -g \
-H "Authorization: Bearer $ACCESS_TOKEN" \
-H "X-Tenant-Context: $TENANT_ID" \
-H "Content-type: application/json" \
-X POST \
-d '{"query": "mutation createClient($name: String!, $roles: [ID!]) { createClient(name: $name, roles: $roles) { client { id name client_id roles role_assignments { id tenant_id role_id role_name expires_at } tenant_id created_at updated_at created_by updated_by environment } client_secret } }", "variables": {"name": "your_awesome_app_name", "roles": ["<desired_role_id>"]}}' \
https://api.ctpx.secureworks.com/graphql
Privileged Credentials with Windows🔗
set ACCESS_TOKEN=your_access_token
set TENANT_ID=your_tenant_id
set ROLE_ID=desired_role_id
curl -H "Authorization: Bearer %ACCESS_TOKEN%" -H "X-Tenant-Context: %TENANT_ID%" -H "Content-type: application/json" https://api.ctpx.secureworks.com/graphql -d "{\"query\": \"mutation createClient($name: String!, $roles: [ID!]) { createClient(name: $name, roles: $roles) { client { id name client_id roles role_assignments { id tenant_id role_id role_name expires_at } tenant_id created_at updated_at created_by updated_by environment } client_secret } }\", \"variables\": {\"name\": \"your_awesome_app_name\", \"roles\": [\"%ROLE_ID%\"]}}"
Tip
You can persist environment variables across sessions with setx. You may need to open a new cmd shell after setting environment variables for them to be available for use. See the example below:
Example Credential Creation Scripts🔗
These two example scripts are a guide to easily create API credentials. These scripts can assist users in managing API client credentials for Taegis. A Python and a PowerShell version are available depending on your Operating System or Platform of choice.
Current Version: 1.0
Part 2: Generate an Access Token🔗
Your application uses the client credentials created in Part 1: Create Client Credentials to log in to the XDR system and generate an access token. This access token must be included in all other XDR API requests to identify your application and prove that it has valid authentication. Access tokens are only valid for a few hours, so your application must repeat this process as necessary.
Important
Do not create new client credentials each time you need a new token—your client credentials are good for the lifetime of your application.
The examples below show how to complete this process manually using the cURL tool. Use these examples to familiarize yourself with the process. It is likely that your application can use other methods to issue these requests, though the requests needed are the same.
You need three pieces of information to accomplish this step:
- The authentication URL:
https://api.ctpx.secureworks.com/auth/api/v2/auth/token - Your client_id from Part 1
- Your client_secret from Part 1
Substitute the appropriate server name for your region in the authentication URL if necessary.
your_client_id and your_client_secret are the client credentials you created in Part 1.
Generate Token on a UNIX-like System🔗
export CLIENT_ID="your_client_id"
export CLIENT_SECRET="your_client_secret"
curl --basic -u "$CLIENT_ID:$CLIENT_SECRET" -H "Content-Type: application/json" -d '{"grant_type":"client_credentials"}' https://api.ctpx.secureworks.com/auth/api/v2/auth/token
Generate Token on a Windows System🔗
set CLIENT_ID=your_client_id
set CLIENT_SECRET=your_client_secret
curl --basic -u "%CLIENT_ID%:%CLIENT_SECRET%" -H "Content-Type: application/json" -d "{\"grant_type\":\"client_credentials\"}" https://api.ctpx.secureworks.com/auth/api/v2/auth/token
your_client_id and your_client_secret are the client credentials you created in Part 1.
This command returns a result similar to the one shown below.
{"access_token":"your_unique_token_value","expires_in":36000,"expiry":"2022-04-22T09:40:06.677Z","token_type":"Bearer"}
Your application uses your_unique_token_value in all subsequent API requests. The token is valid until the time shown in the expiry value, after which your application must to generate a new token.
Part 3: Invoke XDR API Services🔗
When you have a valid access token for your application you can issue requests to the XDR APIs. To authenticate, include the access token generated in Part 2 in an Authorization header in your HTTP requests. The token is what is known as a bearer token—include the word Bearer in the header value before the token. An example of a properly formatted authorization header:
your_unique_token_value is the token you generated in Part 2.
As an example of how to invoke an API, you can query for the version of a service. Note that this is just an example and is not a part of the authentication process.
Get a Service’s Version on Linux🔗
export ACCESS_TOKEN="your_unique_token_value"
curl -H "Authorization: Bearer $ACCESS_TOKEN" "Content-Type: application/json" https://api.ctpx.secureworks.com/assets/version
Get a Service’s Version on Windows🔗
set ACCESS_TOKEN=your_unique_token_value
curl -H "Authorization: Bearer %ACCESS_TOKEN%" "Content-Type: application/json" https://api.ctpx.secureworks.com/assets/version
Example Response🔗
{"tag":"0.1.11","revision":"1332dad18827c3d6e60b801e6b4b44737e8f11f6","timestamp":"2019-10-02T06:01:28Z"}
Notice the similarity between access token usage and the commands used in Part 1. A user’s access token and a token created with client credentials are equivalent as far as the XDR API is concerned; however, always use client credentials rather than user logins to create your tokens for API automation.
Part 4: Use an OAuth2 Client in Your Application (Optional)🔗
Instead of authenticating with XDR manually, you may find it more convenient to use pre-packaged OAuth2 client software in your application. In general these packages take care of the authentication process for you, and most of them automatically renew the access token when it is about to expire. Any software that supports the OAuth2 ’client credentials’ flow is supported. You need the same three pieces of information listed in Part 2 to initialize an OAuth2 client: the authentication URL, your client ID, and your client secret.
Run either of the examples below in a command-line terminal that has been pre-populated with your client credentials:
OAuth2 on Linux🔗
OAuth2 on Windows🔗
Example: Go Client🔗
This example uses the OAuth2 clientcredentials package.
package main

import (
    "context"
    "fmt"
    "io"

    "github.com/gobuffalo/helpers/env"
    "golang.org/x/oauth2/clientcredentials"
)

func main() {
    clientConfig := clientcredentials.Config{
        ClientID env.EnvOr("CLIENT_ID", ""),
        ClientSecret: env.EnvOr("CLIENT_SECRET", ""),
        TokenURL "https://api.ctpx.secureworks.com/auth/api/v2/auth/token",
    }

    httpClient := clientConfig.Client(context.TODO())
    response, err := httpClient.Get("https://api.ctpx.secureworks.com/assets/version")
    if err != nil {
        // handle error
    }
    defer response.Body.Close()
    body, err := io.ReadAll(response.Body)
    fmt.Println(string(body))
}
Note
You can supply your own preconfigured HTTP client to the OAuth library, but if you do so, it will copy only your client's Transport and will ignore all other settings. This is a known issue that can lead to unexpected behavior. To work around this, make sure you explicitly set any required options on the resulting OAuth client as in the following example.
    myContext := // your input context
    myHttpClient := // your specific HTTP client setup
    ctx = context.WithValue(myContext, oauth2.HTTPClient, myHttpClient)
    oauthHttpClient := clientConfig.Client(ctx)
    // set all other required values here!
    oauthHttpClient.Timeout = myHttpClient.Timeout
    oauthHttpClient.Jar = myHttpClient.Jar
    oauthHttpClient.CheckRedirect = myHttpClient.CheckRedirect
Example: Python Client🔗
This example uses the requests-oauthlib package. You may need to install this package before running the example. If you are using the XDR Python SDK, it handles authentication for you. This is a raw Python example:
The example program:
from oauthlib.oauth2 import BackendApplicationClient
from requests_oauthlib import OAuth2Session
import os

client_id=os.environ.get('CLIENT_ID')
client_secret=os.environ.get('CLIENT_SECRET')
client = BackendApplicationClient(client_id=client_id)
oauth_client = OAuth2Session(client=client)
token = oauth_client.fetch_token(token_url='https://api.ctpx.secureworks.com/auth/api/v2/auth/token', client_id=client_id, client_secret=client_secret)
print(token)

r = oauth_client.get("https://api.ctpx.secureworks.com/assets/version")
print(r.content)
Save this to a file named client_example.py and run it:
Either example will return the same result as the cURL command used in Part 3:
{"tag":"0.1.11","revision":"1332dad18827c3d6e60b801e6b4b44737e8f11f6","timestamp":"2019-10-02T06:01:28Z"}
Search Client Credentials🔗
If you want to audit your client credentials or need to look up metadata about client credentials, there is a query clients that can be used.
You can also search client credentials with the XDR Python SDK.
Example Output🔗
[Client(id='c373d68a-fdca-476f-5b48-92ed5804dc53', name='docs-test-client-adcghzxc', client_id='b42USvw1jm5fk3Y2VqoAWSyG4CF47Ek5', roles='tenantAnalyst', tenant_id='xxxxx', created_at='2023-04-17T14:26:44.821551Z', updated_at='2023-04-17T14:26:44.821551Z', created_by='0000', updated_by='0000', environment='production', role_assignments=[ClientRoleAssignment(id='ca5928cf-7481-416a-8c53-1de4197f3593', tenant_id='xxxxx', role_id='a4903f9f-465b-478f-a24e-82fa2e129d2e', role_name='TenantAnalyst', expires_at=None)])]
Device Authorization🔗
Device Authorization is a type of authentication that can be used with Notebooks or the Python SDK to authorize a device to use the application via the Command Line Interface (CLI) prompt.
When accessing the application via the CLI, the device in use can be input constrained as the browser is not the preferred interface to the application. Subsequently, the device may need to be authorized to enable access to the application as required.
Follow the below steps when accessing the Python SDK.
- When accessing the Python SDK from the CLI, enter your Taegis username (not dedicated credentials) when prompted.
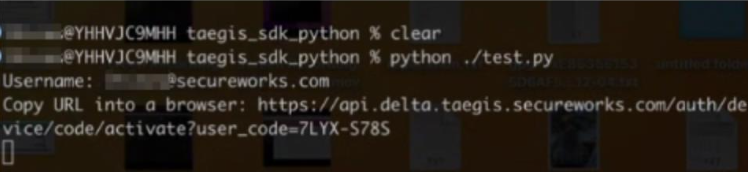
- A URL will be provisioned. Copy the URL into a browser where a device code will then be displayed on screen.
Note
Note the device code. In this example, the device code is at the end of the URL, but the code may be presented separately depending on the implementation.
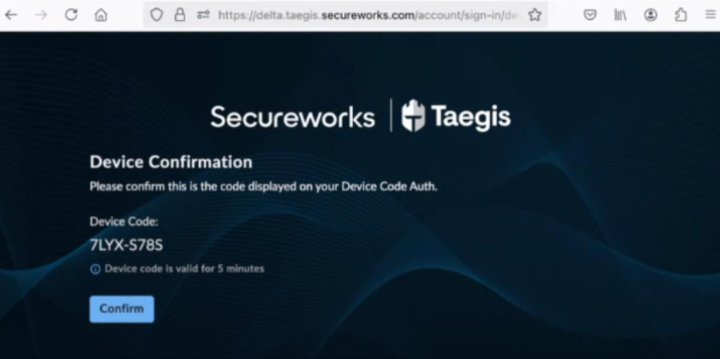
- Check that the device code displayed matches that at the end of the URL provided. Then select Confirm.
The browser will confirm the action is successful via the following message:
- Now log in to XDR via MFA or SSO as required. The CLI instance will now be authorized to use the defined user token to proceed.
Search Client Credentials🔗
query clients($name: String, $clientIDs: [String] = ["<CLIENT_ID>"], $tenantID: ID, $roleIDs: [ID], $tenantIDs: [ID], $page: Int, $perPage: Int)
{
    clients(name: $name, clientIDs: $clientIDs, tenantID: $tenantID, roleIDs: $roleIDs, tenantIDs: $tenantIDs, page: $page, perPage: $perPage)
    {
        id name client_id roles role_assignments { id tenant_id role_id role_name expires_at } tenant_id created_at updated_at created_by updated_by environment
    }
}
Reset a Client Secret🔗
If you need to reset a client secret, but want to retain the same client id, you can use the rotateClientSecret mutation to generate a new client secret. The ID input can either be the UUID or the client_id. It also requires the client secret. The API validates the old secret before creating a new secret.
mutation rotateClientSecret($id: ID! = "c373d68a-fdca-476f-5b48-92ed5804dc53", $secret: String = "<CLIENT_SECRET>")
{
    rotateClientSecret(id: $id, secret : $secret)
    {
        client { id name client_id roles role_assignments { id tenant_id role_id role_name expires_at } tenant_id created_at updated_at created_by updated_by environment } client_secret
    }
}
Force Reset a Client Secret🔗
If the user needs to reset a client secret and has an invalid old secret or does not know the old secret, the client secret can still be refreshed for an existing client id using forceRotateClientSecret. Note that only TenantAdmin users of the tenant, Secureworks Admins, or Secureworks Operations users can call this API.
mutation forceRotateClientSecret($id: ID! = "c373d68a-fdca-476f-5b48-92ed5804dc53")
{
    forceRotateClientSecret(id: $id)
    {
        client { id name client_id roles role_assignments { id tenant_id role_id role_name expires_at } tenant_id created_at updated_at created_by updated_by environment } client_secret
    }
}
Delete a Client🔗
When you are finished with client credentials, you can use the deleteClient mutation to revoke credentials. The ID input can either be the UUID or the client_id.