Secureworks Counter Threat Unit™ (CTU) Countermeasures🔗
The Secureworks Counter Threat Unit™ (CTU) Countermeasures consist of high-fidelity, high-priority Rulesets that can be deployed to Snort-based sensors and Suricata-based sensors. Countermeasures can be downloaded via the API or by using the CTU Countermeasures download utility within Secureworks® Taegis™ XDR.
Note
CTU Countermeasures are available for download by Tenant Administrators.
Snort Sensors 2.9.x🔗
- Snort Talos Supplement
Note
Updates for the Snort Talos Supplement Ruleset have been discontinued as of April 2023, but they are available for download.
Suricata Sensors 2.0.x and later🔗
Suricata Enhanced (Recommended)🔗
- High-fidelity, broad Ruleset composed of malware and other security-related countermeasures with additional metadata that conforms to the v1 of the BETTER Schema.
Suricata Security🔗
- High-fidelity, broad Ruleset composed of malware and other security-related countermeasures.
Suricata Malware🔗
- High-fidelity, high-priority Ruleset composed mainly of malware-related countermeasures.
Note
Suricata Rulesets are usually updated during United States business days (Monday - Friday).
Download Countermeasures🔗
You can download the CTU Countermeasures using the Countermeasure API or you can follow the steps below to download them from XDR.
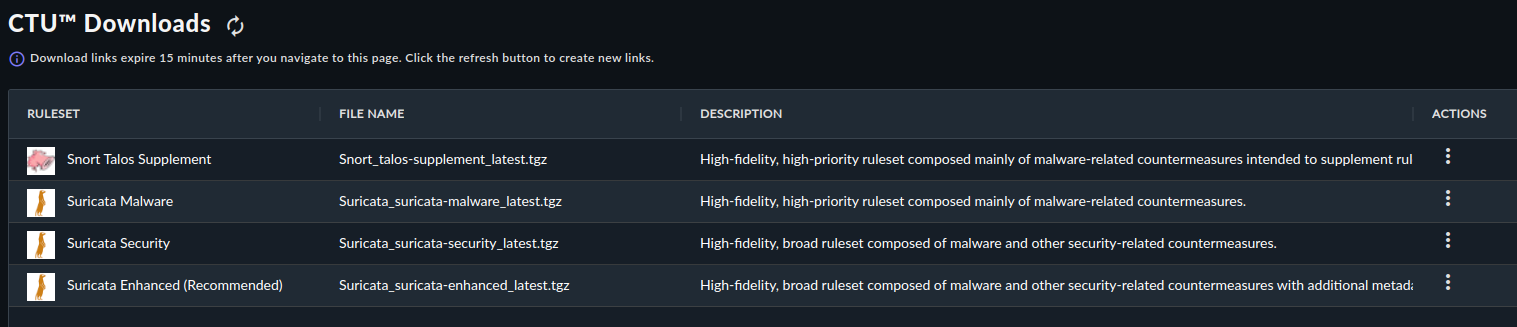
- From the Taegis Menu, select Downloads → Countermeasures.
- Choose the Ruleset and Policy corresponding to the device type to which you plan to import the ruleset:
Note
The download links expire 15 minutes after you navigate to the CTU Countermeasure Download page. Refresh the page to generate new links.
The Ruleset downloads in the form of a gzip compressed tar archive file with a .tgz extension. The Rules can be found in the XML file for the PAN Policy or the ’Rules’ directory for the Snort and Suricata Policies.
Sourcefire Installation Instructions🔗
This section describes the steps to follow to unpack CTU countermeasures, configure a shared Policy, add a shared layer, and import or update Rules for Sourcefire & Firepower sensors.
Updating CTU Countermeasure Rulesets🔗
This section describes the contents of the Countermeasures file downloaded in the preceding section. The CTU rulesets discussed in this document are intended to complement the Talos (formerly VRT) rules from Sourcefire.
Note
When establishing rulesets, the CTU takes into account duplicate coverage provided by Talos rules and performance metrics.
Ruleset Unpacking🔗
After service implementation, follow the steps in the preceding sections to download the latest Countermeasures file. The following is a sample screenshot showing the unpacking of the ruleset download and the files contained.
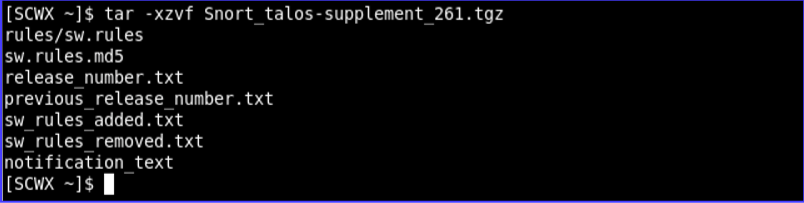
Ruleset files🔗
The following files are included as part of the ruleset file.
sw.rules🔗
This file is located in the ’rules’ directory and contains the full ruleset that is updated at least twice weekly. New rules will be added to the complete ruleset. Modified rules will be modified with an increased revision number. Existing rules will have rule collisions (expected).

sw.rules.md5🔗
An md5sum file provides integrity of the file. The entries should match before importing any rules. The following screenshot displays an example of an md5sum with matching entries.

release_number.txt🔗
This file displays the rule’s release version. The following screenshot displays ruleset 261.

previous_release_number.txt🔗
This file displays the rule’s previous release number. The following screenshot displays ruleset 260.

sw_rules_added.txt🔗
This file displays newly added and changed rules since the previous release. The following screenshot displays 12 lines, corresponding to 10 rules with the header and trailing blank line discounted.

sw_rules_removed.txt🔗
This file is a diff of rules that were in the previous ruleset but have been removed in this release. The following screenshots display one rule with two lines for comment.
Note
Please review and then manually delete these rules from the Defense Center.


notification_text🔗
This is an informational text file describing the files in the ruleset download.
Sourcefire v4.10 Policy Layering🔗
This section describes the steps to follow to configure a shared policy, add a shared layer, and import/update rules for a Sourcefire v4.10 sensor.
Note
Sourcefire v4.10 has been classified as End of Life by Sourcefire and is no longer supported by Secureworks. The following instructions for applying Countermeasures to a v4.10 sensor are included as a courtesy to our clients.
Configuring Shared Policy🔗
There are many ways to configure the Policy layers in a Sourcefire Policy. The following is a recommendation explaining how Secureworks deploys Rules to the devices we manage.
- Log in to the Defense Center and click Policy and Response → IPS → Intrusion Policy.
-
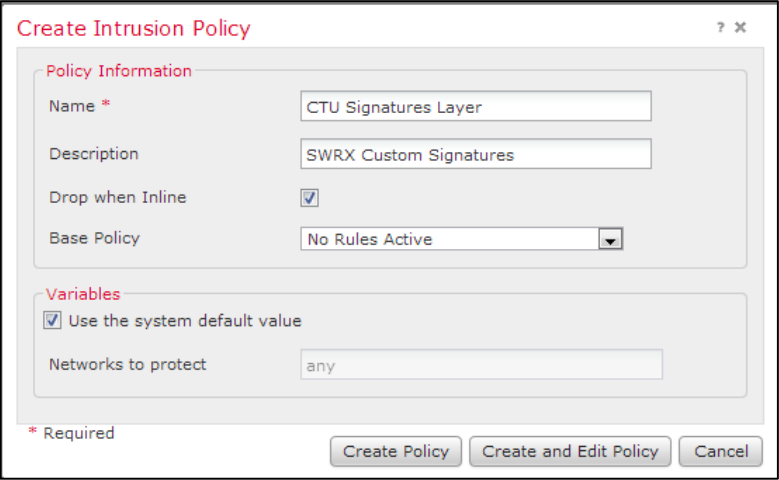
Create a new Policy named CTU Signatures Layer.
Note
Variables are unnecessary, as we are creating this Policy as Rules layer to be used in existing IPS Policies. Hence, No Rules Active is the base Policy.
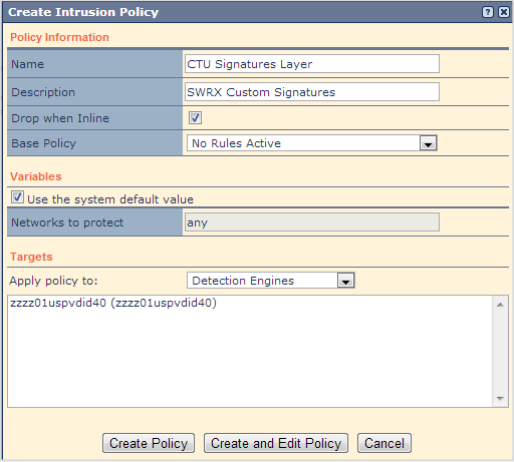
Create Intrusion Policy -
Select Create and Edit Policy to open the Policy for editing.
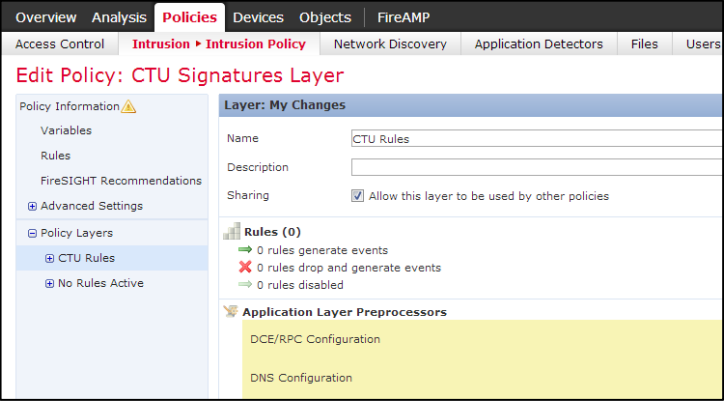
- Expand the Policy Layers menu on the left and select My Changes.
- Rename the layer CTU Rules and make it a shareable layer by clicking the checkbox.
- Click Policy Information → Commit Changes.
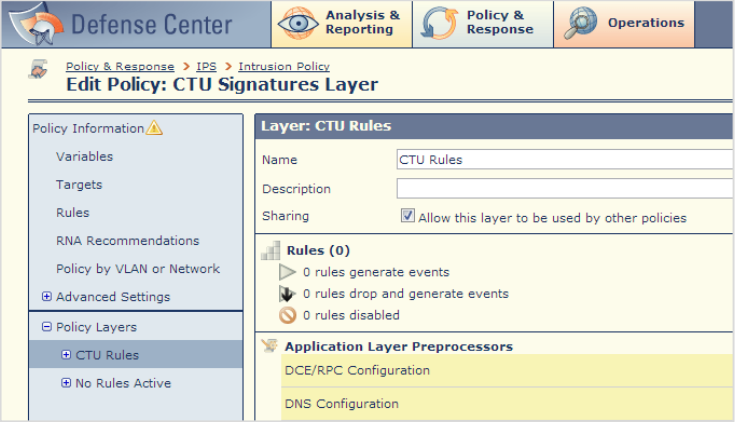
Note
Custom signatures are disabled by default when imported to the Defense Center
Adding a Shared Layer🔗
Now that you have a shareable Policy layer that can be used by any other Policy, you can add this Shared Layer to other Policies.
Note
Please ensure that signatures are enabled only on the Policies you’ve chosen.
To add a shared layer, perform the following steps:
- Select or edit an existing Policy to which you wish to add the CTU layer.
- Select Policy Layers.
- Select Add Shared Layer.
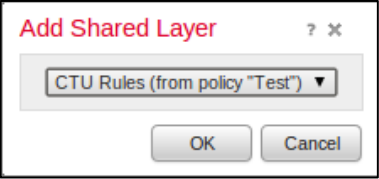
-
Select the CTU Rules layer from the Dropdown menu, and then click OK.
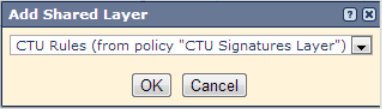
Add Shared Layer -
Click Policy Information → Commit Changes
- Repeat step 5 for every Policy on the Defense Center to which you wish to add this layer.
Importing/Updating Rules🔗
- Click Policy and Response → IPS → SEU.
-
Select the Import SEU.
Note
Only import the
sw.Rulesfile.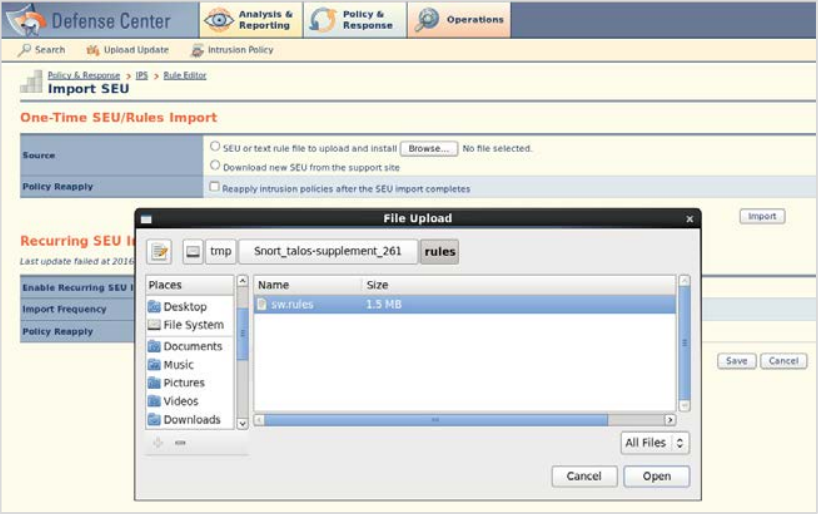
Import Rules -
Browse to the extracted file and select Open → Import. After the rule import is complete, a message displays indicating a successful import.
- Click Policy and Response → IPS → Intrusion Policy. Select or edit your CTU Signatures Layer Policy.
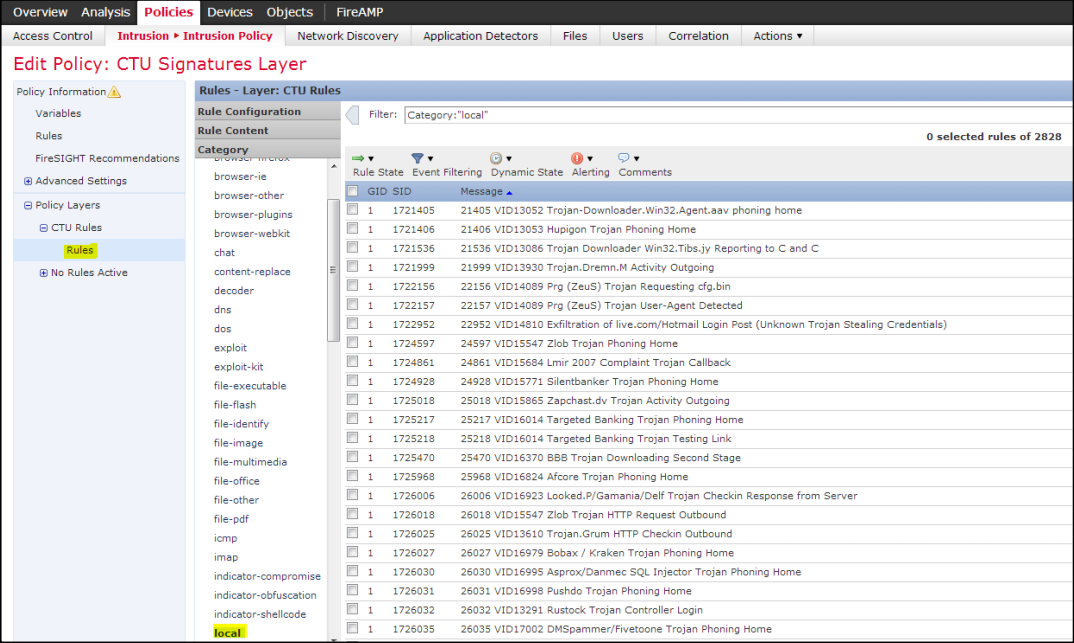
-
Browse to the CTU Rules Layer, expand, and select the Rules and the Local category.
Important
This step is critical to select the correct context.
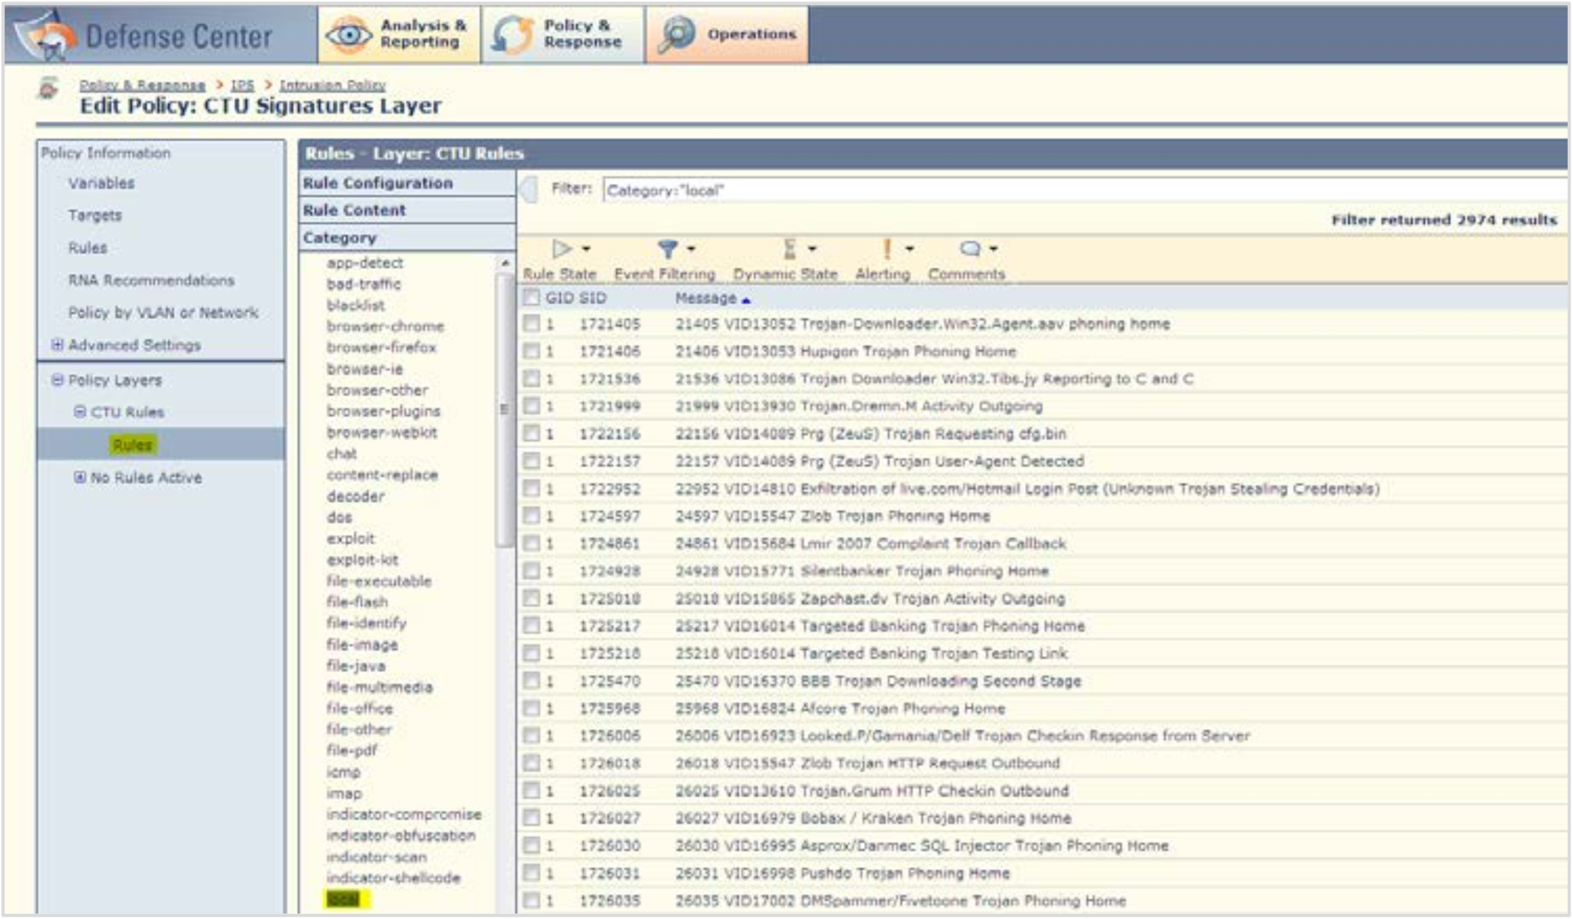
Edit CTU Rules Layer -
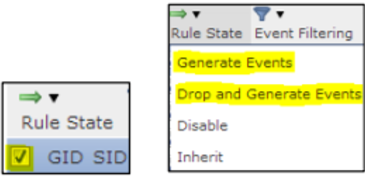
Select the top-level checkbox to select all.
-
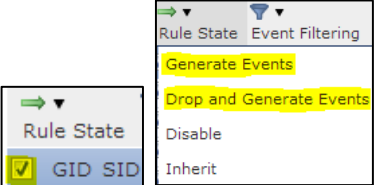
Select Rule State → Generate Events or Drop and Generate Events.
Note
Determine whether you want the signature in a blocking or alerting-only state, and be mindful of the rule count to ensure you performed step 6 correctly.

CTU Rules Layer Actions -
Click Policy Information → Commit Changes. An alert displays stating that all Policies to which the layer is added will be affected.
Note
You can push/apply the Policy during your normally scheduled change window.
Sourcefire v5.x Policy Layering🔗
This section describes the steps to follow to configure a shared Policy, add a shared layer, and import/update rules for a Sourcefire v5.x sensor.
Configuring Shared Policy🔗
There are many ways to configure the Policy layers in a Sourcefire Policy. The following is a recommendation explaining how Secureworks deploys Rules to the devices we manage.
- Log in to the Defense Center and click Policies → Intrusion → Intrusion Policy.
-
Create a new Policy named CTU Signatures Layer.
Note
Variables are unnecessary, as we are creating this Policy as Rules layer to be used in existing IPS Policies. Hence, No Rules Active is the base Policy.
Create CTU Intrusion Policy -
After setting your options, select Create and Edity Policy. This will open the Policy for editing.
- Expand the Policy Layers menu on the left, and then select My Changes.
- Rename the layer CTU Rules and make it a shareable layer by clicking the checkbox.
-
Click Policy Information → Commit Changes.
Edit CTU Rules Policy Note
Custom signatures are disabled by default when imported to the Defense Center.
Adding a Shared Layer🔗
Now that you have a shareable Policy layer that can be used by any other Policy, you can add this Shared Layer to other Policies.
Note
Please ensure that signatures are enabled only on the Policies you’ve chosen.
To add a shared layer, perform the following steps.
- Select or edit an existing Policy to which you wish to add the CTU layer.
- Select Policy Layers.
- Select Add Shared Layer.
-
Select the CTU Rules layer from the Dropdown menu, and then click OK.
Add Shared Layer -
Click Policy Information → Commit Changes.
Importing or Updating Rules🔗
- Click Policies → Intrusion → Rule Editor.
-
Select Import Rules.
Note
Only import the
sw.Rulesfile.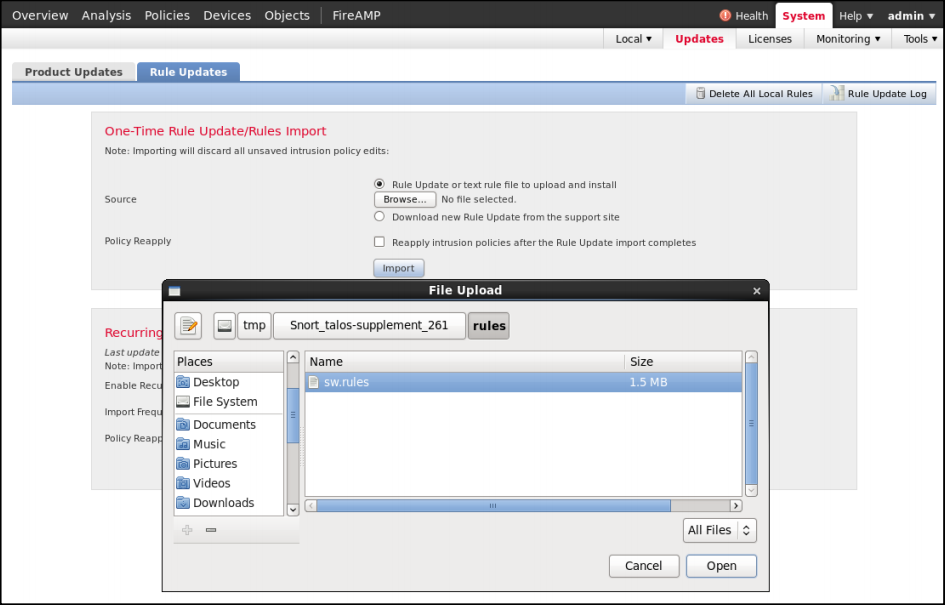
Import CTU Rules -
Browse to the extracted file and select Open → Import. After the rule import is complete, a message displays indicating a successful import.
- Click Policies → Intrusion → Intrusion Policy. Select or edit your CTU Signatures Layer Policy.
-
Browse to the CTU Rules layer, expand, and select the Rules and the Local category.
Important
This step is critical to select the correct context.
Edit CTU Rules Layer -
Select the top-level checkbox to select all.
-
Select Rule State → Generate Events or Drop and Generate Events.
Note
Determine whether you want the signature in a blocking or alerting-only state, and be mindful of the rule count to ensure you performed step 6 correctly.
CTU Rule Actions -
Click Policy Information → Commit Changes. An alert displays stating that all Policies the layer is added to are affected.
Tip
You can push and apply the policy during your normally scheduled change window.
Cisco Firepower v6.x Installation Instructions🔗
This section describes the steps to follow to configure a shared Policy, add a shared layer, and import/update rules for a Firepower v6.x sensor. There are many ways to configure the Policy layers in a Firepower Policy. The following is a recommendation explaining how Secureworks deploys Rules to the devices we manage.
- Log in to the FMC and select Policies → Intrusion → Intrusion Policy.
-
Create a new Policy named CTU Signatures Layer.
Note
Variables are unnecessary, as we are creating this Policy as Rules layer to be used in existing IPS Policies. Hence, No Rules Active is the base Policy.
-
After setting your options, select CREATE and EDIT Policy. This opens the Policy for editing.
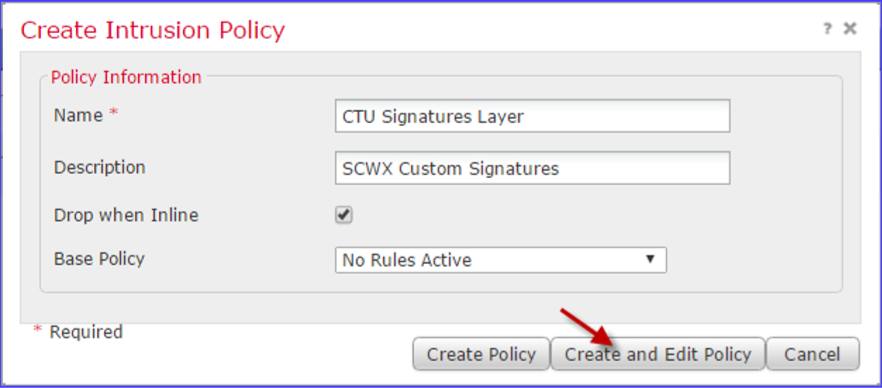
Create Intrusion Policy -
Expand the Policy Layers menu on the left, and then select My Changes.
- Rename the layer CTU Rules and make it a shareable layer by selecting the checkbox.
-
Choose Policy Information → Commit Changes.

Firepower Edit Policy Note
Custom signatures are disabled by default when imported to the FMC.
Adding a Shared Layer🔗
Now that you have a shareable Policy layer that can be used by any other Policy, you can add this Shared Layer to other Policies.
Note
Please ensure that signatures are enabled only on the Policies you’ve chosen. To add a shared layer, perform the following steps.
- Select or edit an existing Policy you want to add the CTU layer to.
- Select Policy Layers.
- Select Add Shared Layers.
-
Select the CTU Rules layer from the Dropdown menu, and then choose OK.

Firepower Add Shared Layer -
Select Policy Information → Commit Changes.
Importing or Updating Rules🔗
- Select Objects → Intrusion Rules.
-
Select Import Rules.
Note
Only import the
sw.Rulesfile.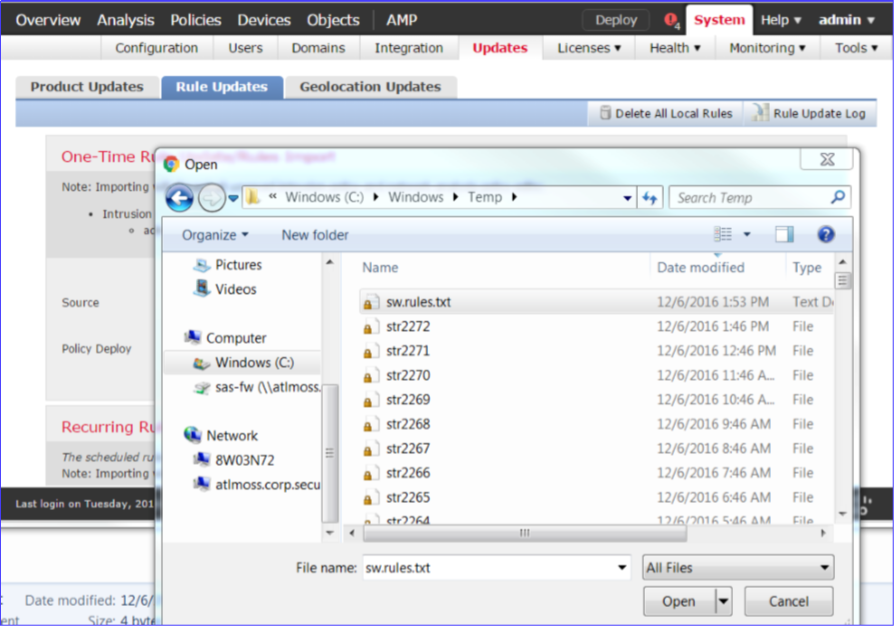
Firepower Rule Import -
Browse to the extracted file and select Open → Import. After the rule import is complete, a message displays indicating a successful import.
- Select Policies → Access Control → Intrusion. Select or edit your CTU Signatures Layer Policy.
-
Browse to the CTU Rules layer, expand, and select the Rules and the LOCAL category.
Important
This step is critical to select the correct context.
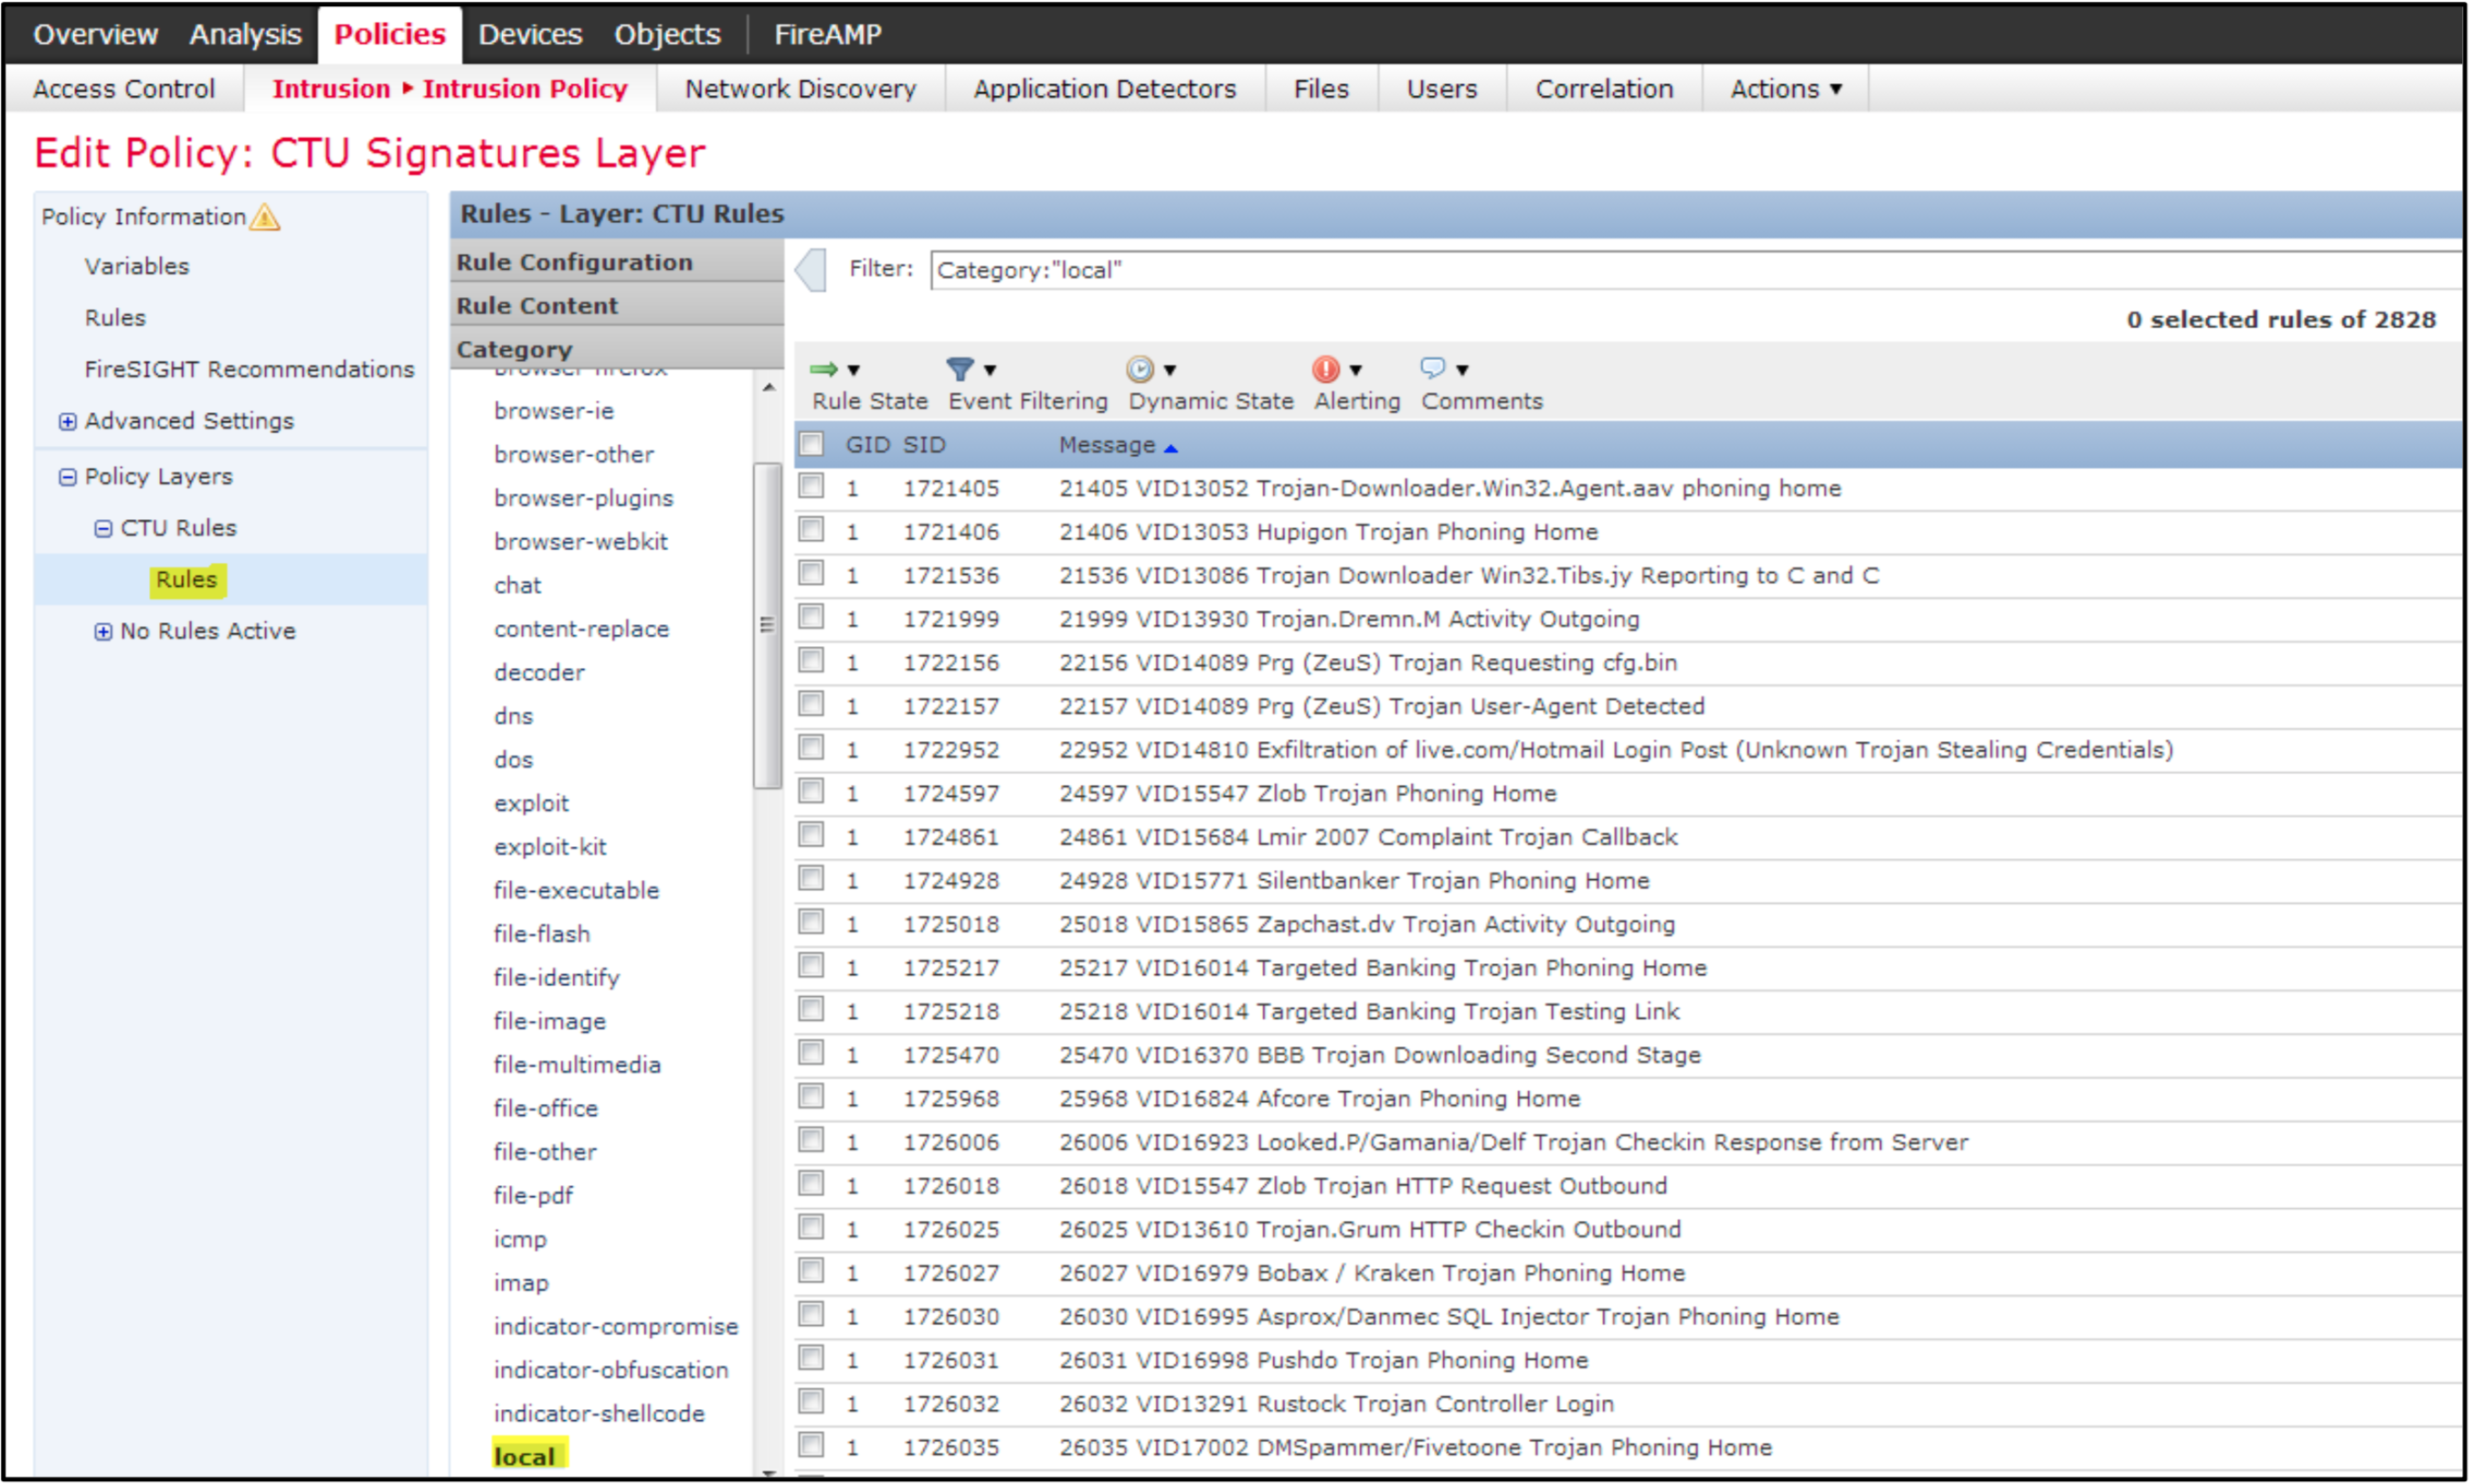
Firepower Local Rules -
Select the top-level checkbox to select all.
-
Select Rule State → Generate Events or Drop and Generate Events.
Note
Determine whether you want the signature in a blocking or alerting-only state, and be mindful of the rule count to ensure you performed step 6 correctly.
Firepower Rule Action -
Select Policy Information → Commit Changes. An alert displays stating that all Policies the layer is added to are affected.
Accounting for Deleted Rules🔗
Rules may be deleted from the Ruleset for a number of reasons. Refer to the sw_Rules_removed.txt file to view Rules that should be deleted from your Defense Center. Use the rule editor to delete Rules.
Sourcefire v4.10🔗
To delete Rules in Sourcefire v4.10, follow these steps:
- Click Policy and Response → IPS → Rule Editor.
- Click Group Rules By → Local Rules.
- Enter the SID to search.
- Right click Disable Rule.
- Click Disable This Rule In All Locally Created Policies.
- After the rule is disabled in all Policies, click the trash icon on the right of the signature to delete the rule.
Sourcefire v5.x🔗
To perform this action in Sourcefire v5.x, follow these steps:
- Click Policies → Intrusion → Rule Editor.
- Click Group Rules By → Local Rules.
- Enter the SID to search.
- Right click Disable Rule.
- Click Disable This Rule In All Locally Created Policies.
- After the rule is disabled in all Policies, click the trash icon on the right of the signature to delete the rule
Firepower v6.x🔗
To perform this action in Firepower v6.x, follow these steps:
- Select Objects → Intrusion Rules.
- Select GROUP Rules BY → LOCAL Rules.
- Enter the SID to search.
- Right-click (context select) DISABLE RULE.
- Select DISABLE THIS RULE IN ALL LOCALLY CREATED Policies.
- After the rule is disabled in all Policies, select the trash icon on the right of the signature to delete the rule.
Removing All Local Rules🔗
The Sourcefire shell has a file named delete_rules.pl , which is a perl script used to delete all locally-created rules. Please consult with Sourcefire Support for usage of this script.
Verifying CTU Countermeasures Are Working Correctly🔗
To ensure your CTU Countermeasures are properly inspecting traffic and detections are correctly making their way into XDR, access the following URL via Internet Explorer or curl command only: http://www.secureworks.com/secureworks_isensor_test. This generates a test intrusion event with a message containing 48053 VID14123 Secureworks Customer Generated Test Detection (Outbound).
Note
A 404 error is expected from this URL — the web request will still pass through the NDR Device in order to fire the test signature.
General Troubleshooting🔗
If a signature didn’t fire that you think should have, try these troubleshooting tips:
- Is the rule on the sensor? Make sure the sensor has the most up to date CTU rule release.
- Verify any variables (e.g. $HOME_NET) that the signature uses are appropriately configured on the sensor.
- Is the source on a safelist?
- There may be an issue getting the detection from the FMC to the portal; check the FMC GUI under Intrusion Events for the detection.