Red Cloak Endpoint Agent Installation🔗
Red Cloak Endpoint Agent Requirements🔗
This section provides information on requirements for deploying and implementing Red Cloak™ Endpoint Agent software.
Red Cloak Endpoint Agent Connectivity Requirements🔗
The below network access items must be permitted in order for the Red Cloak Endpoint Agent to communicate with Secureworks.
| Source | Destination | Port/Protocol | Reason |
|---|---|---|---|
| Red Cloak Endpoint Agent | 52.4.62.128/25, 54.244.50.128/25 (cluster.b.redcloak.secureworks.com) | TCP/443, TCP/17234 | Red Cloak Endpoint Agent Connectivity |
| Red Cloak Endpoint Agent | https://redcloak.secureworks.com | TCP/443 | Remote Agent Upgrade performed by Secureworks Support |
| F-Response US | 3.232.239.2 (fresponse-us1.ir.secureworks.com) | TCP/80 | Required for safelist in the US |
| F-Response EU | 3.71.228.46 (fresponse-eu1.ir.secureworks.com) | TCP/80 | Required for safelist in the EU |
| F-Response JP | 35.73.27.220 (fresponse-jp1.ir.secureworks.com) | TCP/80 | Required for safelist in Japan |
Data Provided from Integration🔗
| Detections | Auth | DNS | File Collection | HTTP | NIDS | Netflow | Process | File Modification | API Call | Registry | Scriptblock | Management | Persistence | Thread Injection | Detection Finding | Technique Finding | Software Info | Generic | |
|---|---|---|---|---|---|---|---|---|---|---|---|---|---|---|---|---|---|---|---|
| Red Cloak Windows Endpoint Agent | ✓ | ✓ | ✓ | ✓ | ✓ | ✓ | ✓ | ✓ | |||||||||||
| Red Cloak Linux Endpoint Agent | ✓ | ✓ | ✓ |
Red Cloak Endpoint Agent Proxy Support🔗
The Red Cloak Endpoint Agent attempts to discover local proxy settings on the host if it is unable to connect directly to the internet.
Red Cloak Endpoint Agent also supports a hard-coded proxy. If you need to create a Red Cloak Endpoint Agent that contains a hard-coded proxy, please submit a support request with the following required information:
- Proxy IP
- Proxy Port
If the proxy is configured but is unavailable or not reachable, the Red Cloak Endpoint Agent will fall back to a direct connection.
Note
The Red Cloak Endpoint Agent does not support hard-coded authenticated proxies at this time. The Red Cloak Endpoint Agent uses a self-signed certificate and a proxy with man in the middle (MITM) capability needs to safelist Red Cloak Endpoint Agent network connections.
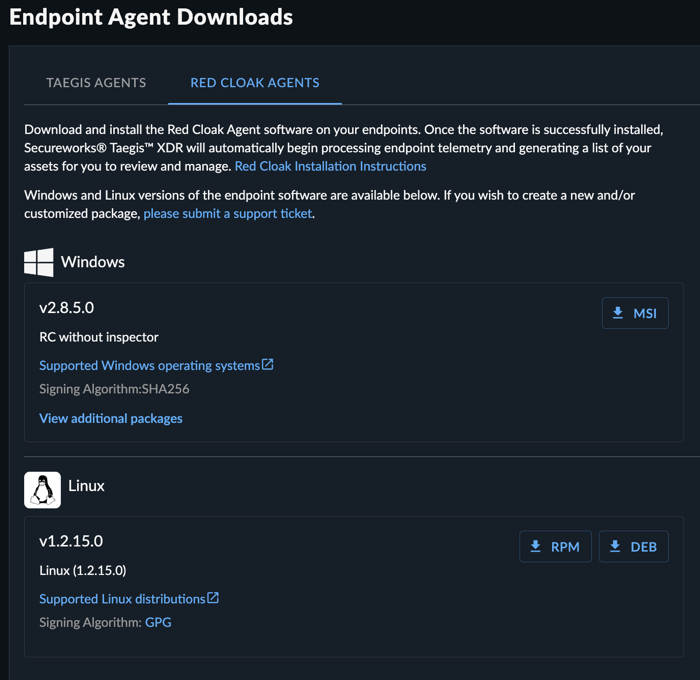
Download the Red Cloak Endpoint Agent Software🔗
You can download Red Cloak Endpoint Agent right from Secureworks® Taegis™ XDR.
- From the Taegis XDR menu, select Endpoint Agents → Downloads.
- Choose the tab for the desired agent type, and then select the download button for the installation package relevant to your operating system.
The Agent Downloads tab also contains a link to the GPG Key needed for Linux installation, as well as checksums for the Taegis Endpoint Agent to verify the integrity of the package.
Once downloaded, deploy with your preferred host management tool, or manually install on an individual endpoint.
If you have problems or do not have prod access yet, your Secureworks representative can provide you with a URL to download the Red Cloak Endpoint Agent software (MSI, RPM, or DEB). This is typically provided as part of an onboarding email.
If you wish to create a new and/or customized installation package, please submit a support request. If using a hard-coded proxy, a new Agent Package must be created that includes the proxy IP and port. The Red Cloak Endpoint Agent does not support authenticated proxy at this time.
Red Cloak Endpoint Agent Installation🔗
Windows Agent🔗
By default, the MSI installs without any user interaction; however, double-clicking on the MSI in an interactive session will show an installation prompt. There is no user interaction with the prompt, but it appears on the screen. To install the MSI without any session notifications, use the following command:
Note
Antivirus products monitor systems for unusual modifications to the operating system or to installed software. The data files Red Cloak Endpoint Agent creates are an example of such modifications. Even though the Red Cloak Endpoint Agent DOES NOT modify anything that belongs to the operating system, some AV/malware protection products consider the Red Cloak Endpoint Agent’s own file modifications as malicious behavior and block or stop the processes. To avoid that, consider excluding the Red Cloak Endpoint Agent installation directories in your antivirus policy. When defining an Exception List for the Red Cloak Endpoint Agent, two directories should be excluded. The default installation directory for the Red Cloak Endpoint Agent which is %ProgramFiles(x86)%\Dell SecureWorks\Red Cloak\ and directory %ProgramFiles(x86)%\Dell SecureWorks\Ignition\ which is the default directory of the Ignition update module.
Note
The Red Cloak Endpoint Agent installation does not require or enforce a system restart; however, for agent versions prior to 2.8.3.0, if there are any pending reboots in your system, endpoints may reboot after the install is completed. This has been fixed in version 2.8.3.0.
Windows Agent Dependencies🔗
Red Cloak Endpoint Agent for Windows is completely self-contained. It requires no DLLs or assemblies other than those that come with a base Windows system.
Note
Installing the Red Cloak Endpoint Agent on Windows Server 2008 R2 or Windows 7 may require the patches described in the following Microsoft support articles:
Validate Red Cloak Endpoint Agent for Windows Installation🔗
A Red Cloak Endpoint Agent installation does not require or enforce a system restart. To validate that the software was successfully installed, follow these steps:
- Verify the
RedCloak.exeprocess is running -
Open a command prompt with Administrator privileges.
Note
Running without Administrator privileges will also function, but will cause a new Command Prompt window to briefly display with the command results and then close as soon as the command execution ends.
-
Navigate to the installation directory:
-
Execute:
!!! Note This step also confirms that connectivity to XDR is successful.
Linux Agent🔗
If a local yum repository will not be used, the RPM can be transferred to individual endpoints, and the yum command can be used. For Ubuntu endpoints, proceed to the next section.
-
Import the GPG Key for RPM validation:
!!! NOTE Find this key on the package details page using the provided download URL. -
Install the RPM:
-
Change the location of core dumps.
If the system needs to generate a core dump during a default agent installation, the file is typically saved in the
and change to:.exemptfolder in the agent installation directory, for example/opt/secureworks/redcloak/.exempt. The size of a core dump varies between systems and can be influenced by a number of unknowable and/or unpredictable factors. To handle that, we recommend having at least 5GB of space free. If the default installation directory cannot accommodate a 5GB file, the location of the core dump can be changed. To change the location of agent core dumps, open the agent’s startup script with admin privileges. You can find the startup script in the agent’s bin folder:/opt/secureworks/redcloak/bin/redcloak_start.sh.Locate the line in the script that looks like this:${prefix}/bin/redcloak --run-service --override-root "${prefix}" --core-dump-path=PATH_TO_CHOICE_OF_PARTION > /dev/null 2>&1 &Note
he new core dump path must exist as the Redcloak Agent will not attempt to create it.
Ubuntu Endpoints🔗
To install the Linux Agent on Ubuntu endpoints:
-
Import the GPG Key:
-
Install the agent using apt command:
Linux Agent Dependencies🔗
When installing the Red Cloak Endpoint Agent for Linux, there are dependencies that can be resolved automatically by using yum:
Starting with the 1.2.10.0 release th default application directory is/opt/secureworks/redcloak.
If you want to install in a place other than the default /opt/secureworks directory, do the following:
- Install all dependencies via YUM
- From the command line, enter:
--relocate is also a valid option.
The dependencies are as follows:
- audit
- /bin/sh
- cronie
- crontabs
- dmidecode
- libcap
- logrotate
- openssl >= 1.0.1e
- policycoreutils-python
- redhat-lsb-core
- rpmlib(CompressedFileNames) <= 3.0.4-1
- rpmlib(FileDigests) <= 4.6.0-1
- rpmlib(PayloadFilesHavePrefix) <= 4.0-1
- rpmlib(PayloadIsXz) <= 5.2-1
- shadow-utils
Validate Linux Endpoint Agent Installation🔗
To validate that the endpoint is reporting, follow these steps:
- Select Endpoint Agents → Summary from the Taegis Menu. The Endpoint Agents Summary displays.
- Verify the endpoint displays in the table with pertinent information such as the Sensor version just installed.
Red Cloak Endpoint Agent Test Event🔗
Windows Agent🔗
To validate that the Red Cloak Endpoint Agent is functioning as expected on a Windows endpoint, please generate a test event following these instructions:
- On the Microsoft Windows system running the Red Cloak Endpoint Agent, open a command prompt.
- Execute the command:
-
A Notepad window opens, prompting that it cannot find the file
redcloaktest.txt. Select NO.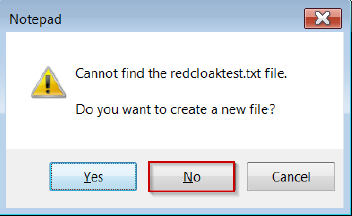
redcloaktext.txt -
Notify your Secureworks representative that the Red Cloak Endpoint Agent installation is complete.
Linux Agent🔗
To validate that the Red Cloak Endpoint Agent is functioning as expected on a Linux endpoint, perform the following:
-
Check the status of the Redcloak service:
-
Check agent connectivity to the cloud as a root user.
-
Starting with the 1.2.11.0 release the default application directory is
/opt/secureworks/redcloak. Accordingly the below command will work: -
If you are running 1.2.10.0 release and if the default application directory is
/opt/secureworks/redcloakuse the below command: -
If you are running release 1.2.9.0 or lower or default application directory is
/var/opt/secureworks/redcloakthen run:
Review Red Cloak Endpoint Agent Assets🔗
As XDR processes endpoint telemetry, a list of assets is generated. You can review these assets by navigating to Endpoint Agents from the Taegis Menu. Your endpoint is displayed there along with other pertinent details.