SentinelOne🔗
Use the following instructions to configure an integration between SentinelOne and Secureworks® Taegis™ XDR.
Important
There are a few important considerations for this endpoint integration.
- This integration requires the SentinelOne Cloud Funnel add-on. Customers must contact their SentinelOne account representative for pricing details about Cloud Funnel.
- Currently, only the apne1, apse1, carvir, euce1, usce1 and usea1 SentinelOne regions are supported by this integration. If your SentinelOne Management Console URL does not start with apne1, apse1, carvir, euce1, or usea1, please contact Secureworks Support.
- The instructions are based on version Unity of SentinelOne Management Console, with Singularity Operations Center option disabled.
- If you are using Singularity Operations Center UI, it can be disabled via User menu → My Preferences.
Data Provided from Integration🔗
| Detections | Auth | DNS | File Collection | HTTP | NIDS | Netflow | Process | File Modification | API Call | Registry | Scriptblock | Management | Persistence | Thread Injection | Detection Finding | Technique Finding | Software Info | Generic | |
|---|---|---|---|---|---|---|---|---|---|---|---|---|---|---|---|---|---|---|---|
| SentinelOne | ✓ | ✓ | ✓ | ✓ | ✓ | ✓ | ✓ | ✓ | ✓ | ✓ | ✓ | ✓ | ✓ |
Create a Service User in SentinelOne Management Console🔗
Pre-requisites🔗
-
You need the following SentinelOne RBAC permissions to perform steps in this section: Roles and Service Users (View, Create, Edit, Delete). The built-in Admin role has these permissions.
-
Depending on the type of integration, you can use either Account or Site scope to create the Service User and its Role.
- When creating an Account-Level integration, use Account scope.
- When creating a Site-Level integration, use either Account, or Site scope.
Create a Role for the Service User🔗
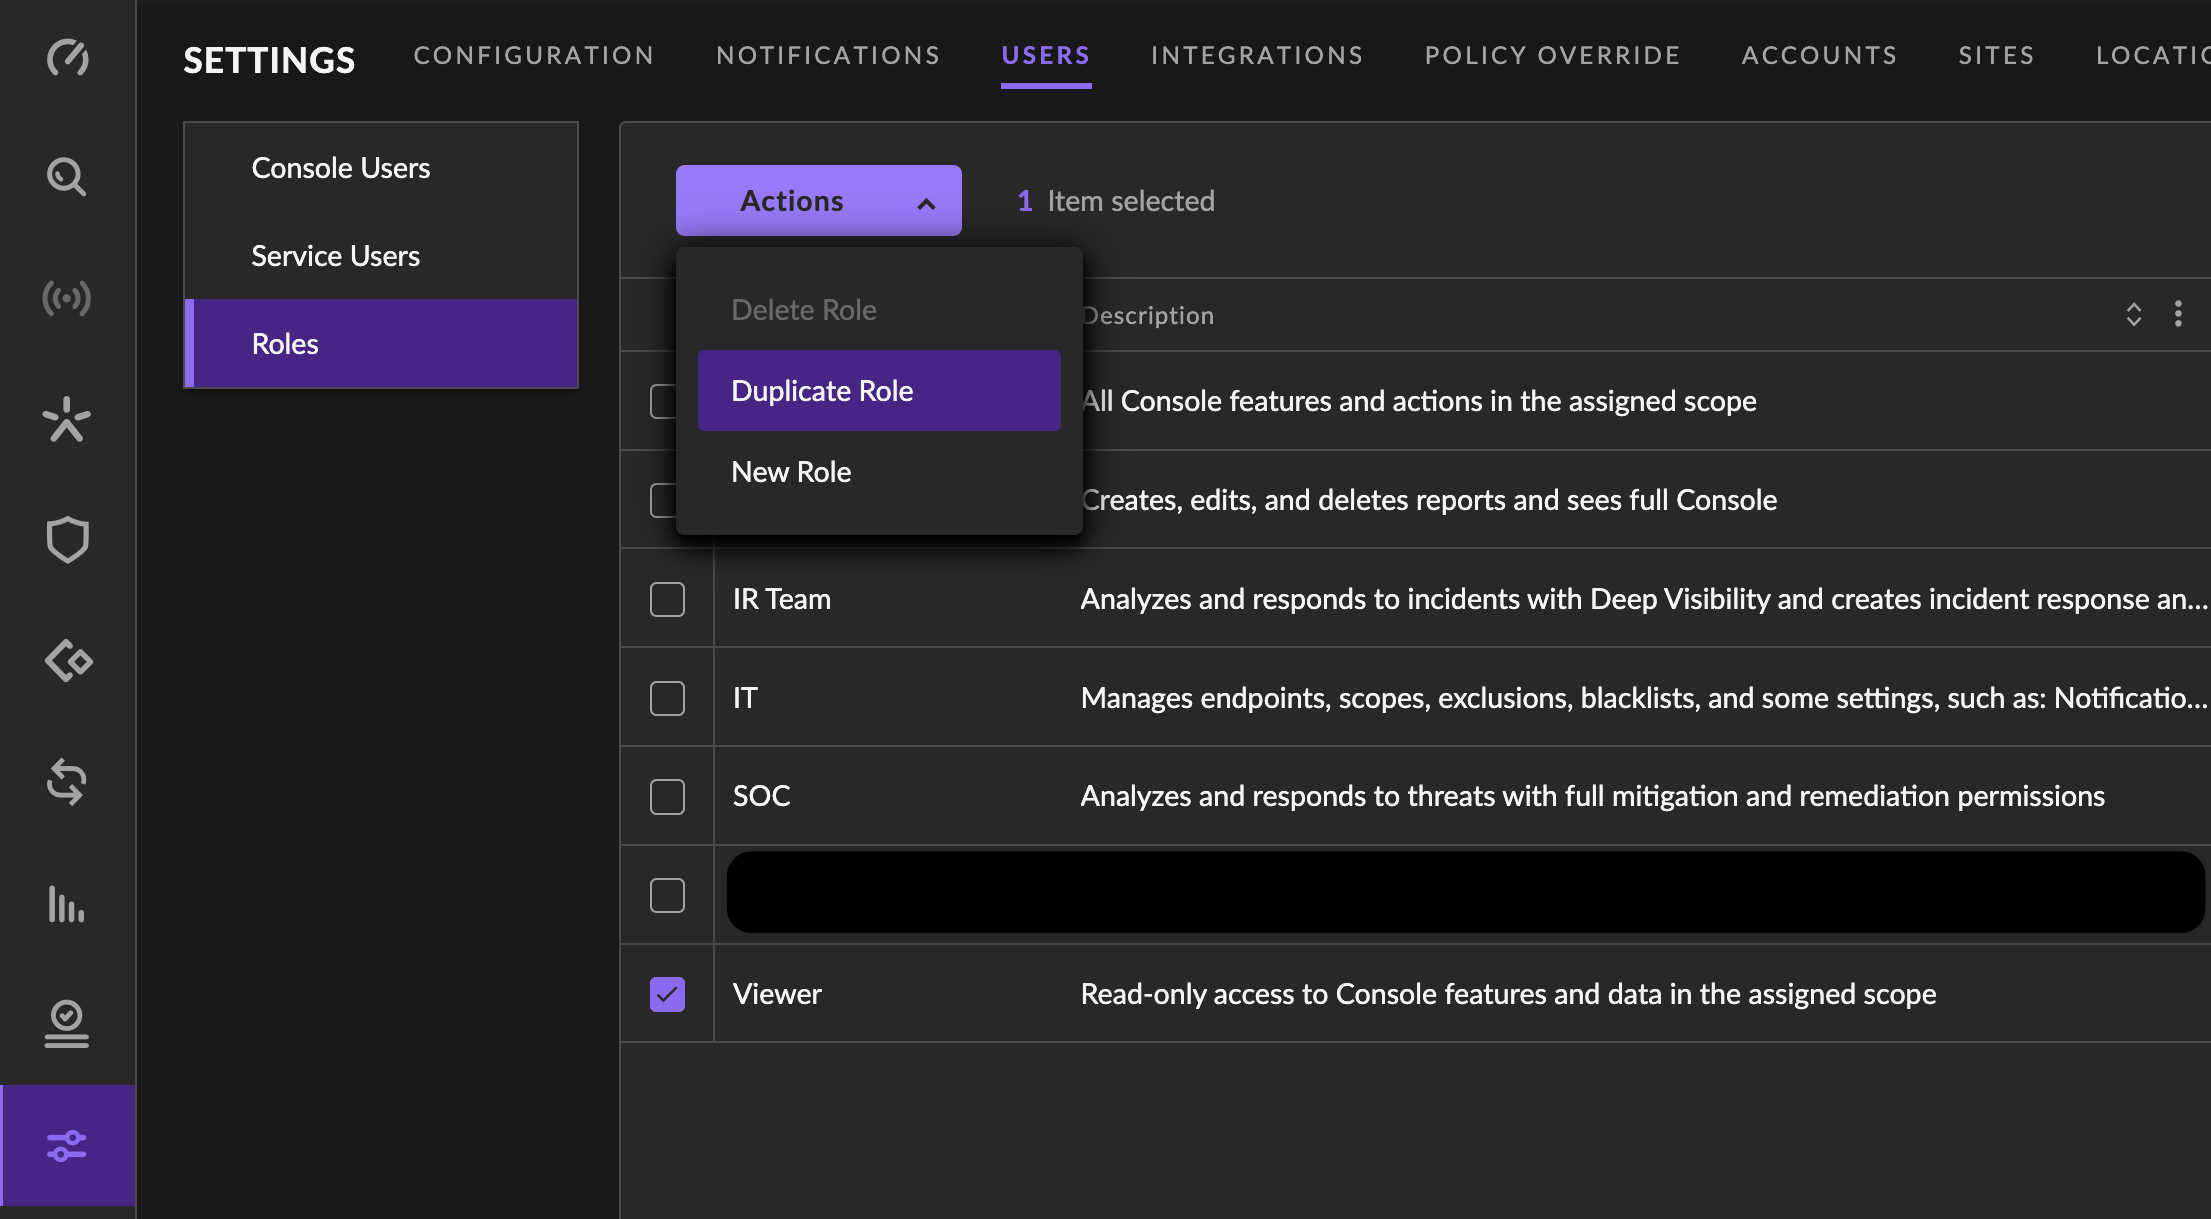
- In the SentinelOne Management Console, navigate to Settings → USERS → Roles.
-
Select the built-in Viewer role, then choose Duplicate Role in the Actions drop down menu.
Duplicate Viewer Role -
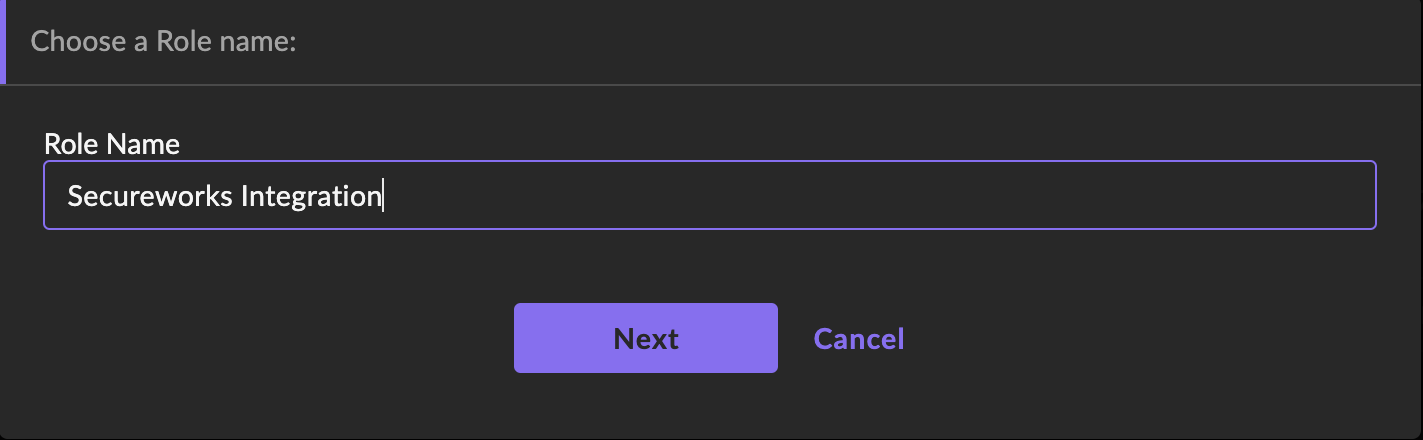
Choose a name for the new user role then select Next.
Choose Role Name -
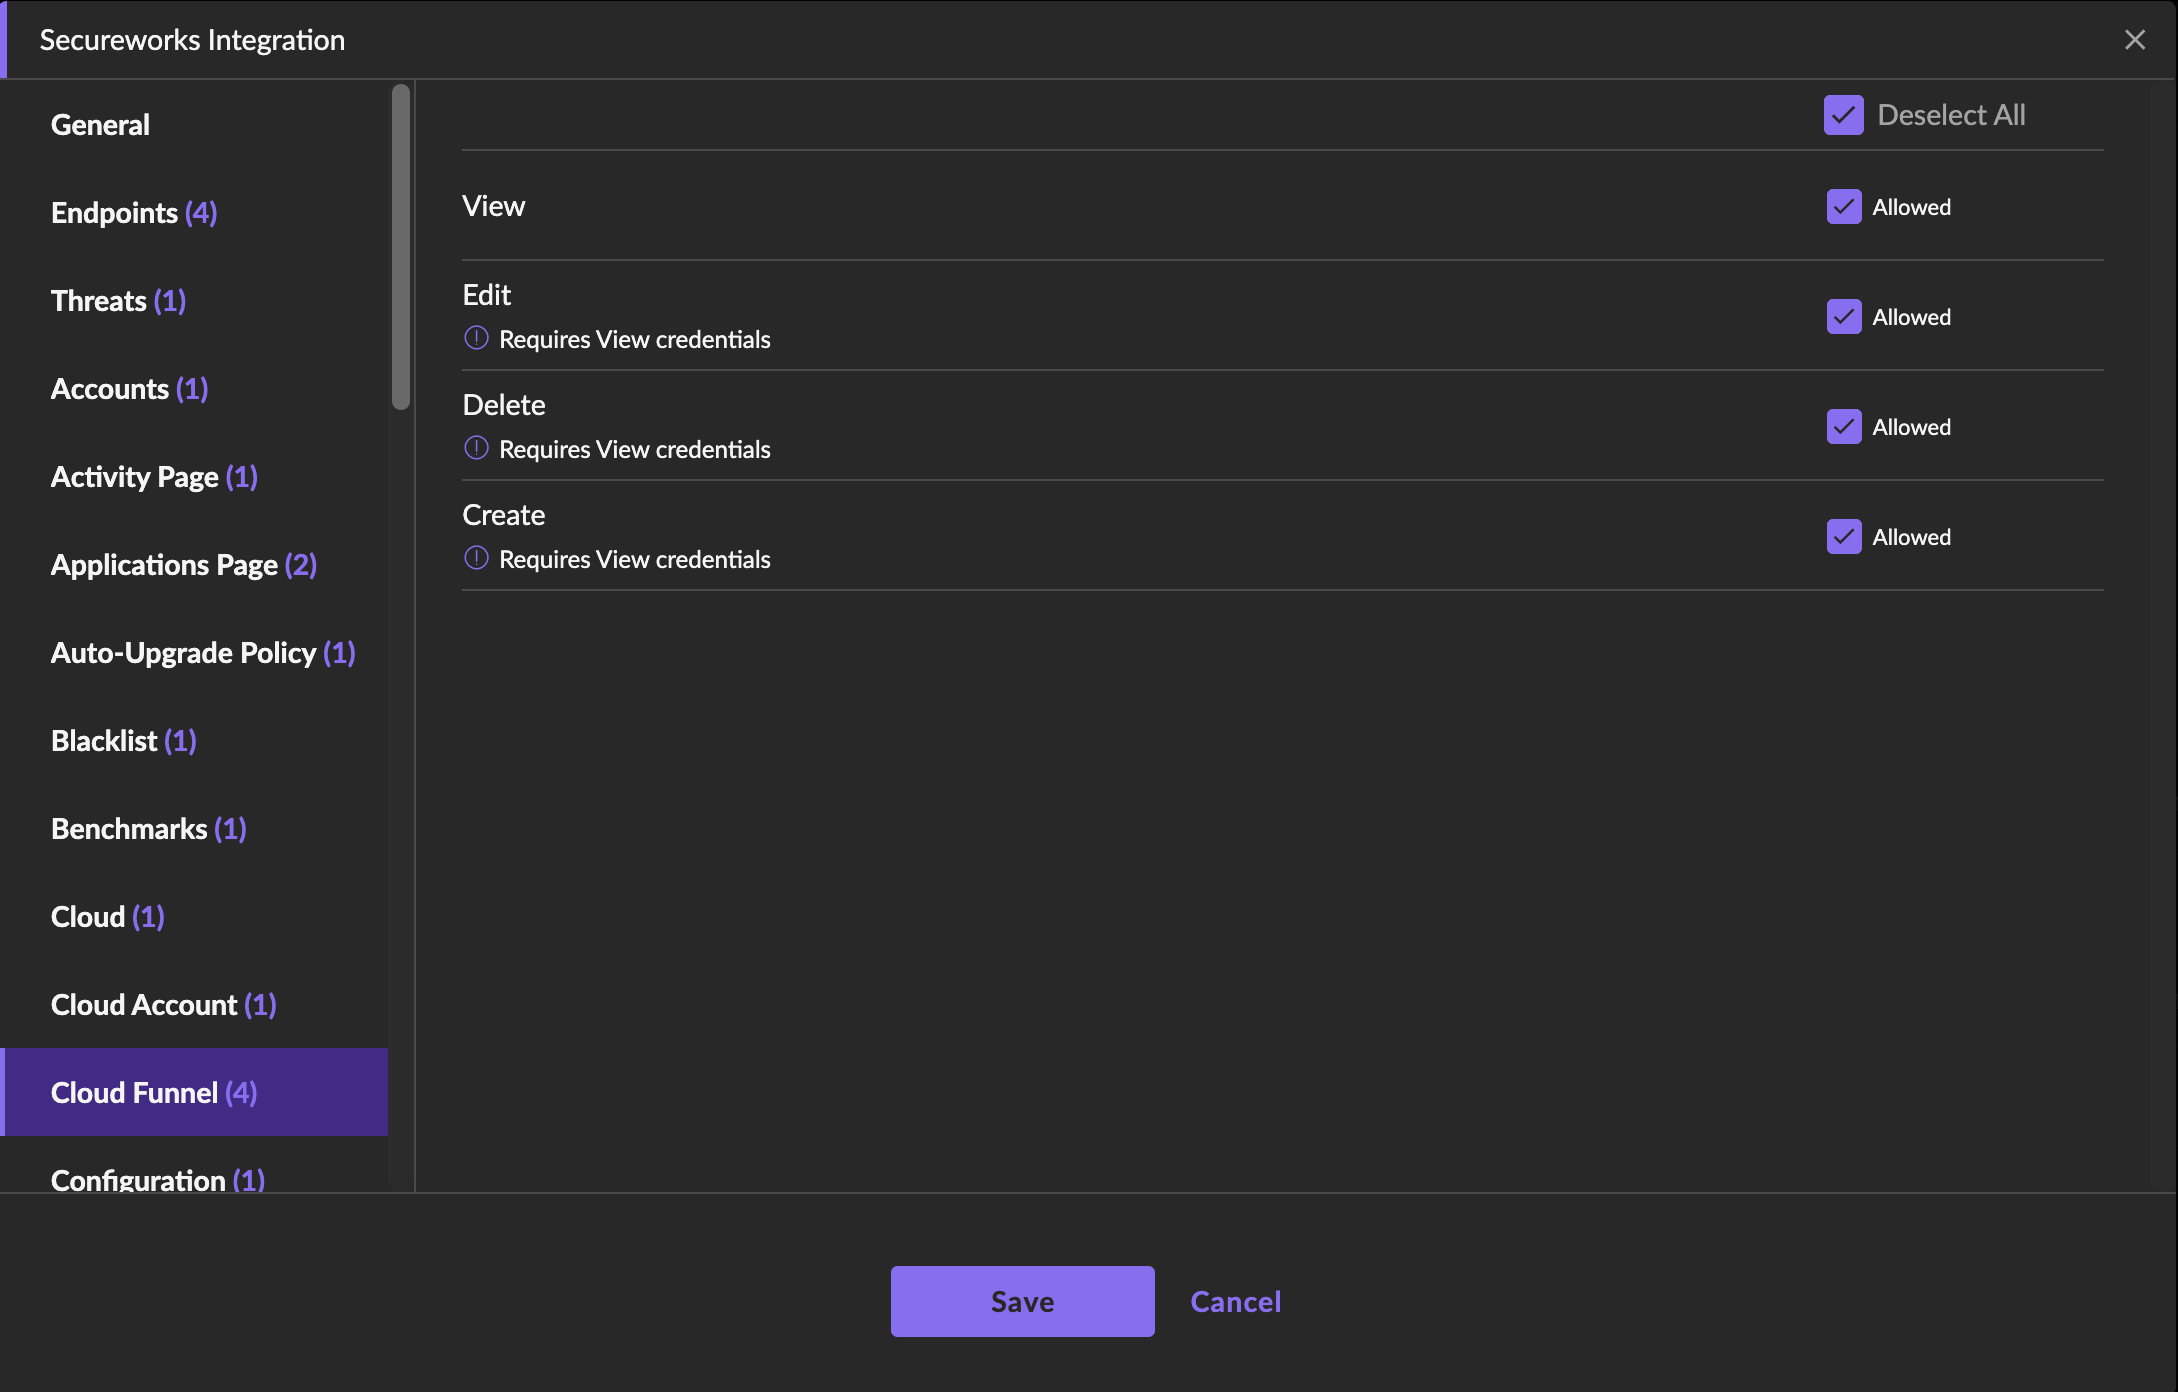
Select Cloud Funnel in the left pane. Choose Select All to allow full access to Cloud Funnel, then select Save.
Allow Full Access to Cloud Funnel
Create a Service User🔗
-
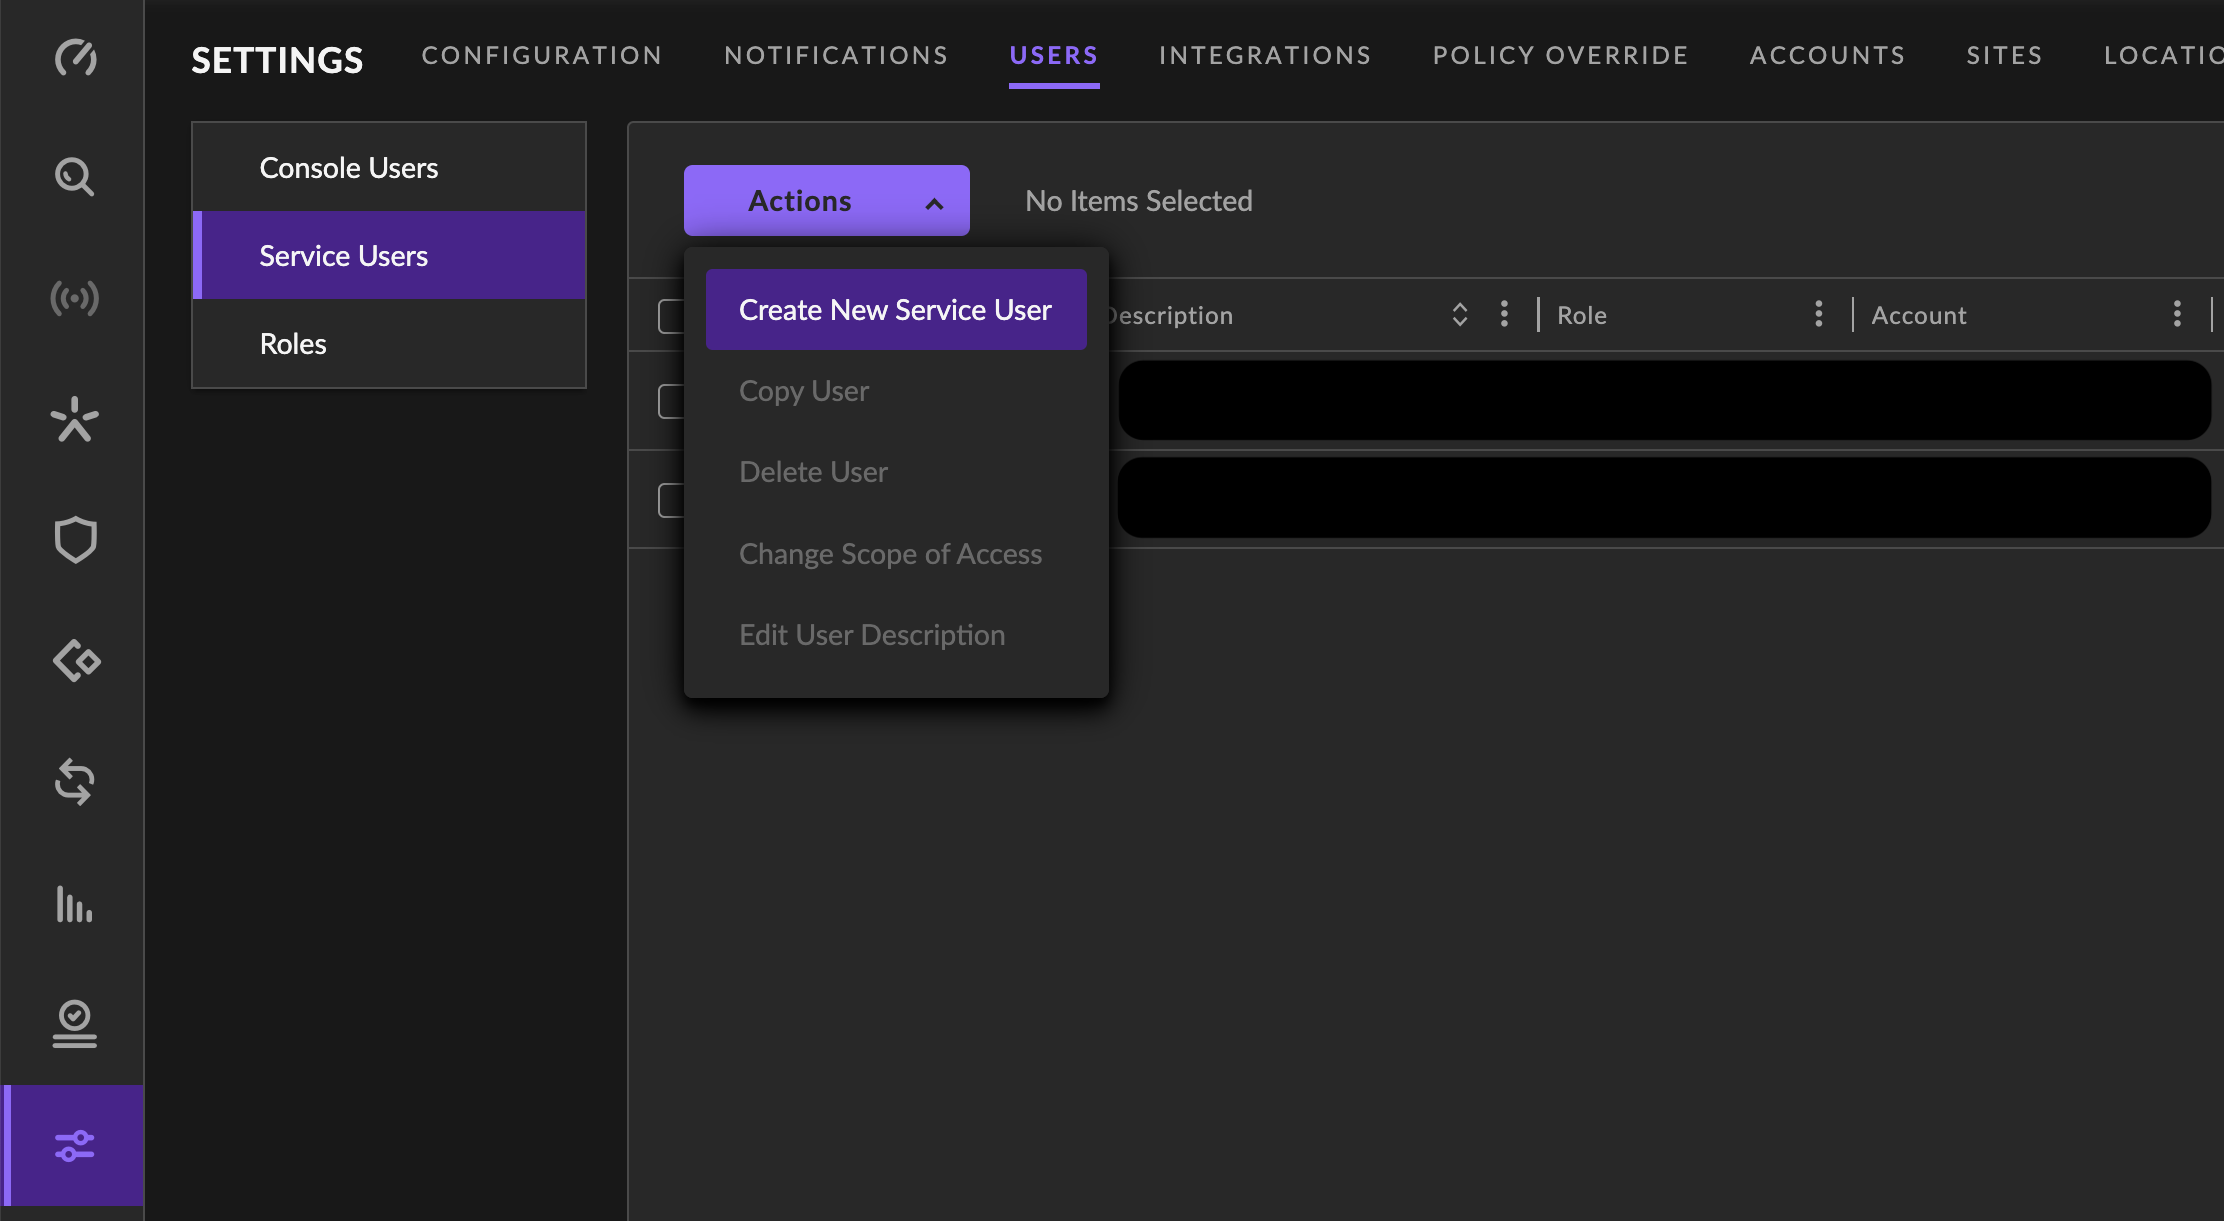
In the SentinelOne Management Console, navigate to Settings→USERS→Service Users.
-
Choose Create New Service User from the Actions drop down menu.
Create New Service User
Configure the Basic Parameters of the Service User🔗
- Add a Name. This identifies the user in SentinelOne Management Console. The name cannot have an equal sign (=) or angle bracket characters ( <, >).
- Enter an optional Description to identify the user.
-
Set the Expiration Date of the API token. The default is one year. Select Custom to set a different date and time.
Note
The expiration time can be as long or as short as necessary; but after you create the service user, you cannot change the expiration date. Make sure that you create another service user and re-create the integration with XDR before the expiration date. You can copy the existing service user to re-create it.
-
When you’re done with the basic parameters, select Next.

Configure Service User Basics
Configure the Scope of Access of the Service User🔗
-
Under Access Level, select one of the following.
- If you are creating an Account-Level integration, select Account.
- If you are creating a Site-Level integration, select either Account, or Site.
-
Identify the Account (and Site) to be integrated with XDR.
- If you selected Account scope, then select the account, and the role created in the step above, Create a Role For the Service User.
- If you selected Site scope, then select the account, the site, and the role created in the step above, Create a Role For the Service User.
-
Select Create User.
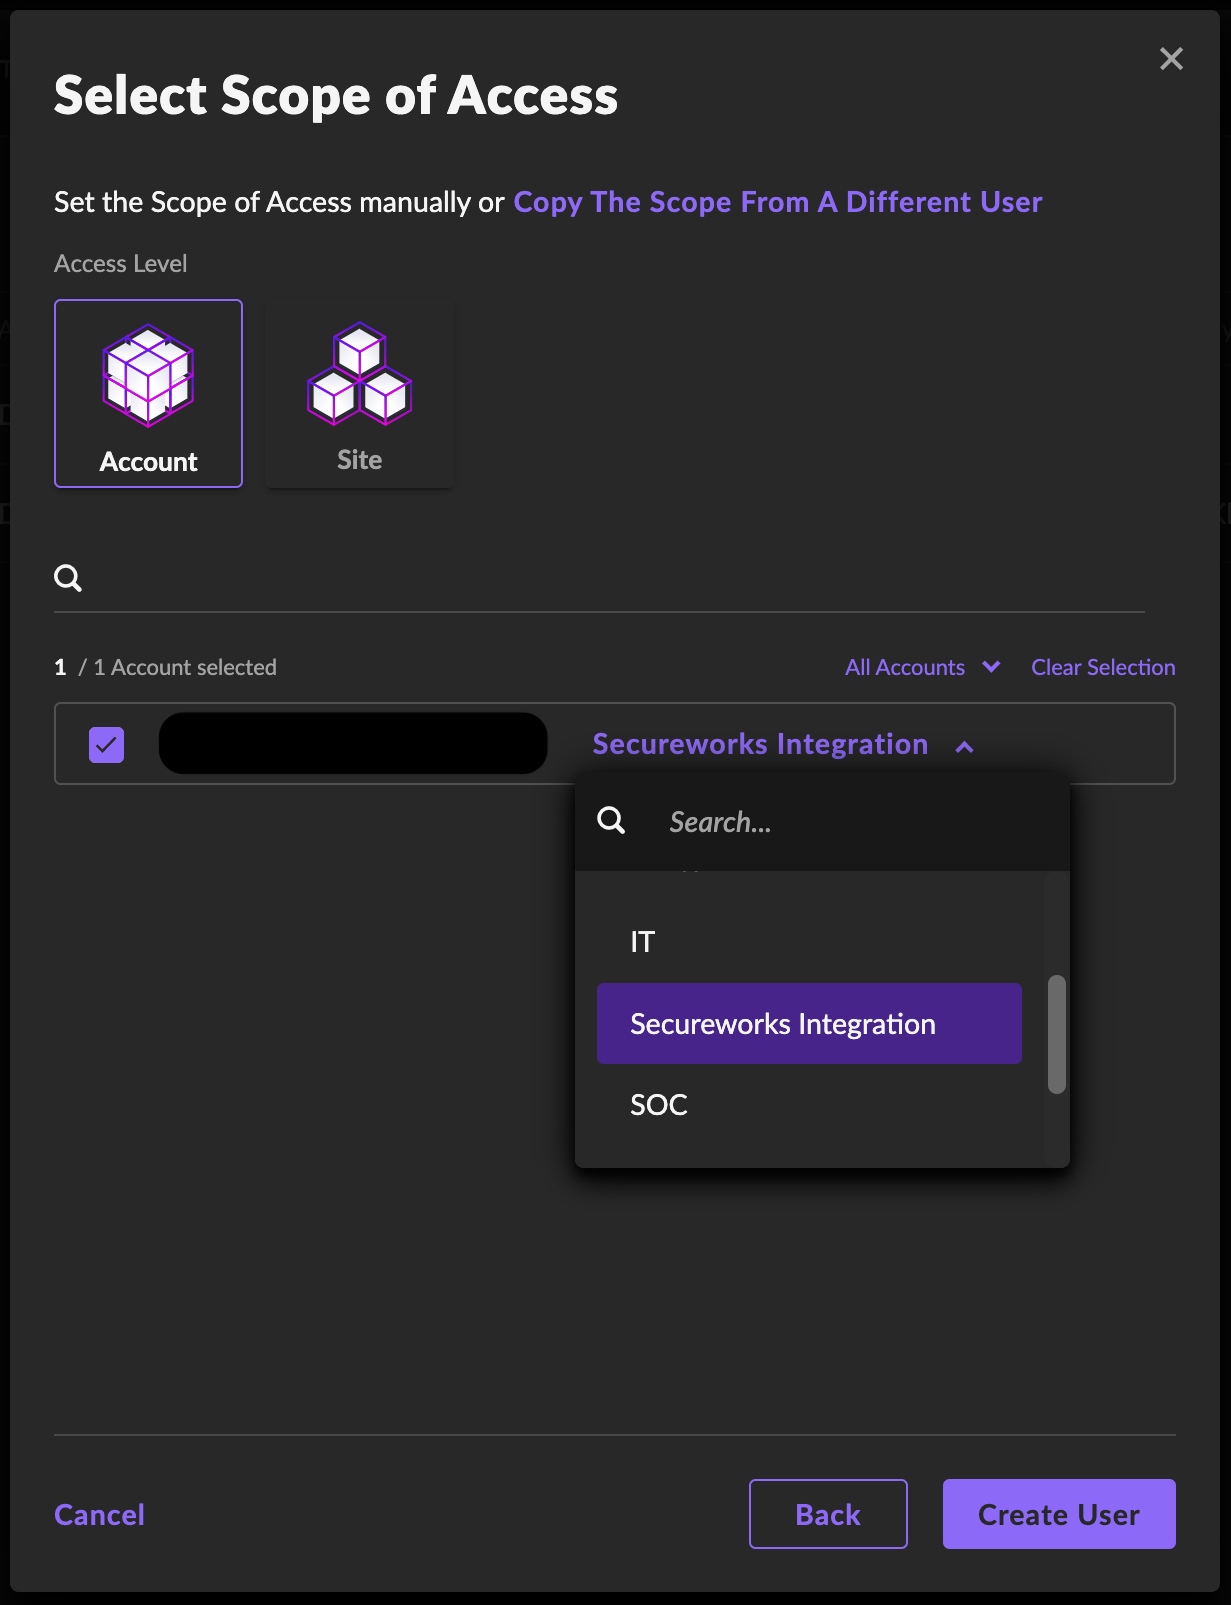
Configure Service User Scope -
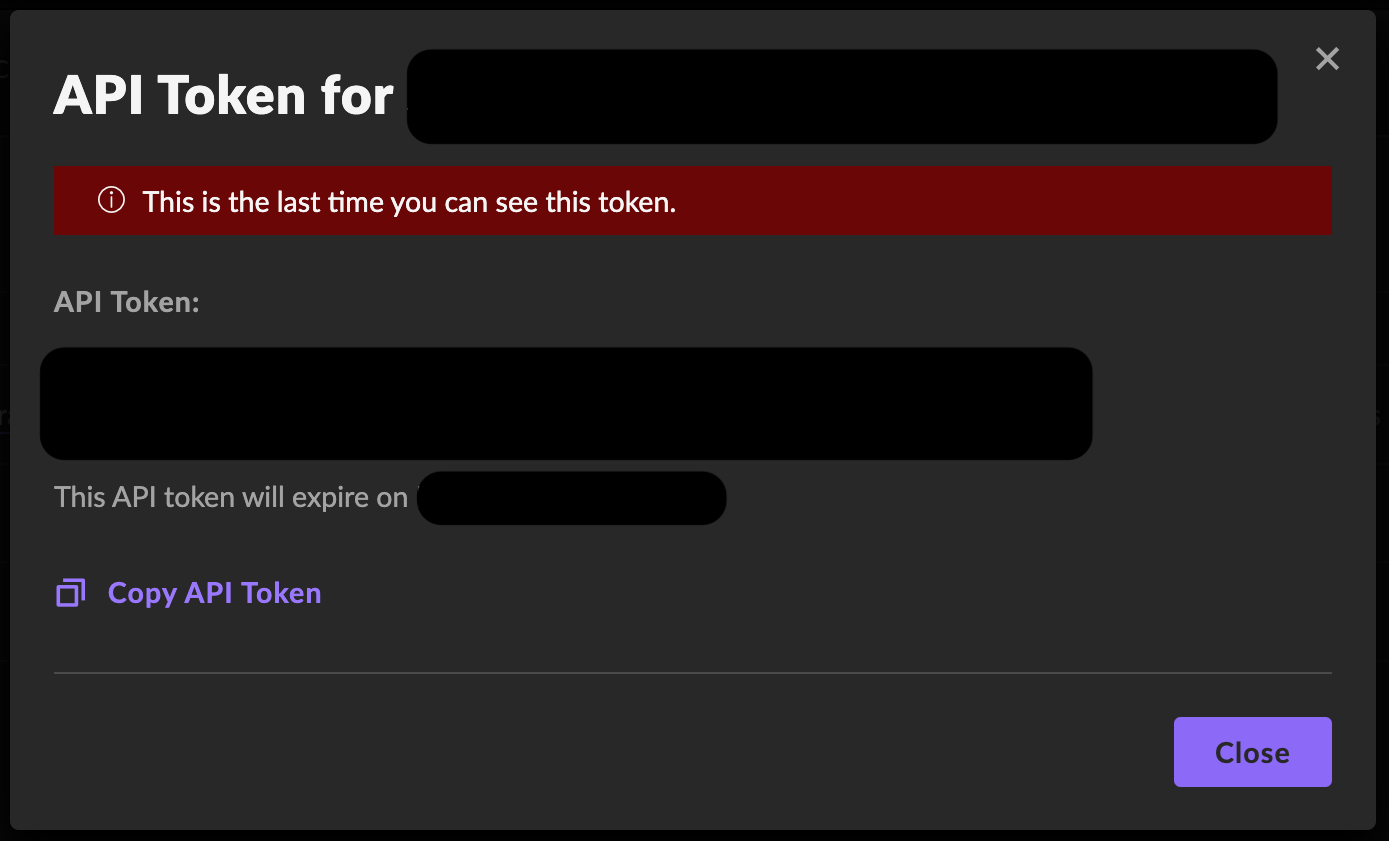
Securely copy the API token associated with the service user, then choose Close.
Copy API Token
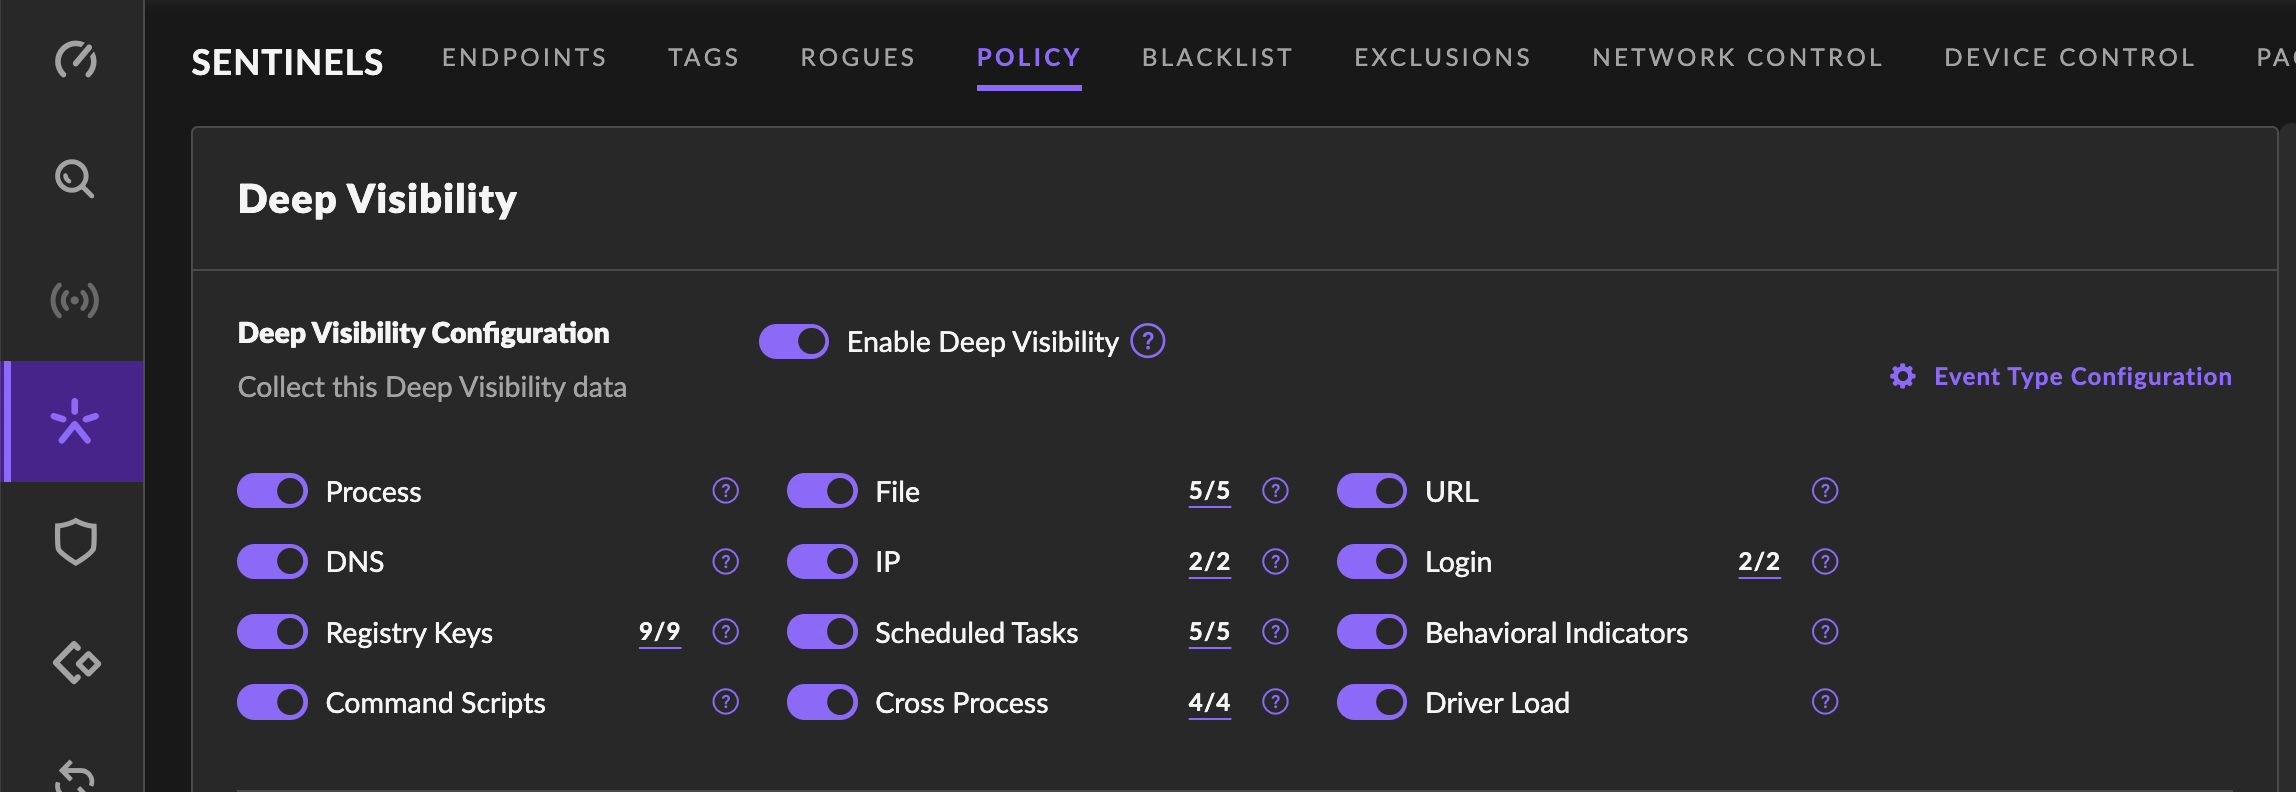
Configure SentinelOne Deep Visibility Policy🔗
- In the SentinelOne Management Console, navigate to Sentinels → POLICY.
-
Find the Deep Visibility section and ensure that Enable Deep Visibility option is selected.
XDR integration supports the following Deep Visibility event categories:
- Process
- DNS
- Registry Keys
- Command Scripts
- File
- IP
- Scheduled Tasks
- Cross Process
- URL
- Login
- Behavioral Indicators
- Module (may not be configurable in the policy)
If you want the integration to ingest these event categories, select the corresponding options in the Deep Visibility Policy. Ensure that all event types in these categories are selected in Event Type Configuration as well.
-
In the Deep Visibility section, under XDR Collections, select the Windows Event Log option if you want the XDR integration to ingest Windows event logs.
Note
Selecting the Windows Event Log Extended option includes the Windows event log XML which the integration uses to add more information to the events. Windows Event Log Extended consumes significantly more data than Windows Event Log in SentinelOne and therefore is more costly.
Please refer to the SentinelOne documentation on Configuring Windows Event Log Collection before enabling these options to understand the cost involved with enabling Windows Event Log Extended and how to configure which Windows event logs you want collected.
-
Select Save Changes.
Configure Deep Visibility Policy
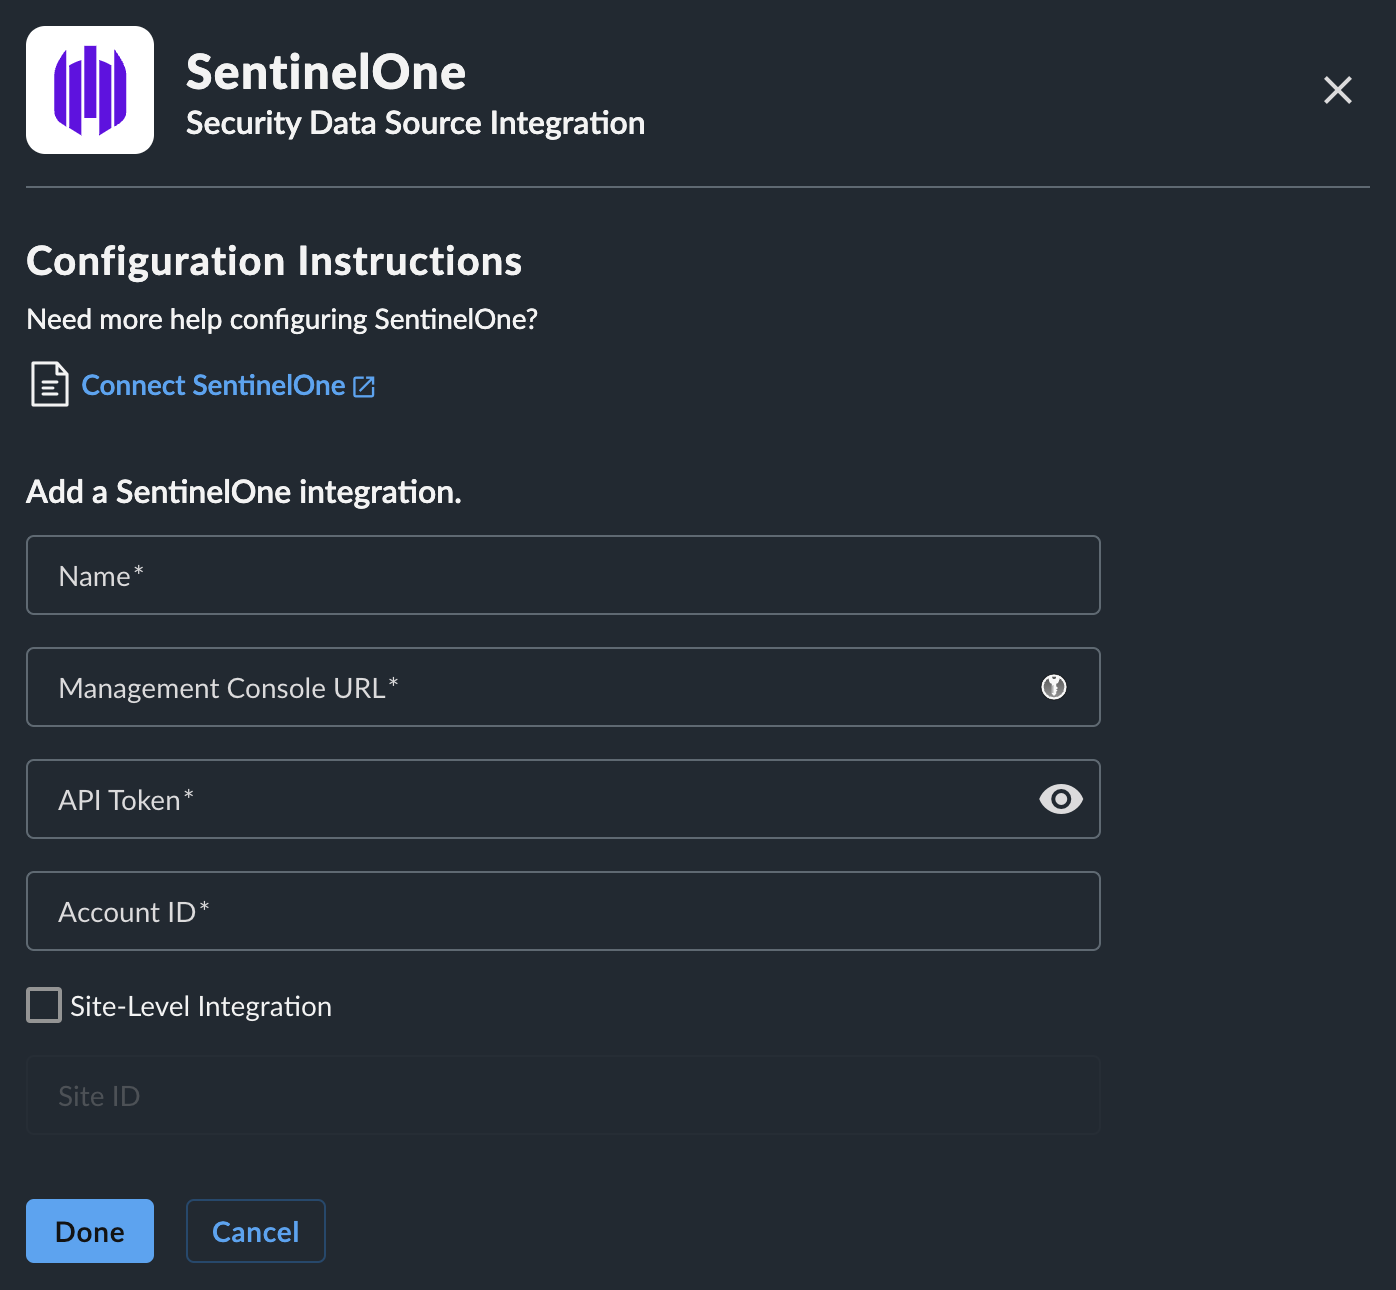
Create Your SentinelOne Integration in XDR🔗
- In XDR, navigate to Integrations→Cloud APIs, then choose Add an Integration from the top right corner.
- From the Optimized tab, select the SentinelOne card.
- Enter a Name. This is how the integration is identified in XDR.
- Enter the Management Console URL. This is the address of your SentinelOne Management Console. For example, usea1-999-example.sentinelone.net.
- Add the API Token. This is the API token you securely copied from Copy API Token above.
- Add the Account ID. This is the ID of the SentinelOne Account to be integrated with XDR.
- If a Cloud Funnel for the specified Account and Site is already configured in SentinelOne Management Console, and you would like this XDR integration to replace it, check Replace existing Cloud Funnel configuration.
- If you are creating a Site-Level integration, check Site-Level integration and add the Site ID. This is the ID of the SentinelOne Site to be integrated with XDR. You can find the Site ID in SentinelOne Management Console by first changing the scope to the desired site, and then navigating to Sentinels → SITE INFO.
-
When satisfied with the above configuration, select Done.
Note
The integration configures a Cloud Funnel that uses a Secureworks-owned S3 bucket. The S3 bucket name is similar to taegis-sentinelone-1-3z6ywcdee3bw3wcxz4d1sskhy4zfsuse1b-s3alias. Please do not change this Cloud Funnel configuration while the integration is in use.
Add XDR Integration