AWS Application Load Balancer (ALB) Logs Integration Guide🔗
The following instructions are for configuring an AWS ALBLogs integration to facilitate log ingestion into Secureworks® Taegis™ XDR.
Note
The following should be done in the same AWS region as your AWS ALB Logs bucket.
Data Provided from Integrations🔗
| Normalized Data | Out-of-the-Box Detections | Vendor-Specific Detections | |
|---|---|---|---|
| AWS Application Load Balancer | HTTP |
Note
XDR detectors are not guaranteed to be triggered, even if a data source's logs are normalized to a schema associated with a given detector. However, you can create Custom Detection Rules to generate detections based on normalized data from a data source.
Set Up AWS ALB🔗
Note
If you do not have login access to XDR, have someone who does help you complete any steps that require access. You can also contact your Secureworks® representative for help.
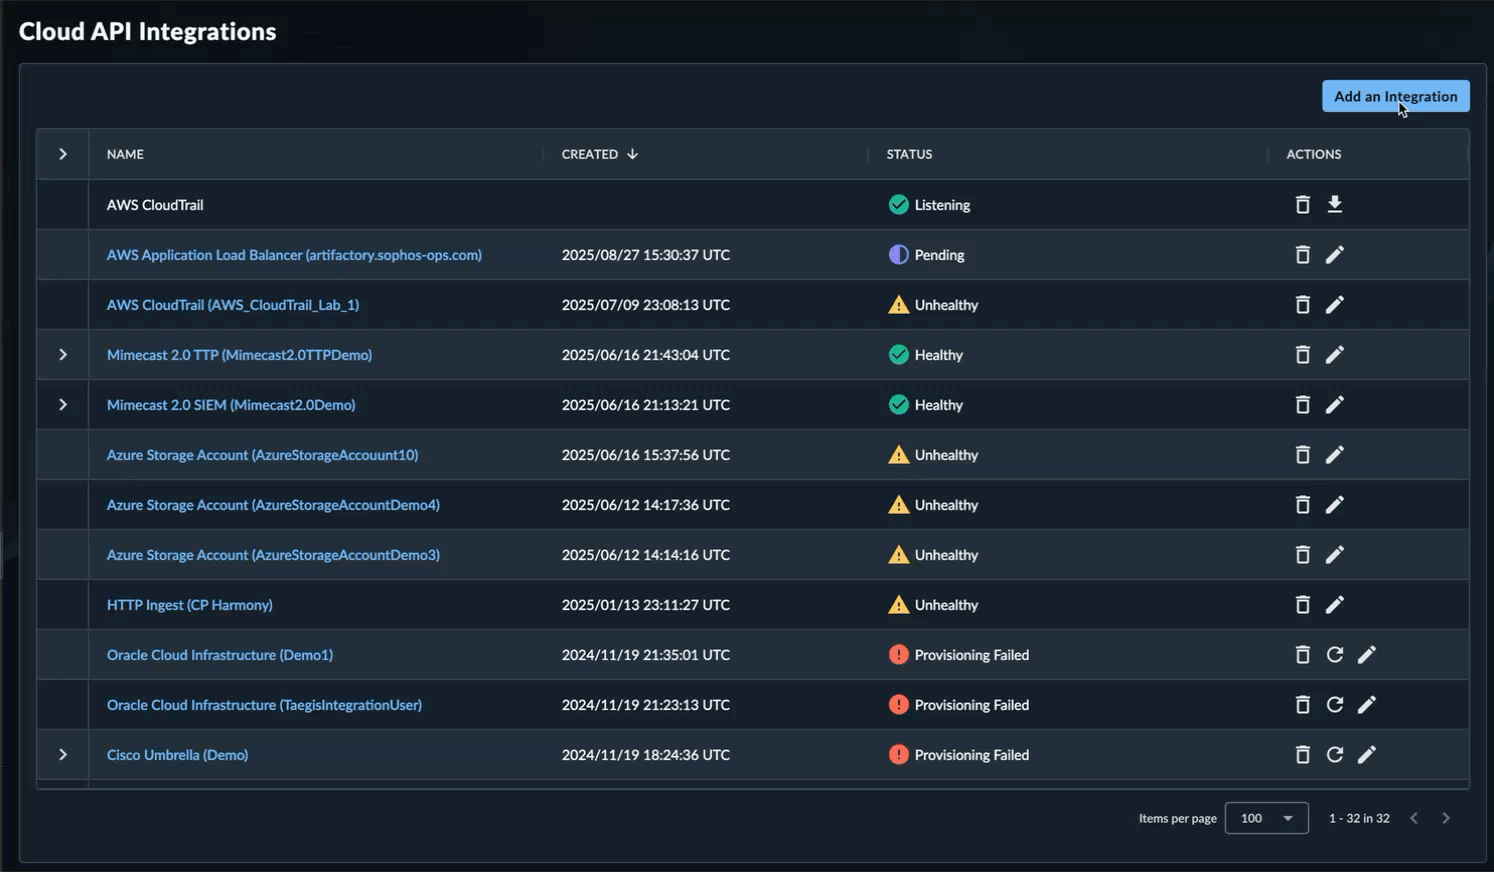
- From the Taegis Menu, select Integrations → Cloud APIs.
-
Select Add an Integration from the top of the page.

Add an Integration -
From the Optimized tab, choose AWS and then select Set Up under AWS ALB.
Set up AWS ALB Integration -
Select Next.
- Enter the Taegis Integration Name. This serves as a unique name for your integration; it can include any valid values up to 100 characters.
- Select Done. The CloudFormation template will automatically download as
taegis-cloudformation-lambda-template.yaml.
Upload the CloudFormation Template to S3 (Optional)🔗
- Log in to the AWS Console for the region (e.g., https://us-east-1.console.aws.amazon.com/cloudformation) with an account that has permissions to create roles, lambdas, secrets, and policies, or using a role that can assume another role with these permissions.
- In the Storage section, select S3.
- Create a new bucket or locate an existing bucket in which to store the CloudFormation template. The bucket does not need to be public, versioned, or encrypted.
-
Upload
taegis-cloudformation-lambda-template.yamlto the same bucket.Tip
Take note of the bucket name and the key, including any prefix. These identifiers are needed when you create a stack.
Create the Lambda Stack🔗
- Log in to the AWS Console for the region (e.g., https://us-east-1.console.aws.amazon.com/cloudformation) with an account that has permissions to create roles, lambdas, secrets, and policies, or using a role that can assume another role with these permissions.
- In the Management and Governance section, select CloudFormation.
-
Select the Create Stack button.
Note
You might see a list of CloudFormation stacks when you select CloudFormation like the following image. If that is the case, select the Create Stack dropdown and choose With new resources (standard).

Create New Stack -
From the Prerequisite - Prepare Template section, select Choose an existing template.
- From the Specify Template section, choose Upload a template file and select the Choose file button.
- Select Next.
-
Enter an appropriate stack name.
Note
Spaces are not allowed in stack names.
-
Select
IntegrationTypefrom the dropdown. This describes what sort of log objects are in theNotificationBucket. If there's more than one type, or you are not sure, selectgeneric.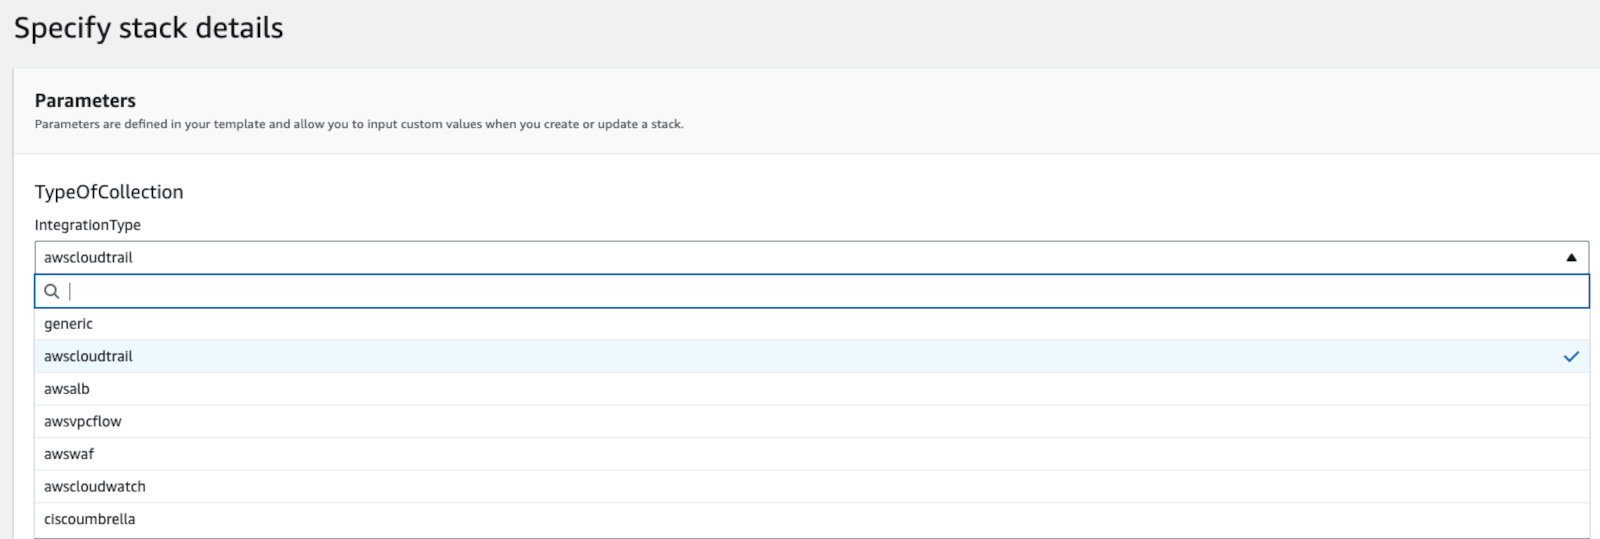
Update Lambda Stack Integration Type -
In the field
NotificationBucket, enter the bucket name, not a URL or URI, that houses the logs. - (Optional) Enter the appropriate value into the
SNSNotificationarnfield if you wish to use SNS notifications going forward instead of S3 notifications. - The remaining fields can be left at their defaults.
- Select Next.
- Select the I acknowledge that AWS CloudFormation might create IAM resources checkbox.
- Select Next.
- Review all parameters.
- Select Submit.
- Wait at least 30 seconds and then select the refresh button. The process may take a minute or more to finish. A status of CREATE_COMPLETE for the stack indicates the process has finished.
Add the Lambda Trigger🔗
- In the AWS console, switch to the Lambda service.
- Locate the new Lambda by name. The default name is {STACKNAME}-scwx-tdr-lambda-{INTEGRATIONTYPE}. For example:
ct-demo-scwx-tdr-lambda-awscloudtrail. - Select the Lambda name. The edit page for that Lambda displays.
- Expand the Function overview section and choose Add Trigger.
- In the Trigger Configuration editor, select the drop down menu and choose S3. Optionally, use an SNS trigger configured with a previously created topic.
- From the Bucket options, find the bucket containing the logs and select it.
- From the Event Type options, choose All Object Create Events.
- In the prefix field, enter the bucket prefix where the logs are located. Leave this blank if no prefix is used.
- Leave the suffix field blank.
- Check the following box to acknowledge the cost impact of a lambda function.
-
Choose Add. The configuration page for that lambda displays again. A message displays at the top indicating adding a trigger was successful; for example,
The trigger wmikeking was successfully added to function Logs-TDR-Upload. The function is now receiving events from the trigger.Important
AWS Lambda Concurrency Guidance🔗
The Reserved Concurrency value set by the Taegis XDR CloudFormation template (
taegis-cloudformation-lambda-template.yaml) is 5. For more information regarding Lambda concurrency and the calculation of a value appropriate for your environment, please reference Lambda function scaling in AWS Docs.Please reference the following AWS documentation to the identify the values to be used in the concurrency calulation:
AWS Concurrent Execution Limit🔗
If you see the following error when running your Lambda:

AWS Concurrent Execution Limit You need to request a quota increase from AWS to raise your concurrent execution limit. For more information, see Lambda quotas in AWS Docs.
Verify Event Flow with Advanced Search🔗
You can use Advanced Search to verify a successful set up by searching for events from the specific integration. For this integration, use this search:
from http where sensor_type = 'AWS Application Load Balancer'