Physical Taegis™ NDR Device Integration Guide🔗
Note
Taegis NDR is an evolution of iSensor, but with a new name and soon with expanded capabilities. You may see some references to the iSensor branding as we complete this transition.
For more information on Taegis™ NDR, see Taegis™ NDR Overview.
Taegis™ NDR is a managed network IDS/IPS solution available from Secureworks. The NDR Device is installed on your network where it monitors all network traffic, leverages our latest threat intelligence to detect network-level threats, and sends detections to Secureworks® Taegis™ XDR when malicious traffic is detected. NDR is a separately contracted feature that may be included with Secureworks® Taegis™ MDR and Secureworks® Taegis™ Elite Threat Hunting.
Supported Features:
- Inline and passive deep packet inspection
- Integration of Counter Threat Unit™ Threat Intelligence
- Ability to block malicious traffic on the network
Data Provided from Integration🔗
| Normalized Data | Out-of-the-Box Detections | Vendor-Specific Detections | |
|---|---|---|---|
| Taegis NDR | Netflow, NIDS | NIDS |
Note
XDR detectors are not guaranteed to be triggered, even if a data source's logs are normalized to a schema associated with a given detector. However, you can create Custom Detection Rules to generate detections based on normalized data from a data source.
Requirements🔗
Review the following requirements prior to implementation.
Connectivity Requirements🔗
| Source | Destination | Port/Protocol |
|---|---|---|
| Taegis™ NDR Device (mgmt IP) | 206.55.100.0/22 216.9.204.0/22 |
TCP/443 (unproxied)* |
* (unproxied) — TCP/443 traffic will need to be excluded from any web content filtering devices. The TCP/443 traffic will be inspected and dropped by most web content filtering devices as malformed HTTPS traffic.
Maximum Transmission Unit (MTU)🔗
Secureworks offers two types of NDR Devices based on software image: the Standard NDR Device and the High Speed NDR Device. The supported MTU sizes differ for each type.
-
Standard — Packets that will traverse the Standard IPQ3 or 3G/10G IPQ3 NDR Device should have a MTU of 1522 or less. Anything higher will lead to packet loss and have a negative impact on network connectivity.
-
High Speed — The High Speed NDR Device running DPDK is able to support an MTU of up to 9000. If you wish to use the non-default MTU size of 1500, please inform your implementation engineer during implementation discussions.
Important
The MTU size is applied to all of the NDR Device's monitoring interfaces. This means that if the NDR Device is monitoring multiple network segments, all segments must have the same MTU.
Physical Requirements🔗
-
The default static rail shipped with the Dell Server is compatible with both two post and four post racks. If desired, there is an optional sliding rail available that is only compatible with four post racks.
-
A monitor and USB keyboard connected to the NDR Device.
-
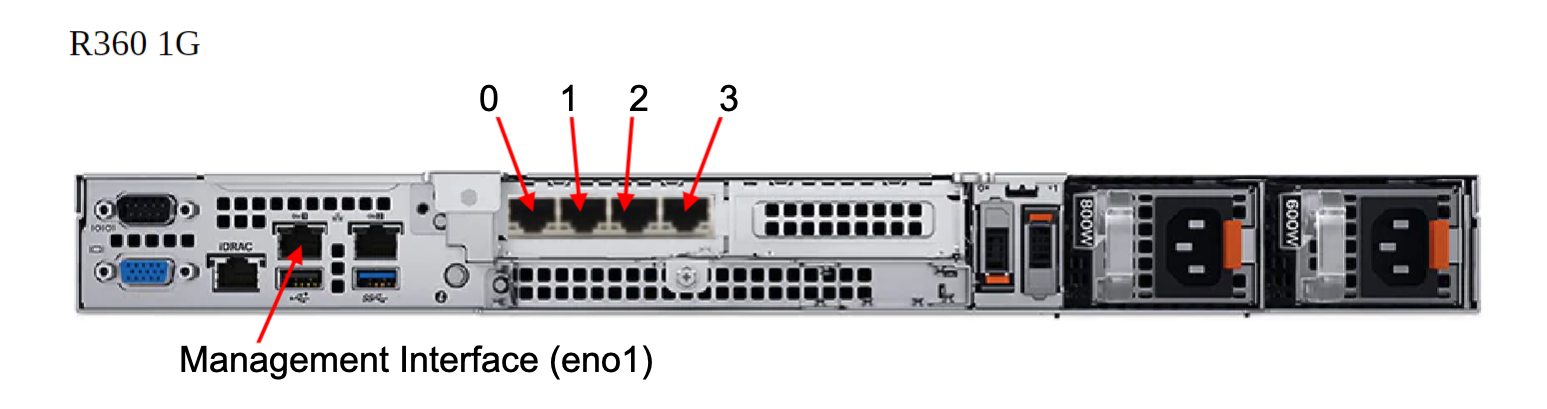
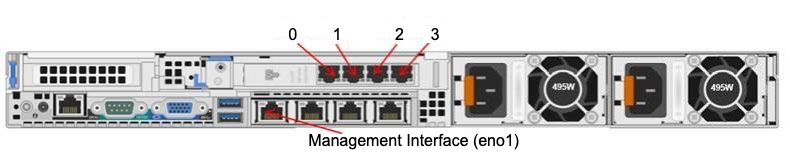
Connection from the management interface of the NDR Device to the network. See the following diagrams.
-
Connection of the included power cable(s) to the NDR Device
-
Device powered on.
Contact your Secureworks representative to walk you through the rest of the implementation.
Physical Setup🔗
Interface Diagrams🔗
- Standard Four Port NDR Device (PER320):

- Standard Four Port NDR Device (PER330):
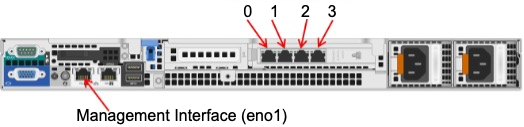
- Standard Four Port NDR Device (R340XL):
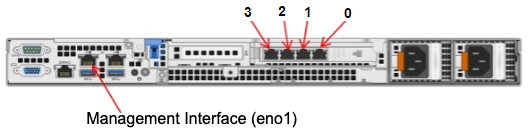
- Standard Four Port NDR Device (PER360):
- High Speed Four Port NDR Device (PER630,PER640):
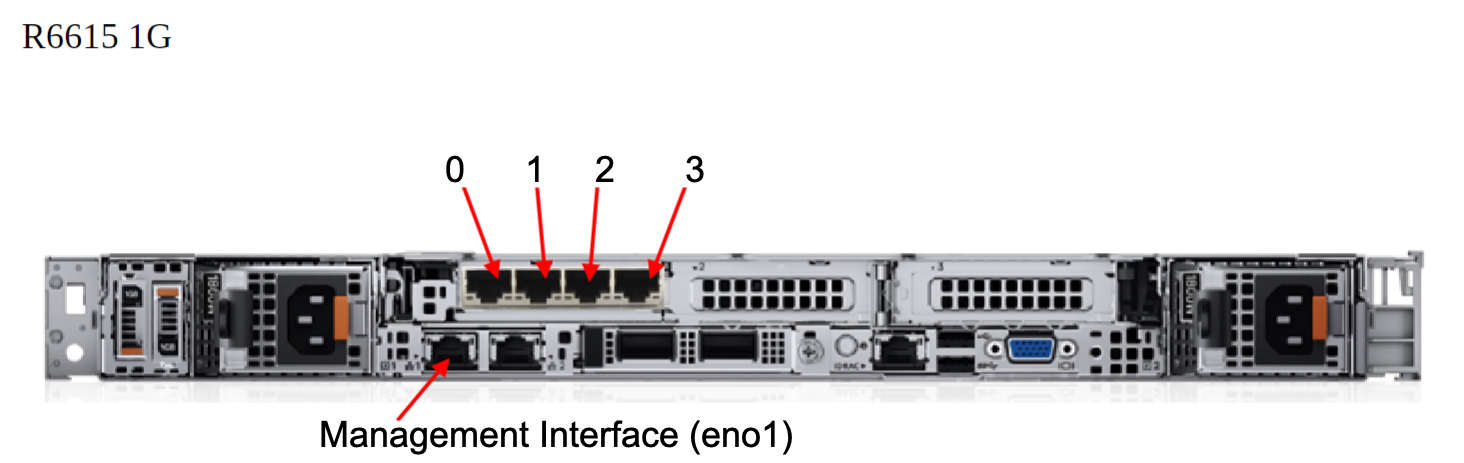
- Standard Four Port NDR Device (PER6615):
- High Speed Eight Port NDR Device (PER630,PER640):

- High Speed 10G Two Port NDR Device (PER630,PER640):
- High Speed 10G Four Port NDR Device (PER630,PER640):
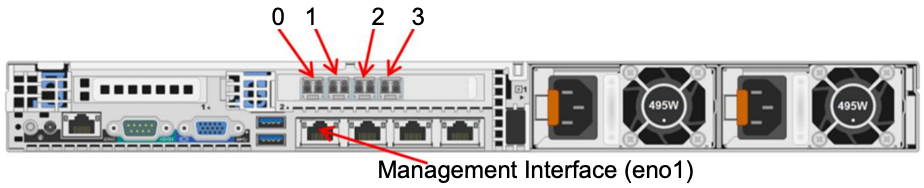
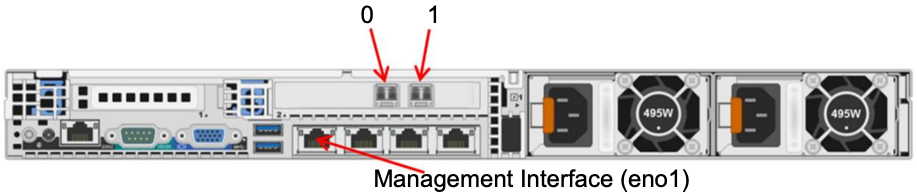
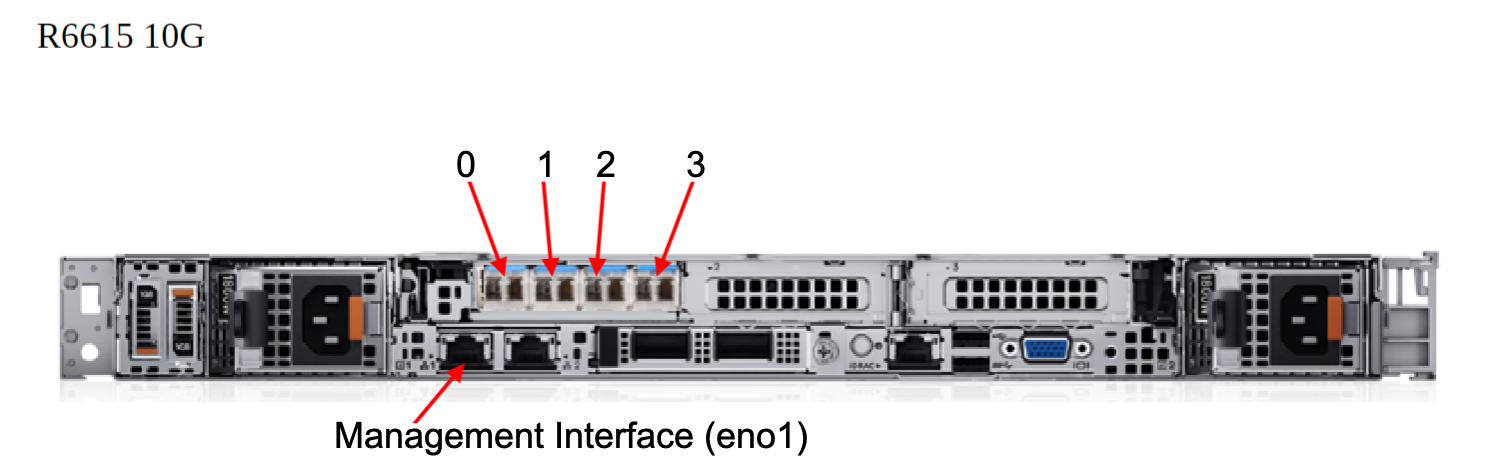
- High Speed 10G Four Port NDR Device (PER6615):
Bridges🔗
When NDR Devices are inline with your network, monitoring ports combine to create a bridge. The following table maps the interfaces to bridges.
| Bridge | Interfaces |
|---|---|
| br0 | 0, 1 |
| br1 | 2, 3 |
| br2 * | 4, 5 |
| br3 * | 6, 7 |
System Specifications🔗
| Feature | Purpose | Form Factor | Rack Support | Power Supplies | Heat Dissipation | NIC |
|---|---|---|---|---|---|---|
| Standard (PER320) | IDS/IPS appliance | 1U rack | Dell A7 Static ReadyRails (default); Dell A8 Sliding ReadyRails (optional) |
Hot-plug redundant power supplies (350 watts each) | 1356 BTU/hr maximum | 4-port copper Gb adapter; management interface; hardware fail-open |
| Standard (PER330) | IDS/IPS appliance | 1U rack | Dell A7 Static ReadyRails (default); Dell A8 Sliding ReadyRails (optional) |
Hot-plug redundant power supplies (350 watts each) | 1357 BTU/hr maximum | 4-port copper Gb adapter; 4-port fiber Gb adapter; management interface; hardware fail-open |
| High Speed (PER630) | IDS/IPS appliance | 1U rack | Dell A7 Static ReadyRails (default); Dell A8 Sliding ReadyRails (optional) |
Hot-plug redundant power supplies (495 watts each) | 1908 BTU/hr maximum | 4/8-port copper Gb adapter; 4-port fiber Gb adapter; 2/4-port fiber 10Gb adapter; management interface; hardware fail-open |
| High Speed (PER640) | IDS/IPS appliance | 1U rack | Dell A7 Static ReadyRails (default); Dell A8 Sliding ReadyRails (optional) |
Hot-plug redundant power supplies (495 watts each) | 1908 BTU/hr maximum | 4/8-port copper Gb adapter; 4-port fiber Gb adapter; 2/4-port fiber 10Gb adapter; management interface; hardware fail-open |
Fiber Connection Information🔗
This section provides information on the physical connection requirements for the NDR Device's fiber network interface cards. Please note that Secureworks does not provide the required fiber cable(s) as part of the NDR Device shipment.
2-Port 10Gb Fiber🔗
The 10Gb NDR Device fiber card is only offered in conjunction with the High Speed NDR Device (PER630/640) models.
- Port Quantity — Dual
- Connector Type — Lucent Connector (LC)
- Fail-open and/or Hardware Bypass — Supported
- Interface Data Transfer Rate — 10.3125 GBd
- Fiber Type — Multimode
- Wavelength — 850 nm
- Optical Output Power — Typical: -3.1 dBm; Maximum: -7.3 dBm
- Optical Receive Sensitivity — Typical: -15.37 dBm; Maximum: -11 dBm
Important
If utilizing the 2-port 10Gb fiber card on a non-High Speed NDR Device, inspection throughput is limited to 3.5Gbps.
4-Port 10Gb Fiber🔗
The 10Gb NDR Device fiber card is only offered in conjunction with the High Speed NDR Device (PER630/640) models.
- Port Quantity — Quad
- Connector Type — Lucent Connector (LC)
- Fail-open and/or Hardware Bypass — Supported
- Interface Data Transfer Rate — 10.3125 GBd
- Fiber Type — Multimode
- Wavelength — 850 nm
- Optical Output Power — Minimum: -7.3 dBm;
- Optical Receive Sensitivity — Maximum: -11 dBm
Important
If utilizing the 4-port 10Gb fiber card on a non-High Speed NDR Device, inspection throughput is limited to 3.5Gbps.
4-Port 1G fiber🔗
- Port Quantity — Quad
- Connector Type — Lucent Connector (LC)
- Fail-open and/or Hardware Bypass — Supported
- Interface Data Transfer Rate — 10.3125 GBd
- Fiber Type — Multimode
- Wavelength — 850 nm
- Optical Output Power — Typical: -6.0 dBm (TX -Switch Norma - Fiber - LC/LC); Minimum: -10.9 dBm
- Optical Receive Sensitivity — Typical: -20 dBm; Maximum: -15.6 dBm
Important
If utilizing the 4-port 1G fiber card on a non-High Speed NDR Device, inspection throughput is limited to 3.5Gbps.
NDR Device Deployment Considerations🔗
During the registration of your NDR Device, you must determine the implementation that best serves your organization. To aid in making these decisions, review the following options and determine what will be needed prior to the registration process.
Interface Configuration🔗
Auto-negotiate or hardcoded? If hardcoded, which speed and duplex settings?
Note
A crossover cable is highly recommended between an NDR Device and layer 3 devices, such as routers and firewalls. Auto MDIX will allow for straight through cables to be used between the NDR Device and layer 3 devices in most cases, but both devices must be configured to auto negotiate speed and duplex. If any side is hard coded, then a crossover cable is required. A straight through cable is required between an NDR Device and layer 2 devices, such as switches. These requirements are necessary to facilitate the fail open functionality.
Traffic Processing Mode🔗
-
In inline-active mode (IPS), the recommended installation setup for your NDR Device, all traffic passes through the NDR Device with network traffic being blocked if determined to be malicious by the signature set.
-
In inline-passive mode (IDS), all traffic passes through the NDR Device and is inspected for alerting. The device will only alert to malicious traffic but will not block it. This is also known as inline-sniffing.
-
In sniffer mode (IDS) (non-inline monitor), the network segments to be monitored are spanned to the NDR Device for inspection, but no traffic is blocked.
HOME_NET🔗
HOME_NET is a network or list of networks that are important to you, and that you wish to protect with the NDR Device. The NDR Device uses the defined HOME_NET(s) to determine the traffic that will be inspected. These networks are stored as a variable on the NDR Device called the $HOME_NET. Selecting the correct HOME_NET is extremely important to ensure proper coverage of your network.
EXTERNAL_NET🔗
EXTERNAL_NET is the network you want to protect the HOME_NET from. There are two general options when setting the EXTERNAL_NET on the NDR Device:
!$HOME_NET(i.e., not the networks defined by HOME_NET, which is the traditional configuration)- Any
If there is a large amount of HOME_NET to HOME_NET traffic being seen by the NDR Device, the EXTERNAL_NET should be set to !$HOME_NET to reduce false positives.
Setting the EXTERNAL_NET to !$HOME_NET does not limit the visibility of lateral movement. Our Counter Threat Unit™ (CTU) team writes all of our signatures with directionality in mind. Signatures that are written for vulnerabilities that can be used for lateral movement are written to look for 'any' to 'HOME_NET' traffic.
Proxy Servers🔗
Proxy servers must be accounted for during the NDR Device deployment. Secureworks must know if you have any proxy servers in the monitored environment, if they are transparent or active (clients are forced through the proxy via browser configuration) proxies, what port number the client browsers connect to the proxy on if active, and the IP address of the proxy/proxies.
HTTP_PORTS🔗
After you have defined your proxy server(s), if any are active, we will need to record the port number used by clients when proxying through the active proxy. This port will be used in the $HTTP_PORTS variable. The HTTP_PORTS variable is used to instruct the NDR Device that HTTP traffic is expected on this port and to apply all HTTP signatures to the traffic. If you do NOT have any proxy servers in your environment, but you have HTTP traffic traversing your network on a port other than the following default ports, please ensure they are recorded so they can be added to the HTTP_PORTS variable for proper HTTP traffic inspection.
The default $HTTP_PORTS variable is as follows:
[80,81,88,311,383,591,593,901,1220,1414,1741,1830,2301,2381,2809,3037,3128,3702,4343,4848,5250,6988,7000,7001,7144,7145,7510,7777,7779,8000,8008,8014,8028,8080,8085,8088,8090,8118,8123,8180,8181,8243,8280,8300,8800,8888,8899,9000,9060,9080, 9090,9091,9443,9999,11371,34443,34444,41080,50002,55555]
Signature Sets🔗
Balanced🔗
The balanced policy offers a mix of increased security coverage while still aiming to provide minimal impact to legitimate traffic. Traffic dropped by the balanced policy includes but is not limited to: current threatscape malware and traffic aimed at exploiting high severity vulnerabilities in both widespread and lesser-used software. Traffic that generates detections, but is not dropped, includes but is not limited to: traffic commonly associated with reconnaissance attempts/the noise of the internet, traffic that triggers lower fidelity signatures, and traffic related to questionable activities such as torrent use.
Security🔗
The security policy provides the highest security coverage feasible, while aiming to limit impact to legitimate enterprise traffic. The security policy leans towards stronger security over connectivity, thus it accepts a higher false positive rate in order to provide increased coverage. Traffic dropped by the security policy includes but is not limited to: malware seen within the current threatscape, traffic aimed at exploiting vulnerabilities in both widespread and lesser-used software for high and medium severity vulnerabilities, traffic commonly associated with reconnaissance attempts/the noise of the internet, generic signatures to prevent common attacks such as SQL injection and Cross-Site Scripting attacks, and traffic related to questionable activities such as torrent use.
Connectivity🔗
The connectivity policy protects against the most severe threats, which have the highest risk within an enterprise environment. It provides minimal impact to legitimate traffic. Traffic dropped by the connectivity policy includes but is not limited to: current threatscape malware and high threat exploit attempts against known vulnerabilities in widespread software or software actively being exploited in the wild. Traffic that generates detections, but is not dropped, includes but is not limited to: threats identified by signatures that protect against a variety of medium threat events in lesser-used applications. Signatures that generate more noise are disabled by default.
Physical NDR Device Deployment Scenarios🔗
The following installation scenarios represent common internal deployments that adhere to Secureworks best practices. Secureworks does not recommend deploying the NDR Device external of the firewall due to detection concerns and masking (hide NAT) of internal assets. Alternative NDR Device deployment scenarios should be reviewed, approved, and documented with your installation team.
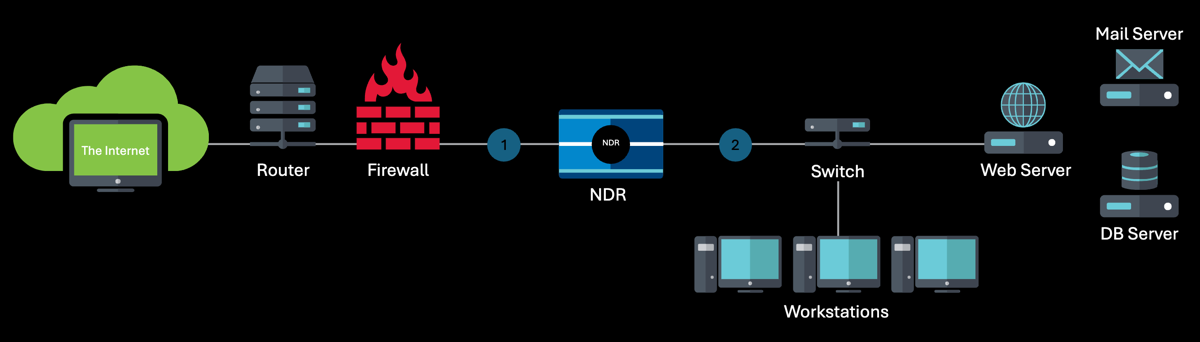
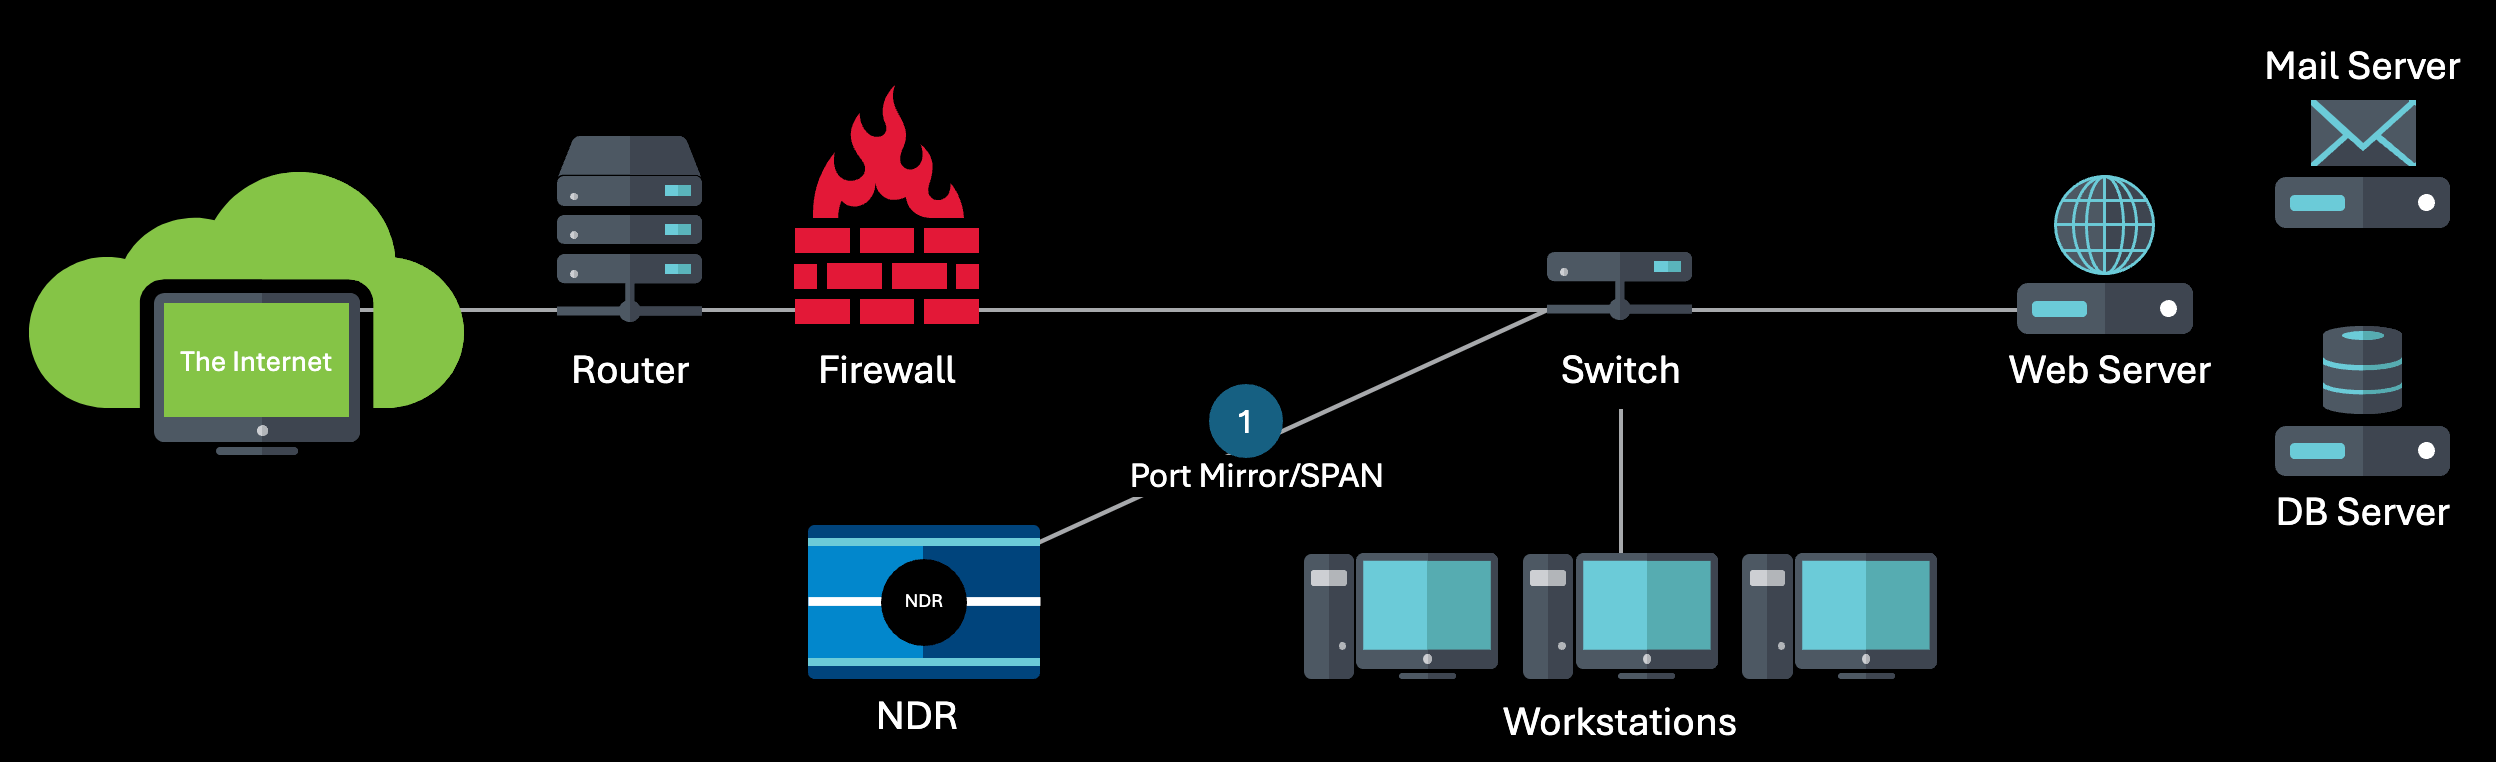
Internal Inline🔗
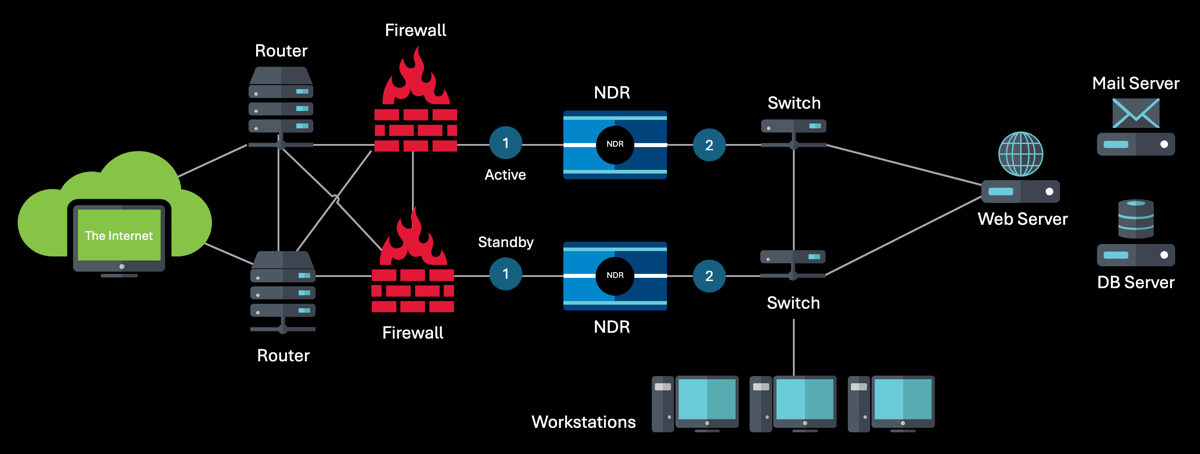
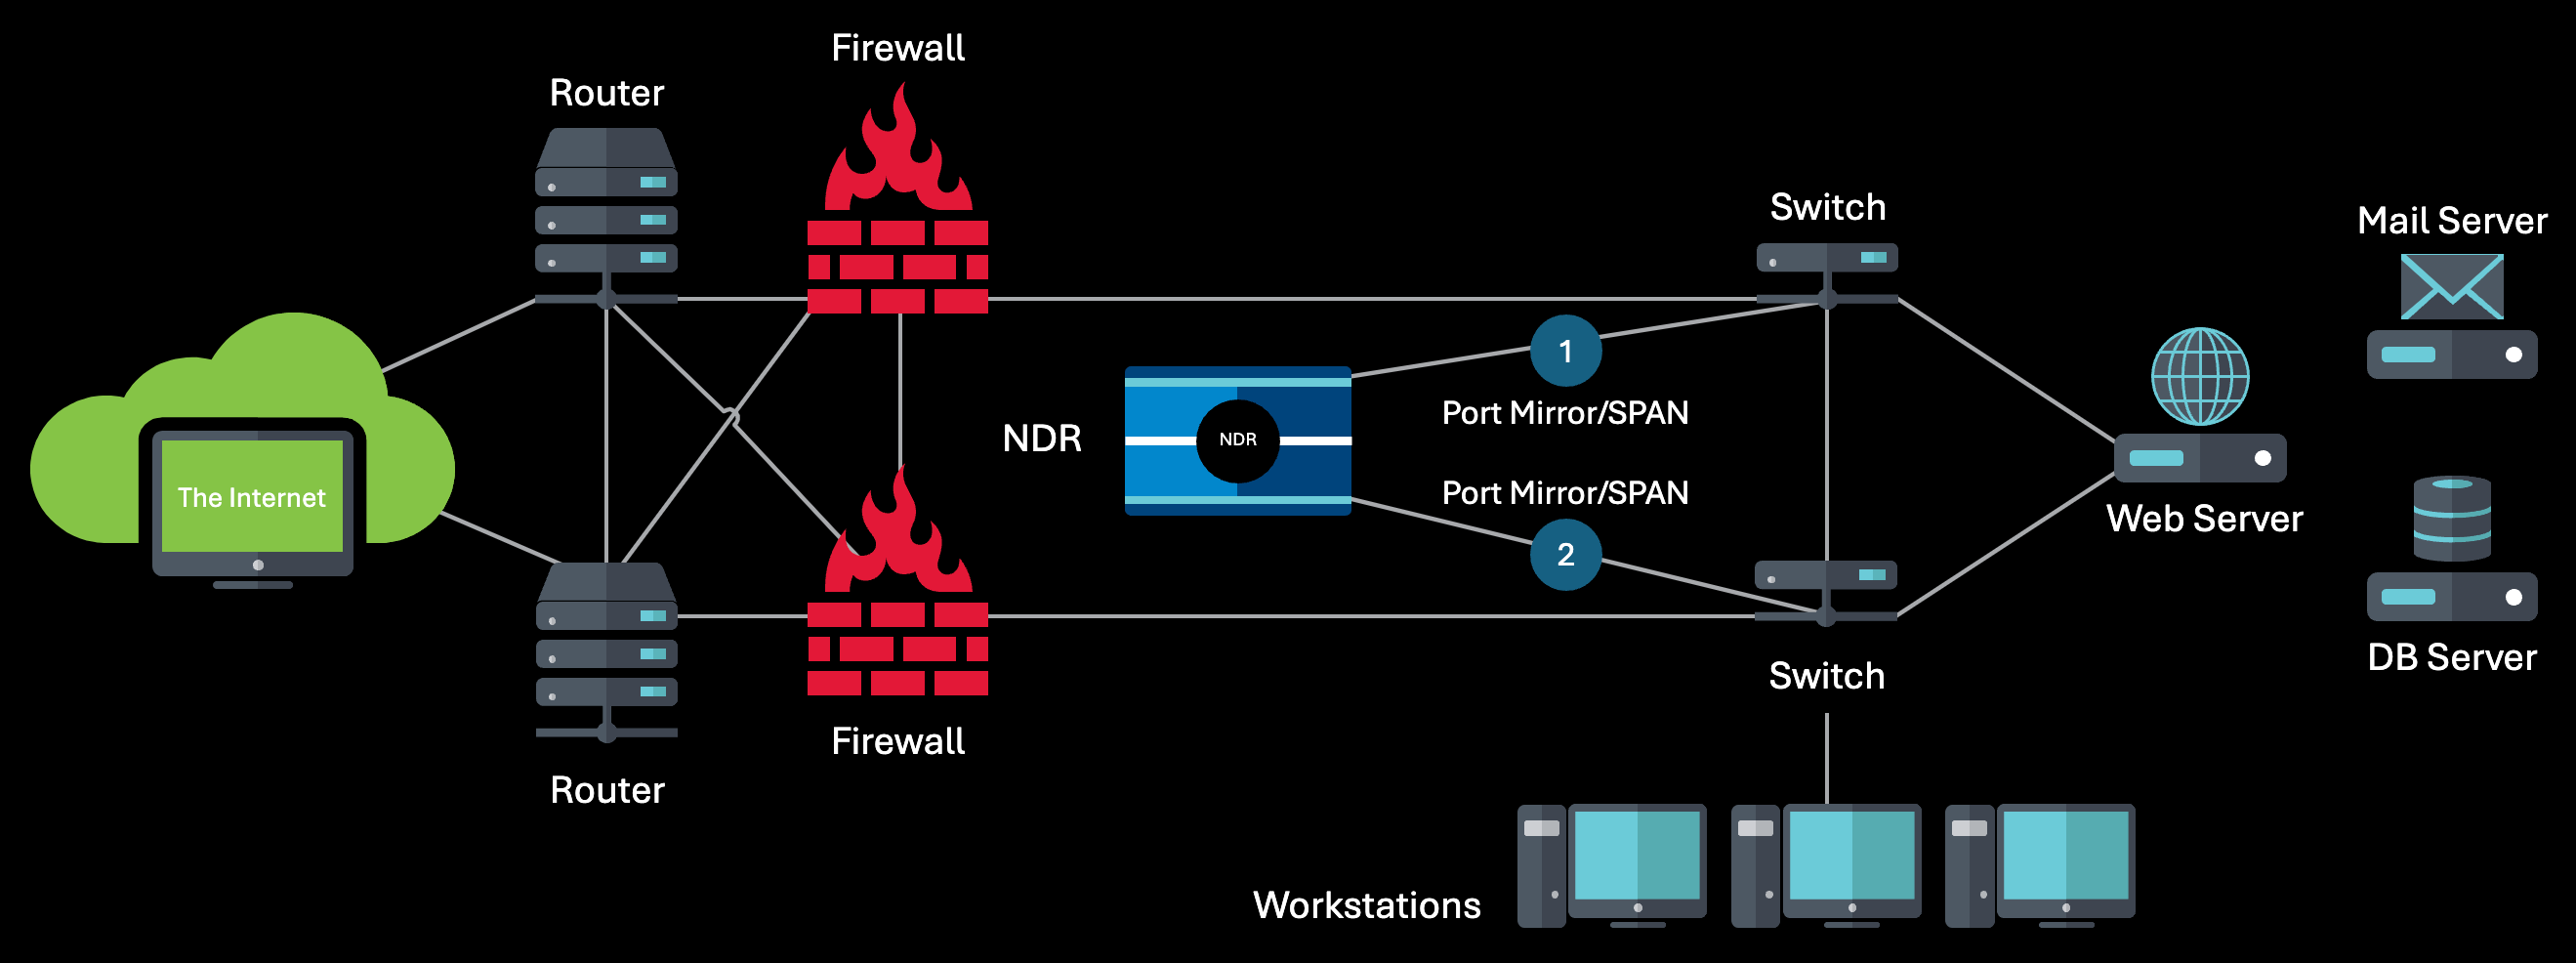
HA Active/Standby Internal Inline🔗
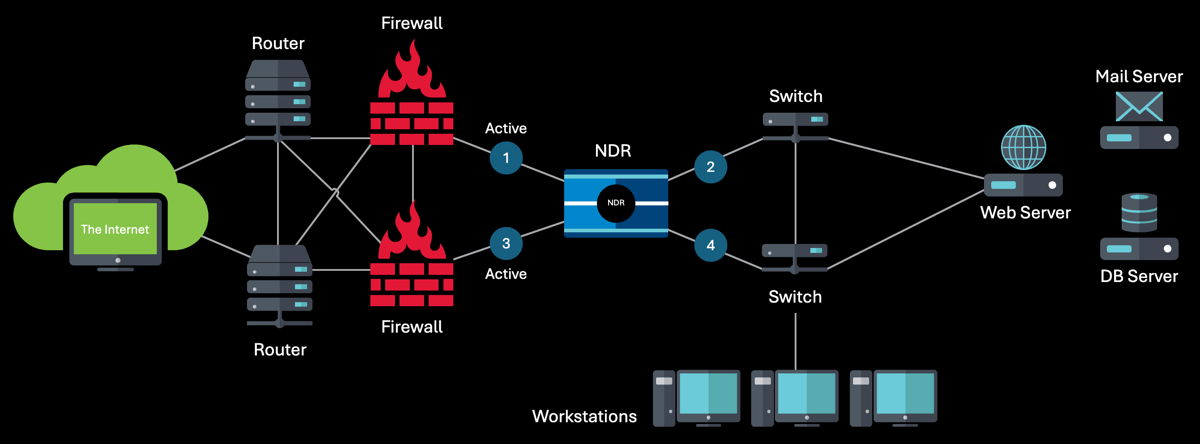
HA Active/Active Internal Inline🔗
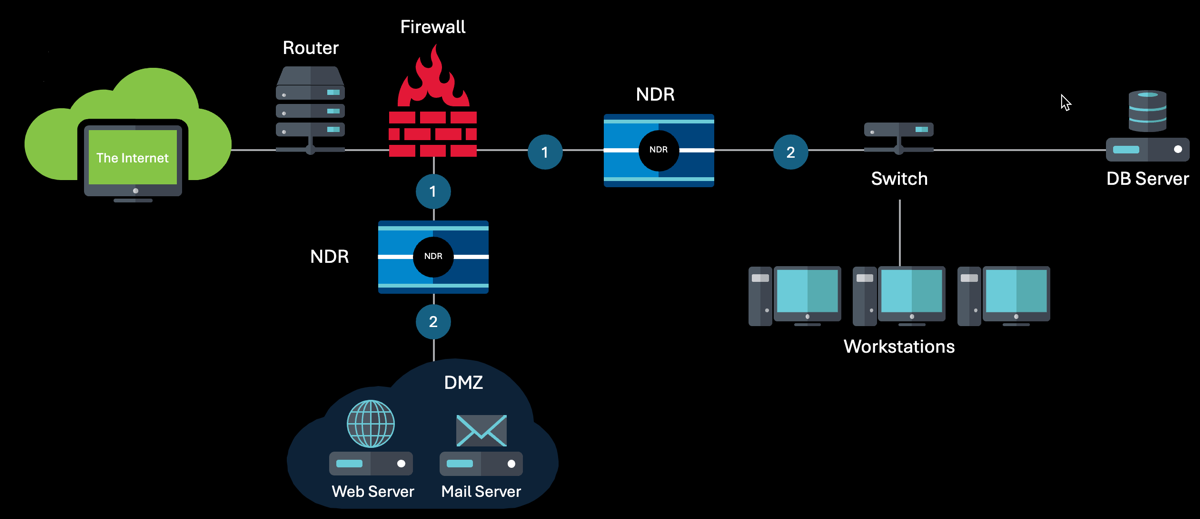
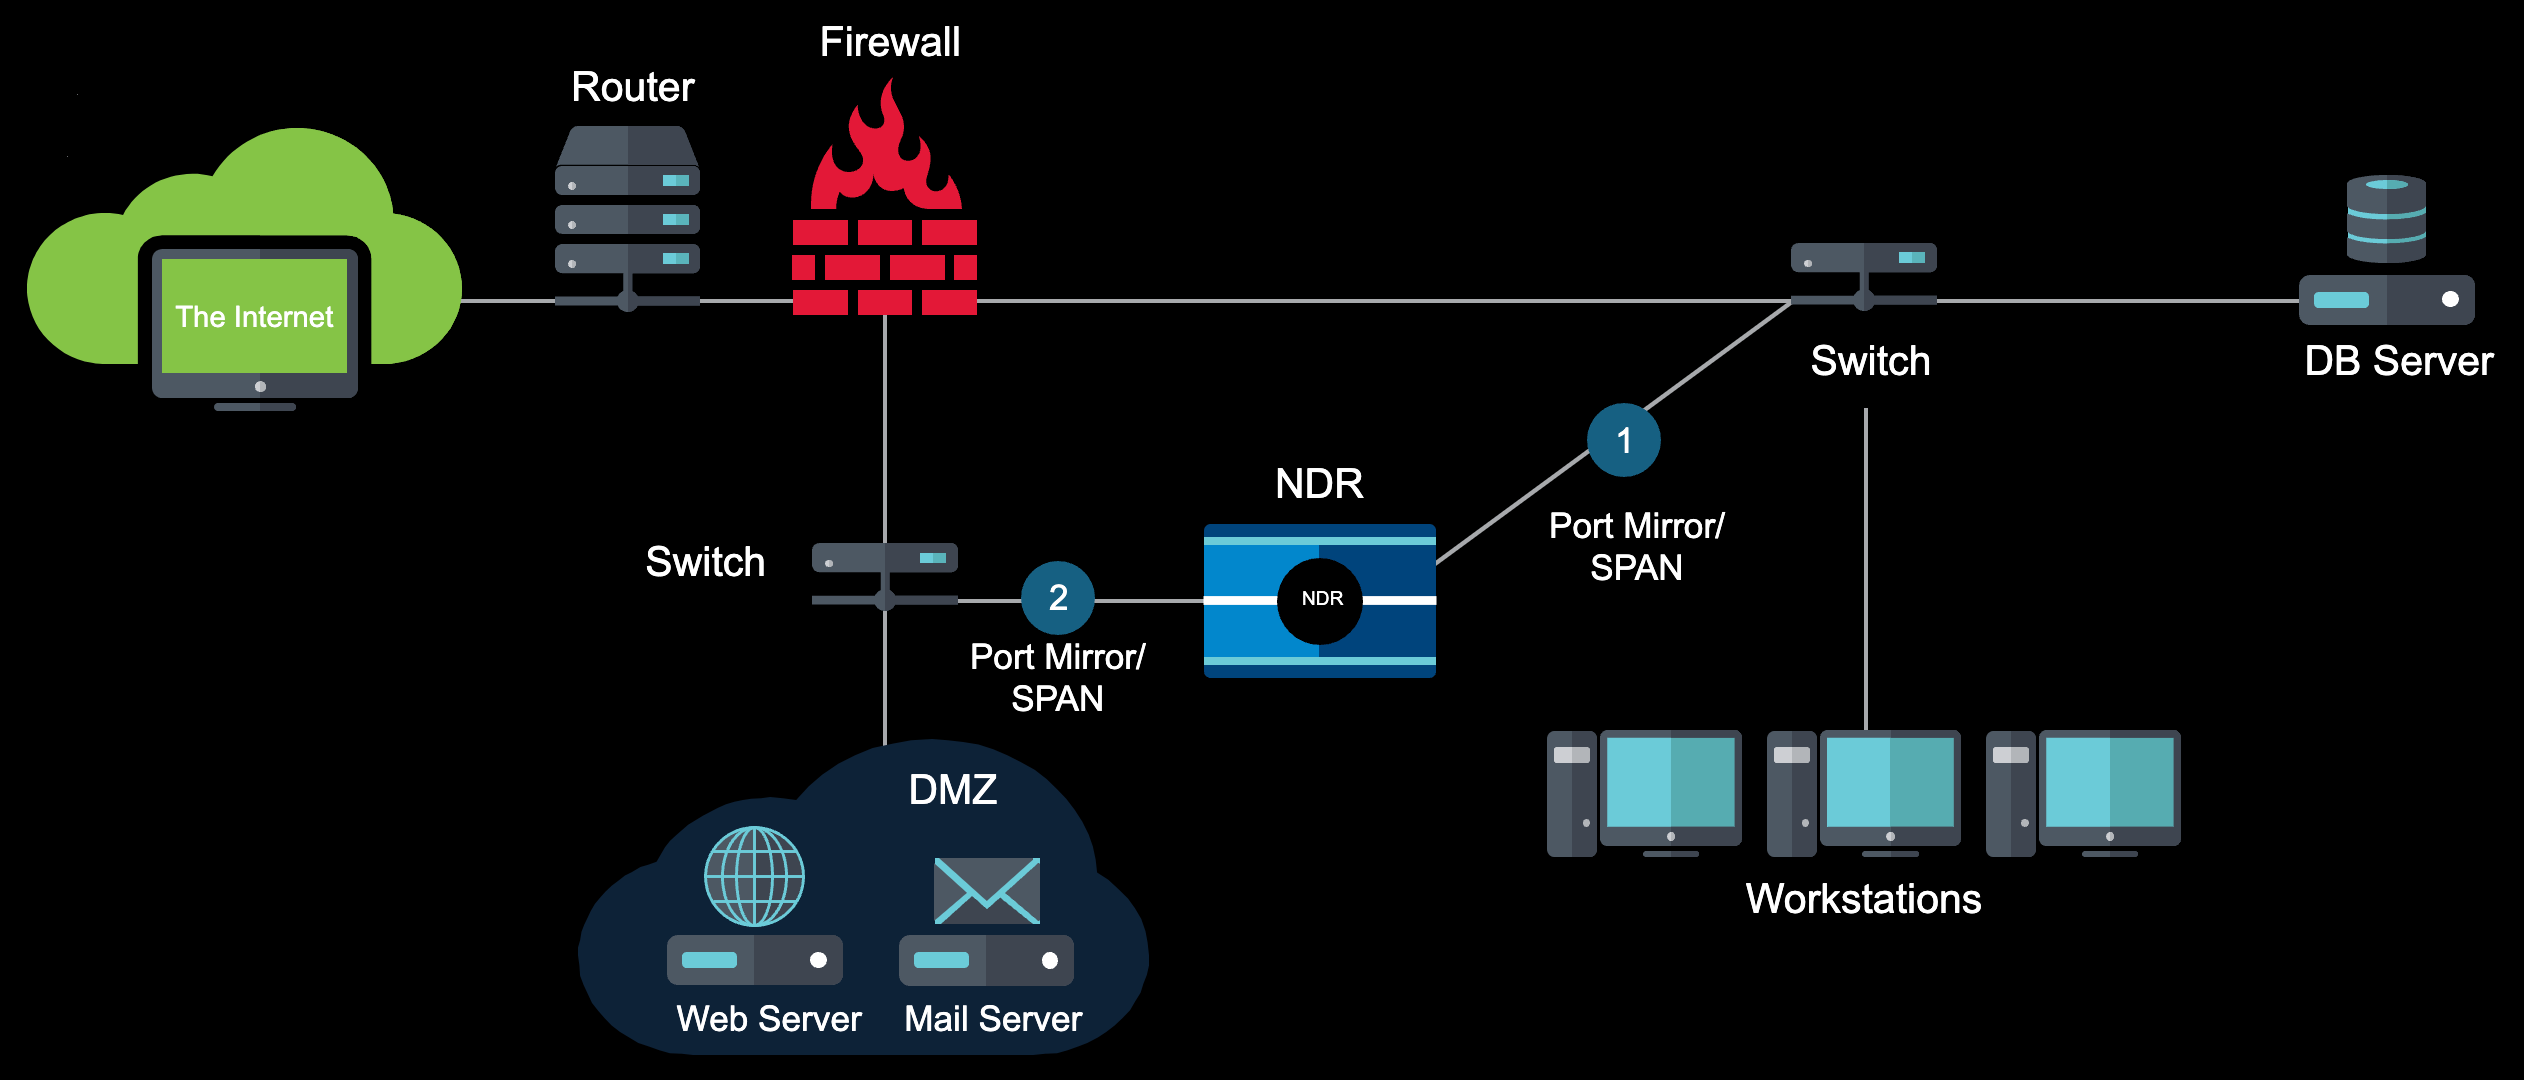
Internal DMZ Inline🔗
Internal Sniffer🔗
HA Internal Sniffer🔗
Internal DMZ Sniffer🔗
Registration Preparation🔗
Before you begin the installation of your NDR Device, prepare the following important pieces of information that you will be prompted for during the installation process:
- Device hostname
- NDR Device Registration Key — If not already received, please contact your onboarding project manager to obtain the Registration Key.
- NDR Device mode that you wish to use — At this time, you should have already worked with a Secureworks representative to identify the best solution for you. You must select one of the three modes during the installation process.
- IP address to assign to your NDR Device — If you plan to use a static IP for your NDR Device, please have your IP address, network mask, and gateway address ready for entry during the installation process. These values should have been provisioned by your network team for use by the NDR Device.
Configuration and Registration🔗
Follow these steps to begin installation of your NDR Device:
- Connect the NDR Device management port to your network.
- Connect a monitor and keyboard to your NDR Device.
- Turn-on your NDR Device. The NDR Device Configuration Wizard displays.
-
At the initial screen, the NDR Device automatically attempts to detect if the management port is connected. If No interface detected is shown, verify the management interface cable is connected and fully seated. Once done, select Yes to retry the interface detection.
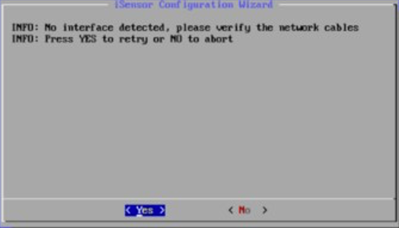
No Interface Detected -
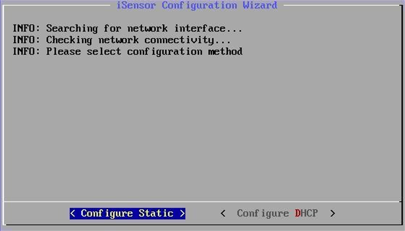
On the next prompt, select Configure Static and then enter your IP, netmask, and gateway information.
Configure Static IP -
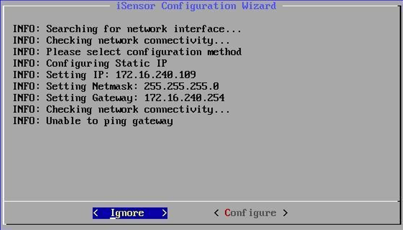
The NDR Device attempts to ping its gateway to verify the information is valid. If a ping failure is expected, select Ignore to continue with the registration process.
Ignore Ping Failure -
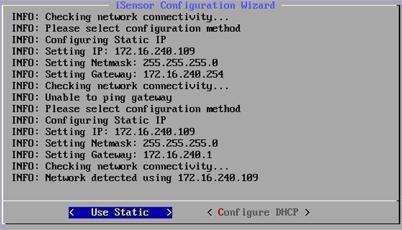
Confirm the network configuration by selecting the Use option.
Confirm Configuration -
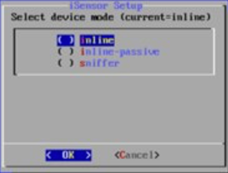
After you confirm the network configuration, select the NDR Device mode desired for your device and then select OK to continue.
Select NDR Device Mode -
Enter the Registration Key you obtained from your onboarding project manager. See the following note to download a specific NDR Device version if required; otherwise, select OK.
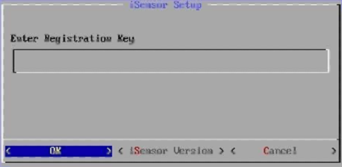
Enter Registration Key Note
Optional: If your compliance framework requires your NDR Device version to be controlled, you may select a specific NDR Device version to download. Once you have entered your Registration Key, select NDR Device Version.
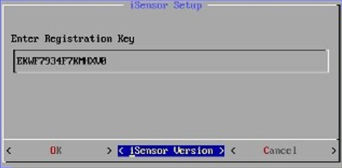
Select NDR Device Version Enter your desired NDR Device version and select OK to continue.
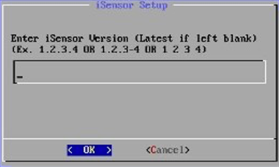
Enter NDR Device Version -
If you did not select the option to enter a specific NDR Device version, select whether to enable or disable automatic software updates. These updates include minor OS patches that will not disrupt inspection or network connection(s). Secureworks recommends you select No to enable updates.

Enable Software Updates -
The NDR Device now contacts Secureworks with its Registration Key and completes a fairly lengthy set of steps to download software and configure itself.
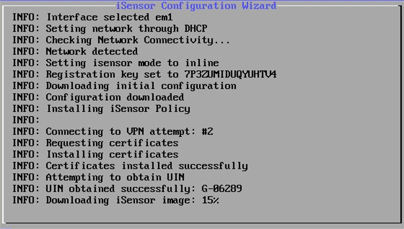
Download and Configuration -
You have now successfully installed your NDR Device. Contact your Secureworks representative to validate connectivity.
Network Reconfiguration🔗
Use the NDR Device CLI to modify the network configuration when needed. Follow these steps:
-
From the console of a physical NDR Device, connect a monitor and keyboard to the system. For virtual devices, navigate to the virtual NDR Device Console. If there is no output present, select Enter to wake the console.
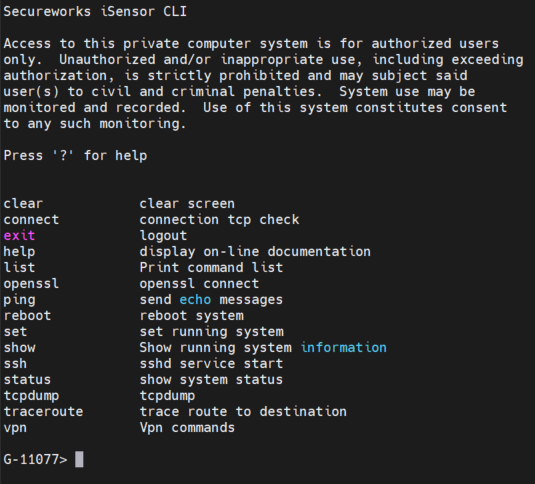
NDR Device CLI -
Use the
setcommand with the following options to make changes to your network configuration:-
set dhcp [enable|disable] -
set gateway <ip> -
set ip <ipv4> <netmask> <gateway> -
set netmode [passive|ips|monitor]
Important
This command should only be used while working with Secureworks support to change the network configuration of the NDR Device. Changes made locally have direct impact on the monitoring and management of the NDR Device and could lead to a service outage if not directed by a member of Secureworks support.
-
Registration Error Codes🔗
The following error codes may be seen during configuration/registration. Review the description for details.
| Error Code | Description |
|---|---|
| 20 | User cancelled the process of setting the network configuration |
| 21 | User cancelled the process of selecting the NDR Device mode |
| 22 | User cancelled the process of setting up a registration key |
| 23 | The policy obtained is not a valid XML file |
| 24 | The policy contains an empty VPN password field |
| 25 | VPN connection failed - user decides not to retry |
| 26 | Unable to retrieve RCMS certificates |
| 27 | Certificate tar file missing /var/mqm/ssl/Key.sth file |
| 28 | CIP server information is missing from the policy (Certinit.config) |
| 29 | Unable to obtain UIN - Server provided an invalid response |
| 30 | Unable to obtain UIN - Server provided no response |
| 31 | Imagetools configuration is missing the NDR Device Version |
| 32 | Image MD5Sum didn't match what the server MD5Sum |
| 33 | Image installation failed (instimage.barebone) |