On-Premises Data Collector🔗
The Secureworks® Taegis™ XDR On-Premises Data Collector enables you to forward various event sources via Syslog for ingestion into the XDR data lake.
Note
When configuring security appliances to forward events via Syslog to a XDR On-Premises Data Collector, ensure that the log format requirements are followed exactly for the supported integration type. If an intermediate log forwarder is being used to forward on behalf of the security appliances, the logs received at the XDR On-Premises Data Collector must meet the log format requirements of the integration type. Logs received by a XDR On-Premises Data Collector that do not adhere to format requirements may be processed as generic events.
Important
With release 1.2.1+, the XDR On-Premises Data Collector has a simplified configuration that requires fewer open ports to operate. If you have a configured collector from an earlier release, it will continue to work. If you want to use the updated collector (release 1.2.1 or better) you need to create and download a new collector from Integrations > Data Collectors in XDR and reconfigure your environment. The instructions below still apply. If you downloaded your generated collector image before December 5, 2019, your collector does not support proxy configuration.
Note
The XDR Collector can support up to 200K EPS (events per second) for properly configured cloud and on-premises collectors.
Note
Third-party tools or applications cannot be installed on any XDR Collector.
Create and Download Your Collector🔗
You can preconfigure, create, and download an On-Premises Data Collector for your environment directly in XDR from Integrations > Data Collectors.
-
From the Taegis Menu, select Integrations → Data Collectors. This page displays the collectors your organization has configured.
-
Select Actions → Add Collector from the top right. The Add Collector modal displays.
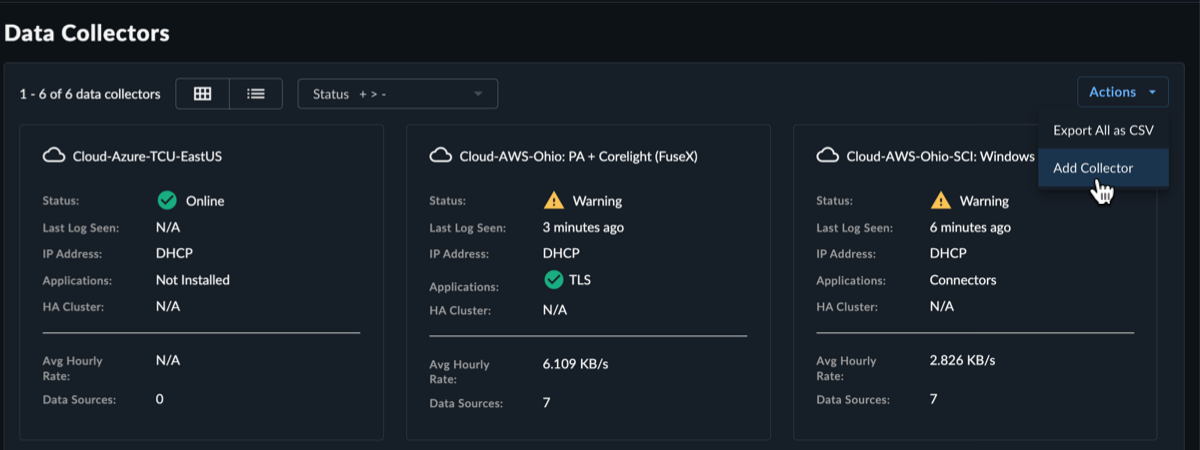
Add New Collector -
Select On-Premises as the collector type and then select Next.
-
Complete the following fields:
- Name of Collector — A nickname for the collector
- Description — (Optional) A description of the collector, such as its geographical location or the property name where it resides
- Hostname — The hostname of the collector
- Host Proxy — (Optional) Add an HTTP proxy address, using the following format:
[http\[s]://\[user:pass@]hostname\[:port]|http://<hostname>[:port]] - NTP Servers — (Optional) Specify your own NTP server IP addresses, using the following formats:
xxx.xxx.xxx.xxxorxxx://xxxxxxx.xxx
Tip
Hit Enter after each NTP server IP address or use a comma
,to separate them in the box. Once entered, you can remove an NTP server by selecting the x.Note
Default and custom NTP settings are only used during the bootstrap process on startup. Once connectivity is established, the Data Collector synchronizes time via the XDR backend connection. The NTP server value will be reflected as
ntp.collectorin the Admiral console once the connection is established.- DHCP or Static — Select whether the collector uses DHCP requirements or specify your own static IP requirements.
-
Select Create Collector.

Create Collector Tip
To add the eStreamer app to the collector to retrieve all security event logs from your Cisco Firepower Threat Defense (FTD) device, see eStreamer App. For more information, see the Cisco FTD Firewall guide.
-
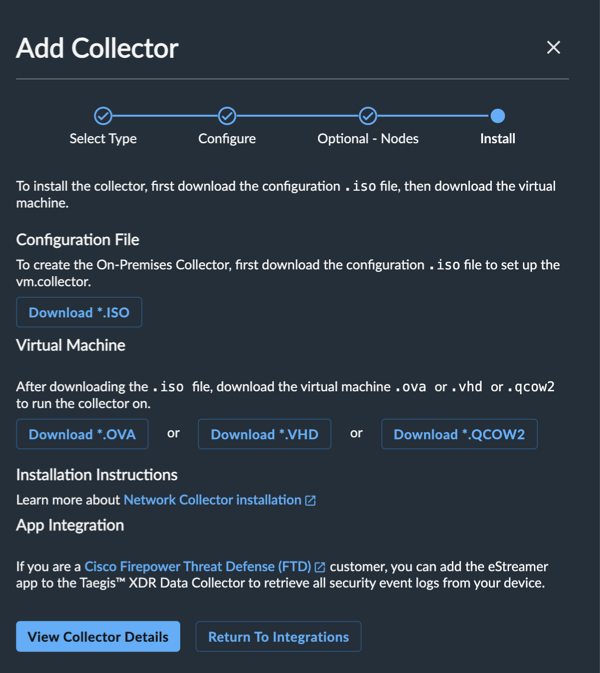
The Install Collector modal displays the following files available for download:
- An
.isothat contains the configuration files for your collector. - An
.ovathat is the virtual machine that the collector will run in. - A
.vhd, which is a .zip collection (downloaded filename is:ctpx-collector.zip) of Microsoft HyperV disk images. This is an alternative to the.ovafile. - A
.qcow2, the virtual disk preferred for Nutanix collectors.
- An
Save these files; you’ll use them during the installation process described below.
Installation🔗
The On-Premises Data Collector is a virtual machine appliance that must be installed in your hypervisor environment in order to collect data and transmit it to the XDR Infrastructure. It can be preconfigured and downloaded in XDR from Integrations > Data Collectors and installed in vsphere, hyperv, or nutanix environments. Once the appropriate information is provided, the collector will be customized, built, and configured to DHCP or static IP addressing depending on your selection.
Note
Recommended virtual environment versions for the XDR On-Premises Data Collector are vSphere ESXi 6.7 or later or Hyper-V 8.0 in Windows Server 2016 or later.
Once complete, an .iso cdrom image containing your client certificate/credentials and disk image in the form of .ova (vsphere) or .vhdx (hyper-v) will be available for download from XDR. You will be required to attach the .iso (cdrom image) to the collector VM on boot.
Once booted the appliance registers with XDR and the status of the connection will be displayed in the XDR Console.
Data Collection and Network Access Requirements🔗
The following is a reference architecture for data collection and provides an overview of the collector’s network access requirements.
Regions
Some configuration specifics of XDR depend on the region you are deployed in (US1, US2, US3, EU1, EU2).

The collector acts by default as a Syslog forwarder and collects security log data. All logs that are sent to the collector will be collected and transmitted using rapid batching to the XDR infrastructure. The collector listens and transmits data on the following ports, and you must allow access from inside your organization to outside on the following hostname and ports.
Note
All Syslog data is forwarded to XDR by way of a secure mTLS connection using TLS 1.3.
Taegis™ XDR Collectors forward Syslog data in batches. The frequency is optimized according to batch size and time since last forward.
Hostname and port configurations are as follows:
Outbound https on Port 443 — TCP🔗
XDR API🔗
- US1—
collector.ctpx.secureworks.com - US2—
collector.delta.taegis.secureworks.com - EU1—
collector.echo.taegis.secureworks.com - US3—
collector.foxtrot.taegis.secureworks.com - EU2—
collector.golf.taegis.secureworks.com
NTP servers: 123/UDP Outbound🔗
The XDR On-Premises Data Collector uses the following standard NTP servers:
- 0.pool.ntp.org
- 1.pool.ntp.org
- 2.pool.ntp.org
- 3.pool.ntp.org
Note
Windows DC servers cannot serve as NTP servers for non-domain hosts such as the On-Premises Data Collector.
Inbound—Syslog🔗
- 514 - UDP
- 601 - TCP
Outbound Device APIs🔗
- 443 - TCP
Connectivity Requirements for Data Collectors🔗
Note
Some configuration specifics of XDR depend on the region you are deployed in (US1, US2, US3, EU1, EU2).
Any device that uses its own SSL certificate, including Cloud-based and On-Premises Data Collectors, must safelist the following destination IP addresses or domains in order to avoid conflict. If using an AWS data collector, please refer to the AWS table.
For Most Data Collectors🔗
| Source | Destination | Port/Protocol | Notes |
|---|---|---|---|
| Data Collector IP or hostname | US1collector.ctpx.secureworks.com18.217.45.178/32 3.16.4.173/32 18.224.219.97/32 13.59.146.90/32 3.16.16.254/32 18.223.74.238/32 US2collector.delta.taegis.secureworks.com52.14.113.127/32 3.141.73.137/32 3.136.78.106/32 US3collector.foxtrot.taegis.secureworks.com44.229.101.49 35.166.77.47 34.214.135.78 EU1collector.echo.taegis.secureworks.com18.158.143.139/32 35.159.14.37/32 52.59.37.234/32 EU2collector.golf.taegis.secureworks.com54.217.251.111/32 54.194.78.20/32 52.50.215.147/32 |
TCP/443 | Safelisting device access to XDR |
| Data Collector IP or hostname | NTP severs IP/Hostnames provided during provisioning | UDP/123 | Safelisting device access to NTP servers This rule is only necessary when custom NTP servers are provided during provisioning. |
| Data Collector IP or hostname | 0.pool.ntp.org 1.pool.ntp.org 2.pool.ntp.org 3.pool.ntp.org |
UDP/123 | Safelisting device access to default NTP server. This rule is only necessary when custom NTP servers are not provided during provisioning. |
| Data Collector IP or hostname | DNS server IPs provided during provisioning | UDP/53 TCP/53 |
Safelisting device access to DNS servers |
Note
If using local NTP, the access must be safelisted both to and from the data collector on those networks.
For AWS Data Collectors🔗
| Source | Destination | Port/Protocol | Notes |
|---|---|---|---|
| AWS Data Collector IP or hostname | US1collector.ctpx.secureworks.com18.217.45.178/32 3.16.4.173/32 18.224.219.97/32 13.59.146.90/32 3.16.16.254/32 18.223.74.238/32 US2collector.delta.taegis.secureworks.com52.14.113.127/32 3.141.73.137/32 3.136.78.106/32 US3collector.foxtrot.taegis.secureworks.com44.229.101.49 35.166.77.47 34.214.135.78 EU1collector.echo.taegis.secureworks.com18.158.143.139/32 35.159.14.37/32 52.59.37.234/32 EU2collector.golf.taegis.secureworks.com54.217.251.111/32 54.194.78.20/32 52.50.215.147/32 |
TCP/443 | Safelisting device access to Taegis XDR via hostname |
| AWS Data Collector IP or hostname | NTP severs IP/Hostnames provided during provisioning | UDP/123 | Safelisting device access to NTP servers This rule is only necessary when custom NTP servers are provided during provisioning. |
| AWS Data Collector IP or hostname | 169.254.169.123 | UDP/123 | Safelisting device access to default NTP server. This rule is only necessary when custom NTP servers are not provided during provisioning. |
| AWS Data Collector IP or hostname | DNS server IPs provided during provisioning | UDP/53 TCP/53 |
Safelisting device access to DNS servers |
Proxy Support🔗
Cloud-based and On-Premises Data Collectors attempt to discover local proxy settings on the host if they are unable to connect directly to the internet.
Cloud-based and On-Premises Data Collectors also support a hard-coded proxy. If you need to create a data collector that contains a hard-coded proxy, please submit a support request with the following required information:
- Proxy IP
- Proxy Port
If the proxy is configured but is unavailable or not reachable, the data collector will fall back to a direct connection.
Note
Cloud-based and On-Premises Data Collectors do not support hard-coded authenticated proxies at this time. A proxy with man in the middle (MITM) capability needs to safelist the above network connections.
Spool Log Cache🔗
A 200GB spool log holds data when the forwarding connection to XDR is slowed or temporarily unavailable.
Virtual Machine Requirements🔗
Important
Data Collectors only support x86-64-v2 micro-architecture level. The x86-64-v2 micro-architecture defines specific features on top of the x86-64 baseline architecture that is found on most modern CPUs that have a feature level matching the 2008 Intel Nehalem architecture. These features provide compile-time optimizations for increased speed and performance. Virtual Machine configurations that do not meet this requirement will fail to boot.
Virtual Machine Requirements:
- 4 vCPUs at 2Ghz or greater
- 20GB root disk
- 200GB secondary data disk
- 8GB of Memory
Configuration🔗
XDR steps you through collector configuration and provides an .iso with credentials and configuration for the collector and an .ova virtual image that you then deploy in your environment.
Set Up On-Premises Data Collector with vSphere🔗
The following steps guide you through installation of the XDR On-Premises Data Collector. It is assumed you have the preconfigured ISO and OVA files on hand. If you still need those, navigate to Integrations > Data Collectors in XDR or contact your XDR representative.
Install the On-Premises Data Collector on VMware vSphere🔗
-
Make sure you have the
.isoand.ovafiles you need to run the collector appliance. You can preconfigure and download those in XDR from Integrations > Data Collectors. -
Connect to your vSphere Web Console.
-
Navigate to Virtual Machines and select Create / Register VM.
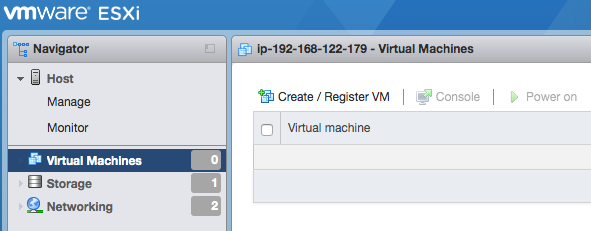
Create or Register a VM -
From Select Creation Type, select Deploy a virtual machine from an OVF or OVA file.
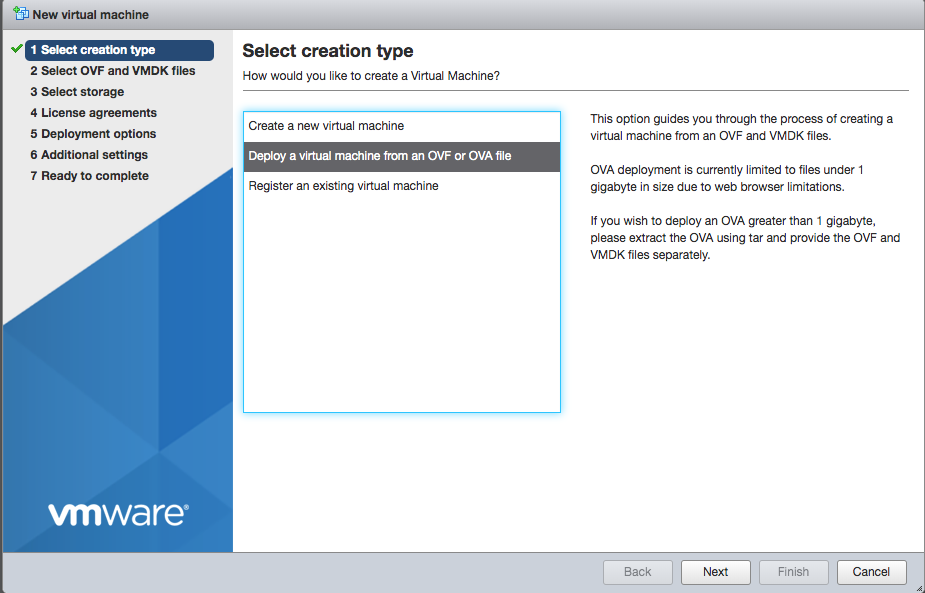
Select Creation Type -
Give your new VM a name such as
taegis-xdr-collectorand then select the.ovafile you downloaded from the XDR integration manager (see Step 1 above).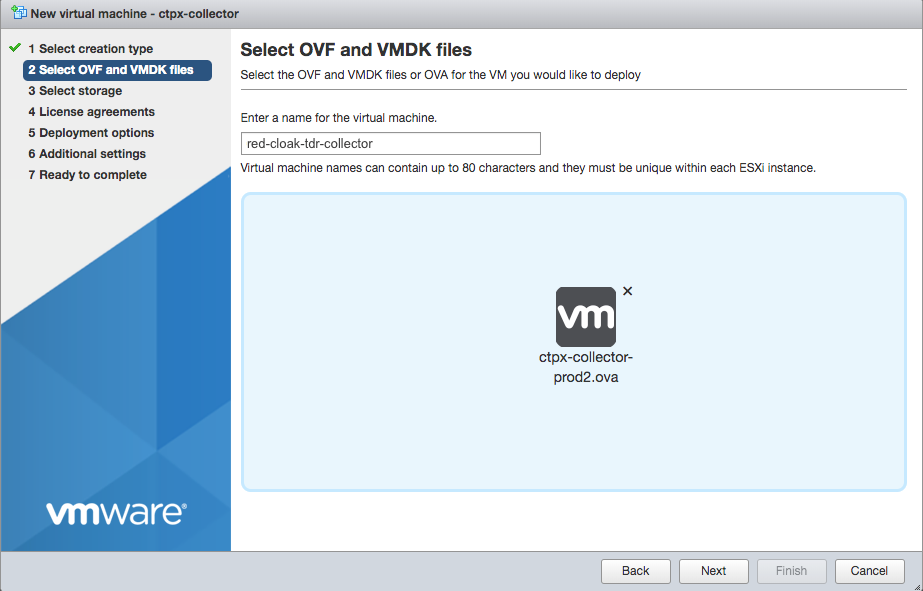
Select XDR .ova File -
Select the appropriate datastore where you want to store the VM’s disk images.
Important
Choose a datastore with at least 220GB of free space for the VM. 20GB is needed for the primary and 200GB for the secondary drive.
-
Choose your preferred network and disk configurations.
- Review the configuration and then select Finish.
-
Navigate to Storage and choose Datastore Browser.
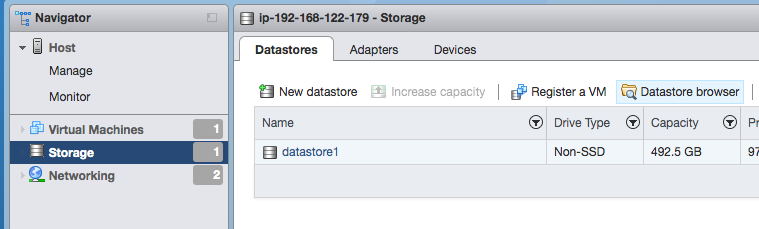
Select Datastore Browser -
Select the datastore where you want to store the XDR On-Premises Data Collector configuration
.iso(see Step 1). - Click Upload and select the configuration
.iso. -
Navigate back to Virtual Machines, and right-click the VM to bring up the context menu. Choose Edit Settings from the context menu.
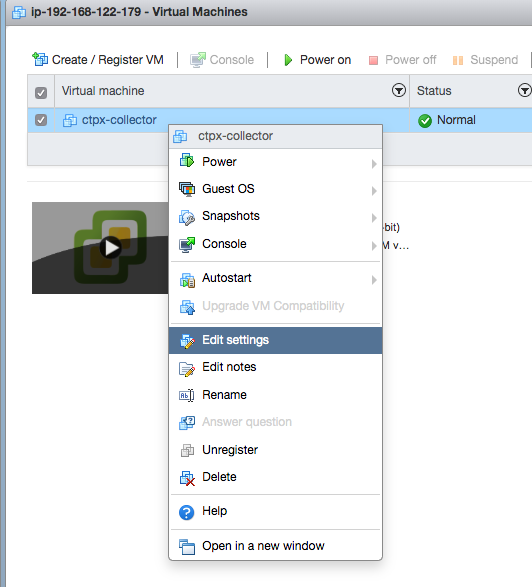
Edit Settings -
Change the CDROM device from Client Device to Datastore ISO File.

Select Datastore .iso -
The Datastore Browser opens. From there select the
.isoyou uploaded in Step 11 and click Save to finalize the changes. -
The VM is now ready to be powered on.
Note
When deploying an onsite collector the .ISO must be mounted at first boot to configure the XDR Collector. After the XDR Collector shows "READY" in XDR, the .ISO can be dismounted.
Set Up On-Premises Data Collector with Hyper-V🔗
The following steps guide you through installation of the XDR On-Premises Data Collector using a Hyper-V environment. It is assumed you have the ctpx_collector.zip file on hand. If you still need that, navigate to Integrations > Data Collectors in XDR or contact your XDR representative.
Install the On-Premises Data Collector on Hyper-V🔗
-
It is assumed you have the
ctpx_collector.zipfile on hand. If you still need that, navigate to Integrations > Data Collectors in XDR or contact your XDR representative. Unzip thectpx_collector.zipfile downloaded from XDR On-Premises Data Collector when you created your On-Premises Data Collector.Tip
Place
ctpx_collector.vhdxandctpx-collector-disk2.vhdxin the same folder with thectpx-collector.isoas it needs to be mounted to the CD drive on the Hyper-V machine.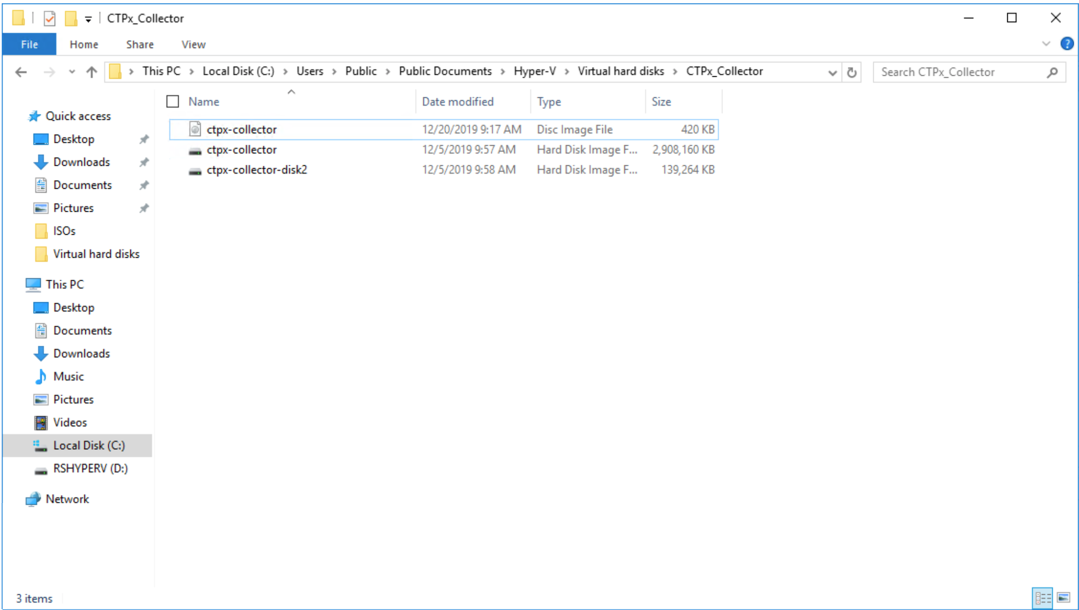
Unzip your ctpx-collector download -
Open the Hyper-V Manager and select New, then select Virtual Machine... from the context popup in the upper right pane.
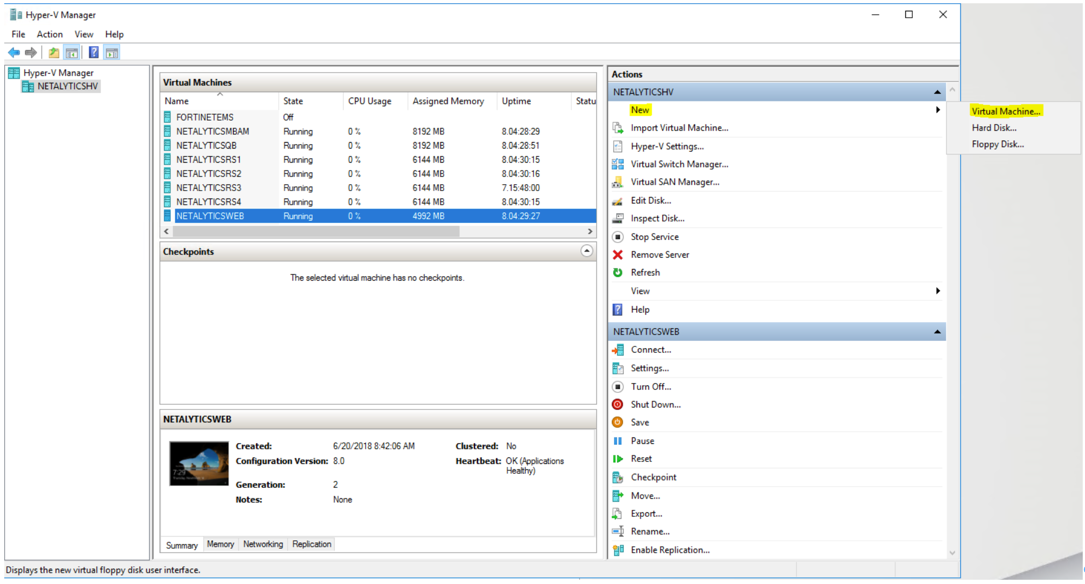
Create a New Virtual Machine -
The New Virtual Machine Wizard displays. Select Next.
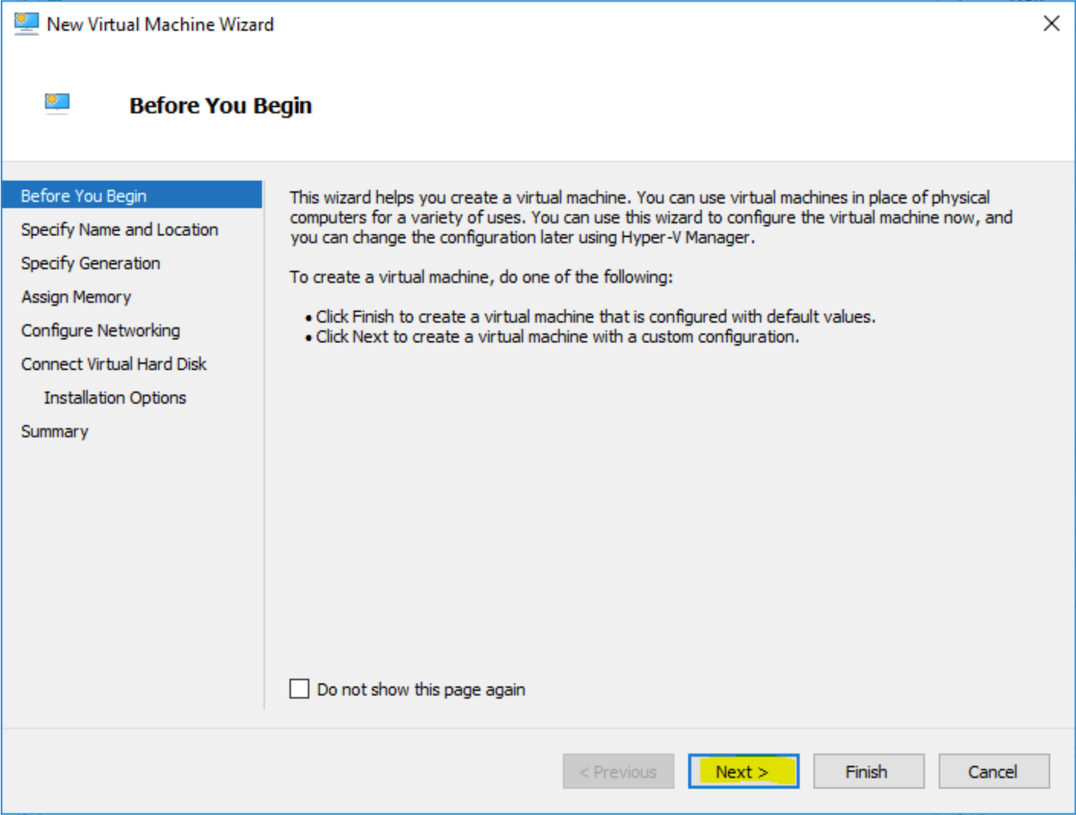
Virtual Machine Wizard The Specify Name and Location dialog displays.
-
Specify a name for the Virtual Machine then select Next.
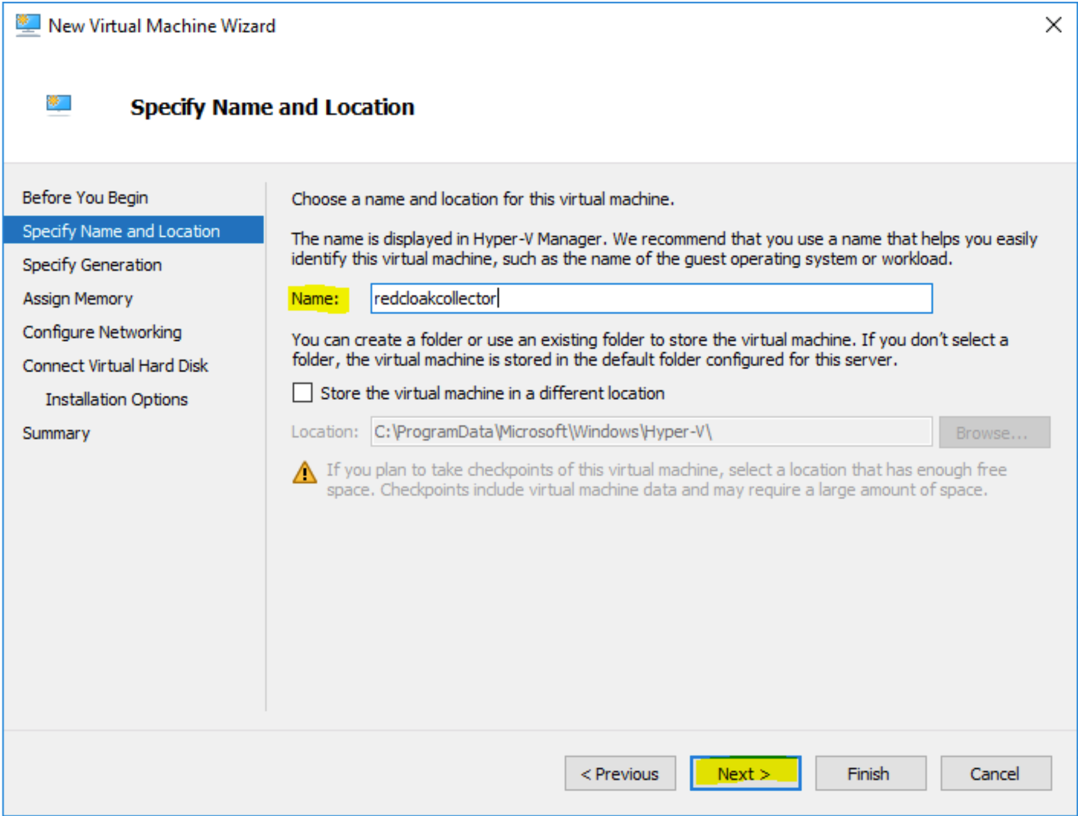
Virtual Machine Name The Specify Generation dialog displays.
-
Choose Generation 1 then select Next.
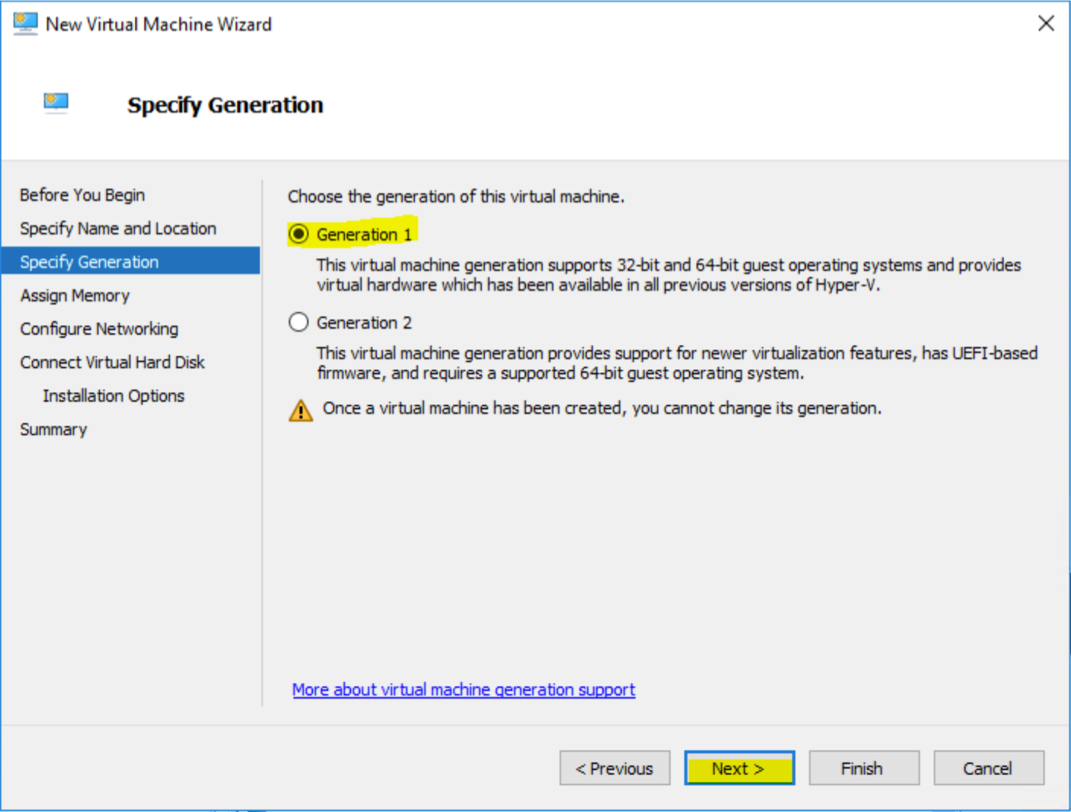
Specify Generation The Assign Memory dialog displays.
-
Assign memory (see Virtual Machine Requirements above for recommended settings) and select Next.
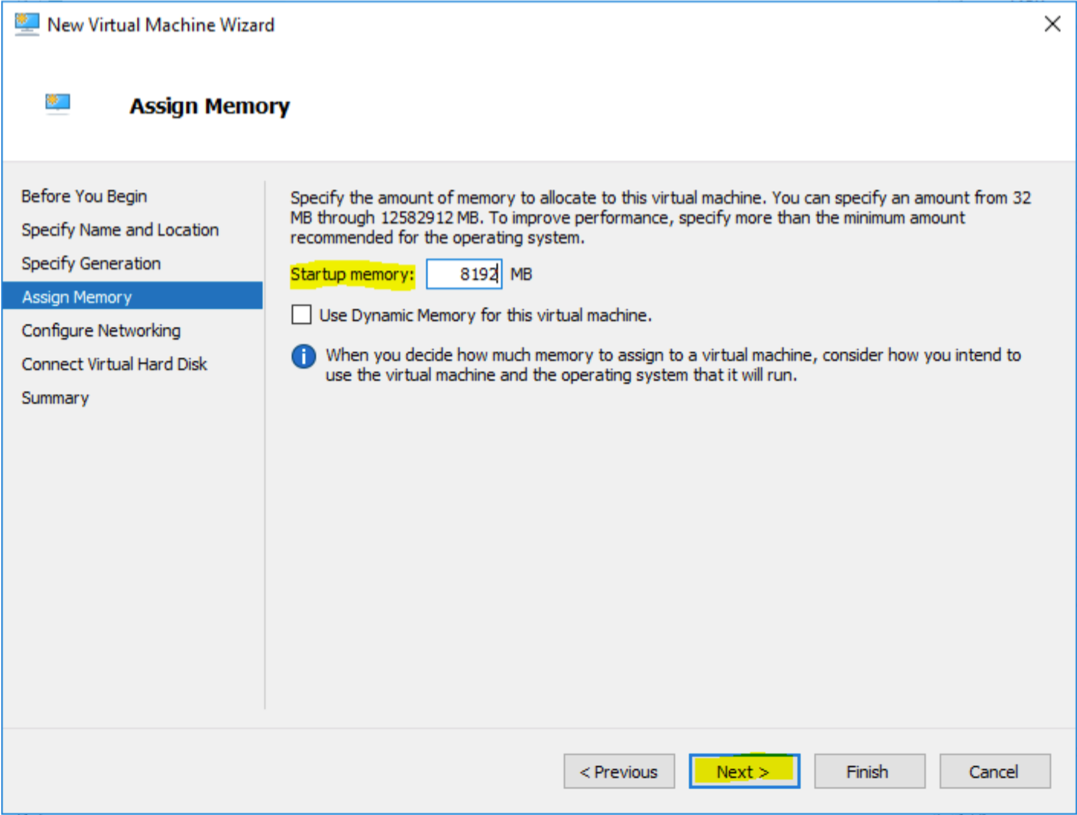
Assign Memory The Configure Networking dialog displays.
-
Choose the network adapter you are going to use with the virtual machine, then select Next.
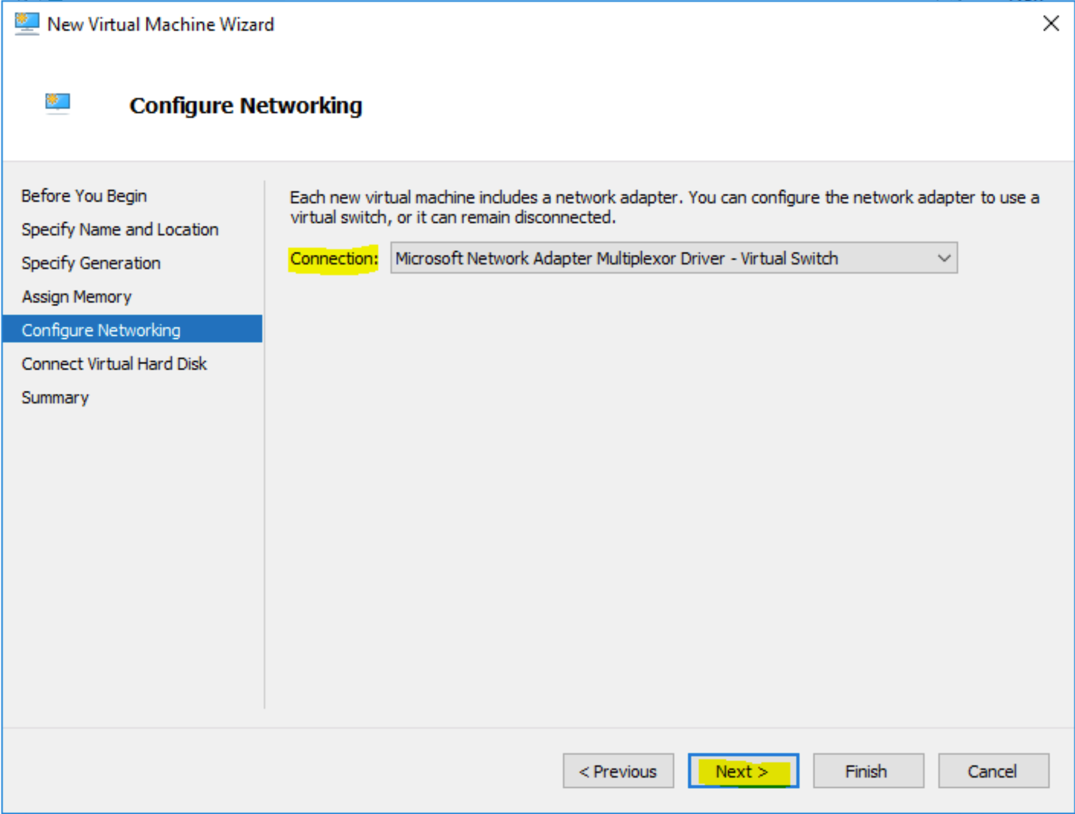
Configure Networking The Connect Virtual Hard Disk dialog displays.
-
Select Use an existing virtual hard disk and then browse to the location you chose in Step 1. Choose the
ctpx-collector.vhdxfile, then select Next.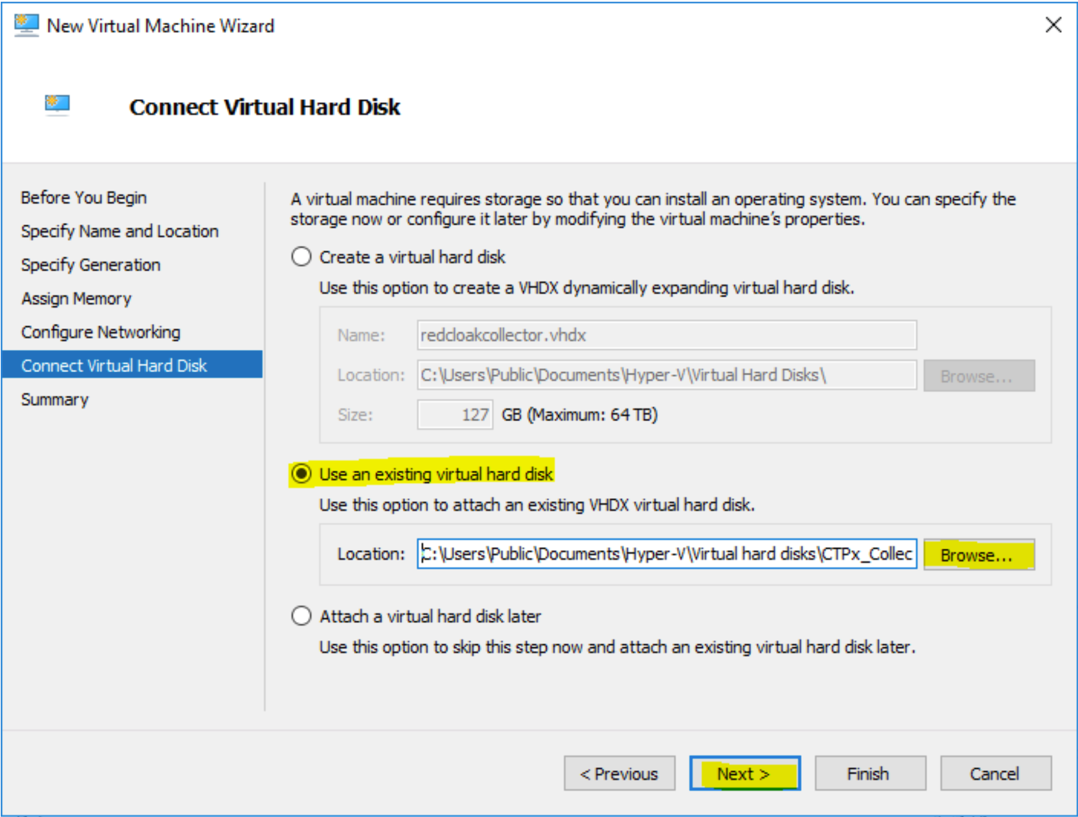
Connect Virtual Hard Disk The Completing the New Virtual Machine Wizard dialog displays.
-
Review the summary information and click Finish.
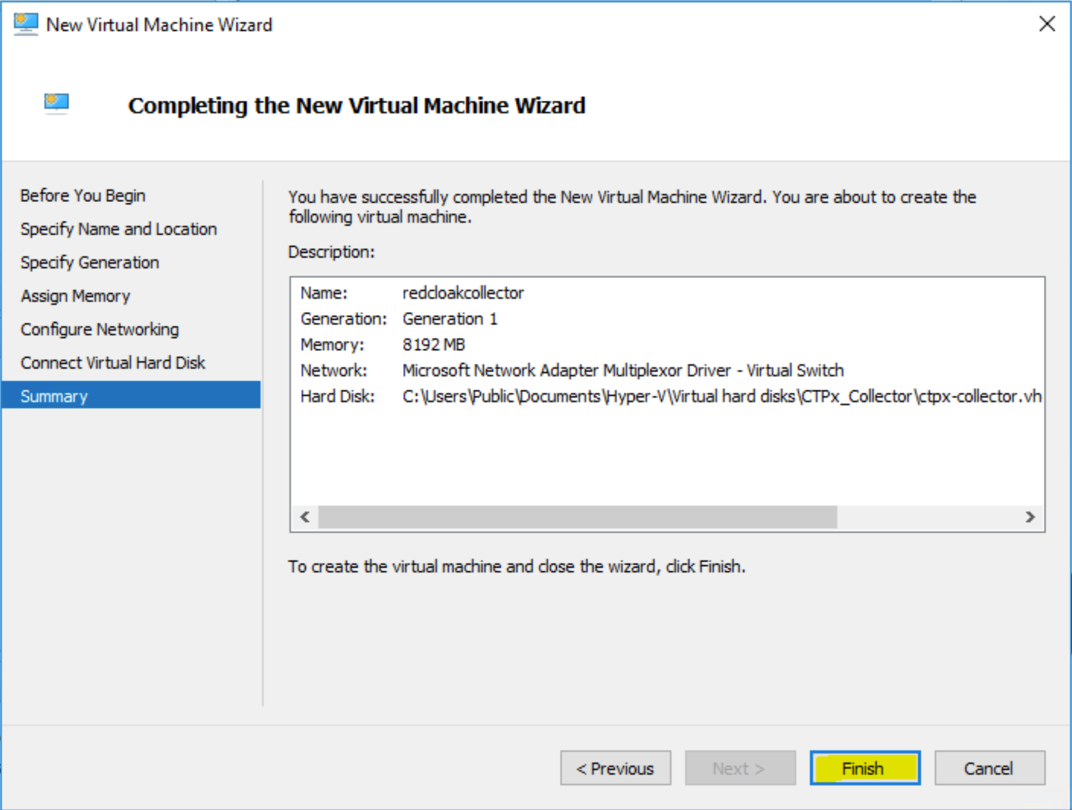
Completing the New Virtual Machine Wizard -
From the Hyper-V Manager, select the virtual machine in the Virtual Machines pane (upper center), then select Settings in the lower right pane.
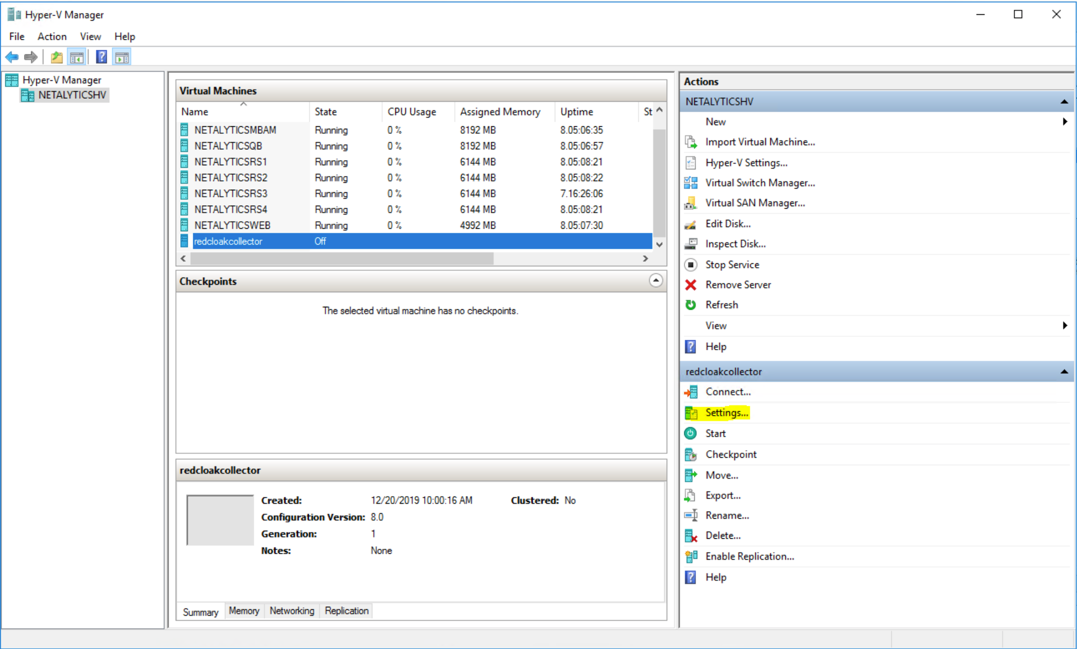
Hyper-V Manager -
Select Processor from the Settings menu in the upper left-hand pane (see Virtual Machine Requirements above for recommended settings). Do NOT select OK or Apply at this step.
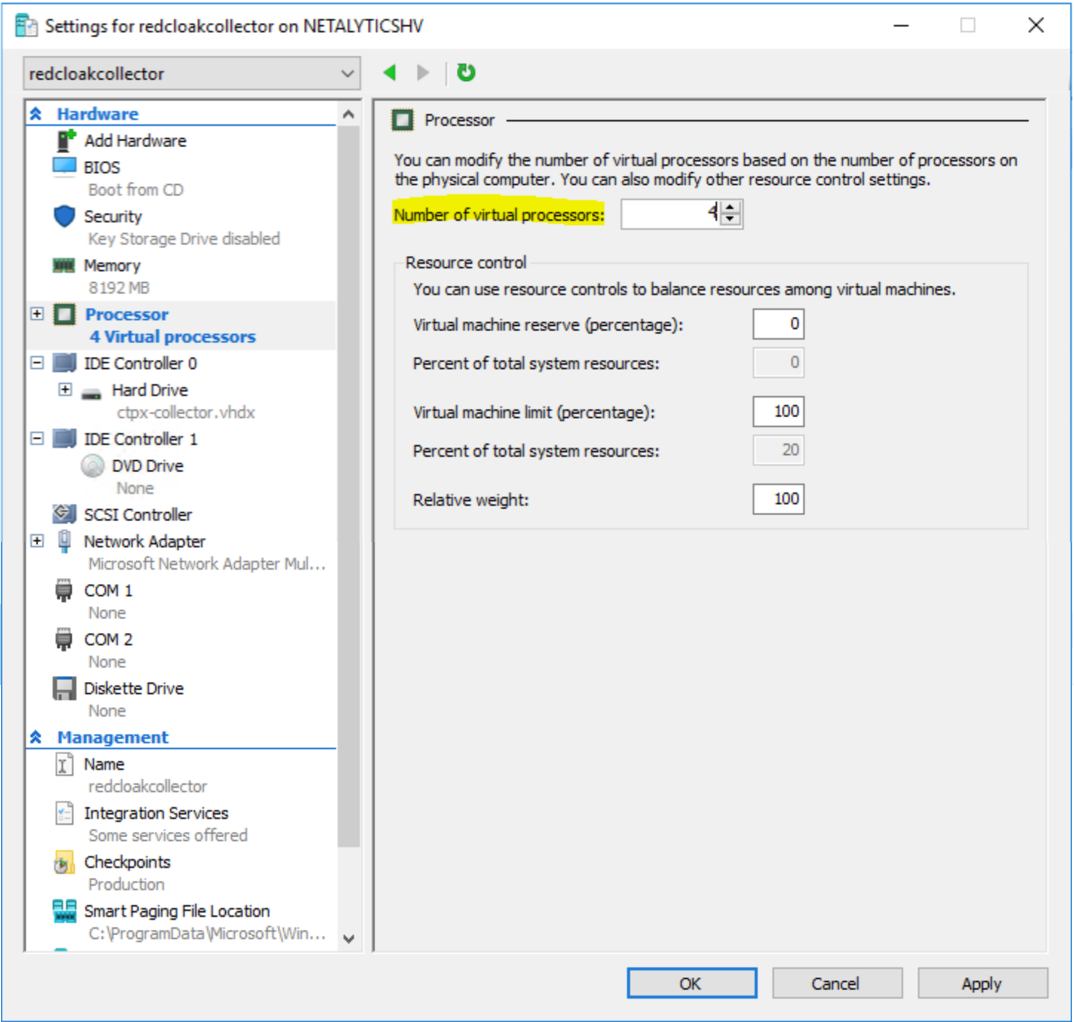
Hyper-V Processor -
Next, open IDE Controller 0 right below Processor. The IDE Controller details display in the right-hand pane.
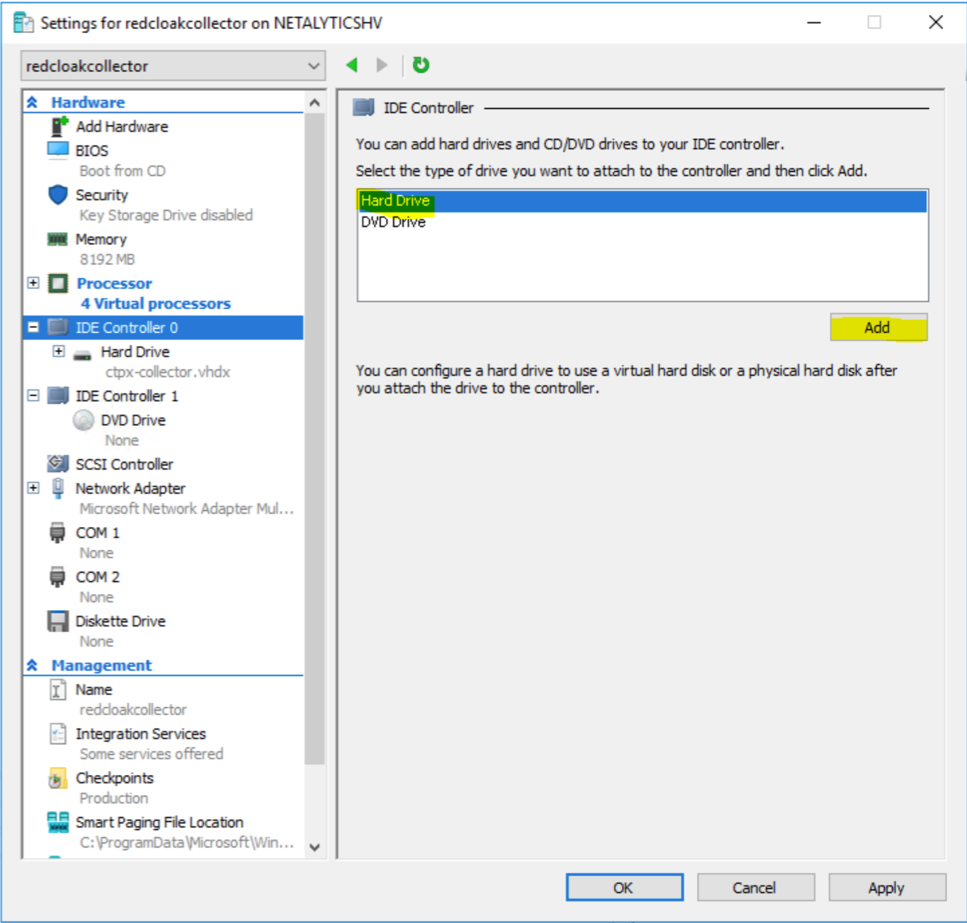
IDE Controller 0 Choose Hard Drive then select Add.
-
Another Hard Drive appears under IDE Controller 0 in the left pane; it should be automatically selected. Select Browse..., navigate to the folder from Step 1, and choose ctpx-collector-disk2.vhdx. Do NOT select OK or Apply at this step.
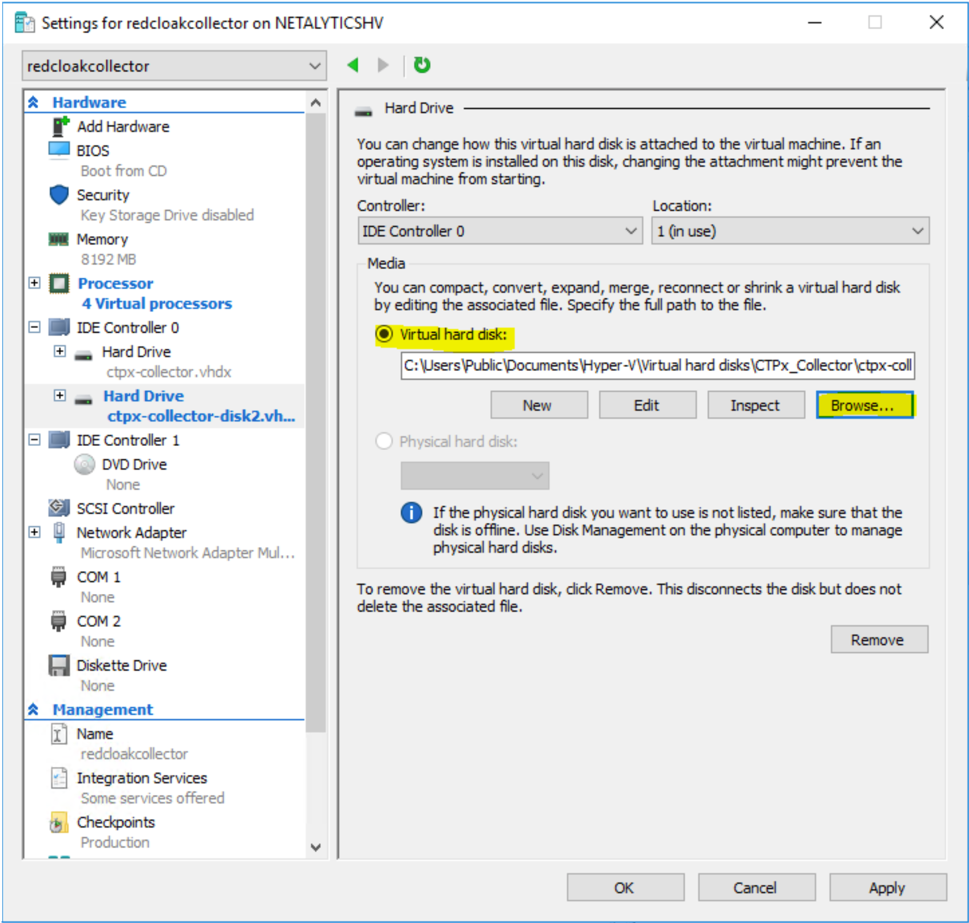
Second Hard Drive -
Click on DVD Drive under IDE Controller 1 in the upper left pane. Choose Image file:, then Browse, navigate to the folder from Step 1, and choose
ctpx-collector.iso. Do NOT select OK or Apply at this step.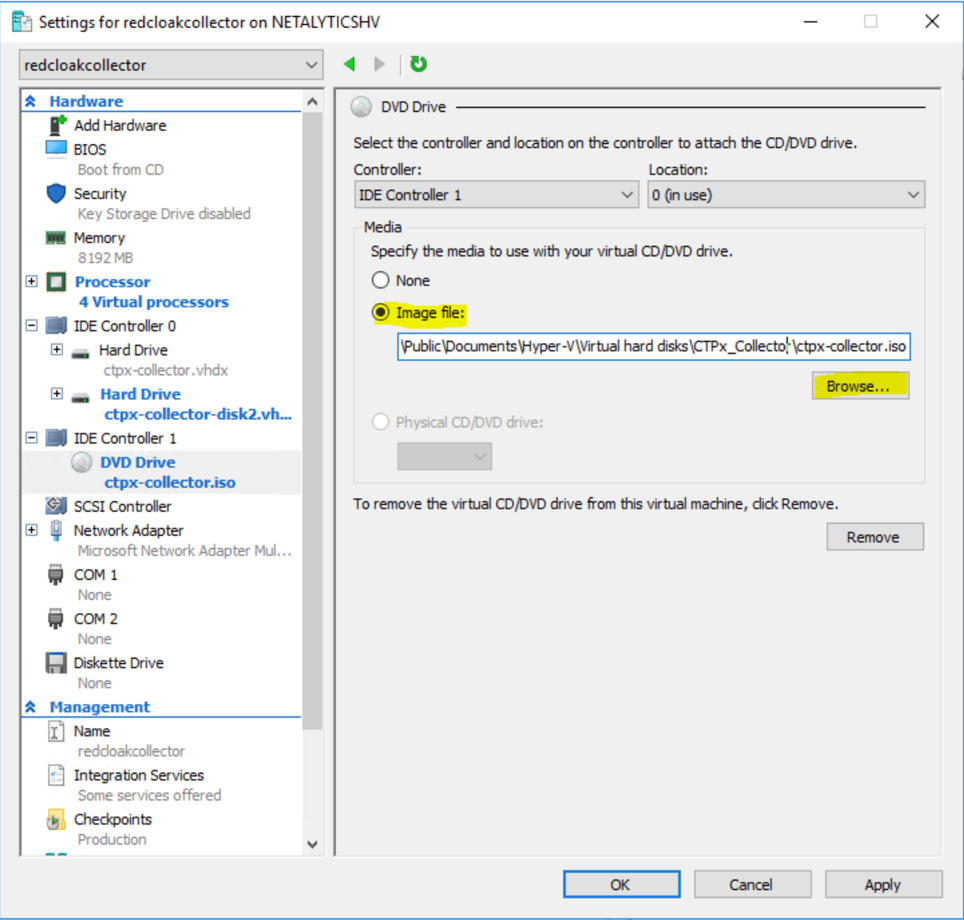
ctpx-collector.iso -
Review the Processor, IDE Controller 0, and IDE Controller 1 entries on the left pane. Verify the following selections:
Processor - 4 Virtual processors
IDE Controller 0 - Hard Drive—
ctpx-collector.vhdx- Hard Drive—ctpx-collector-disk2.vhdxIDE Controller 1 - DVD Drive—ctpx-collector.iso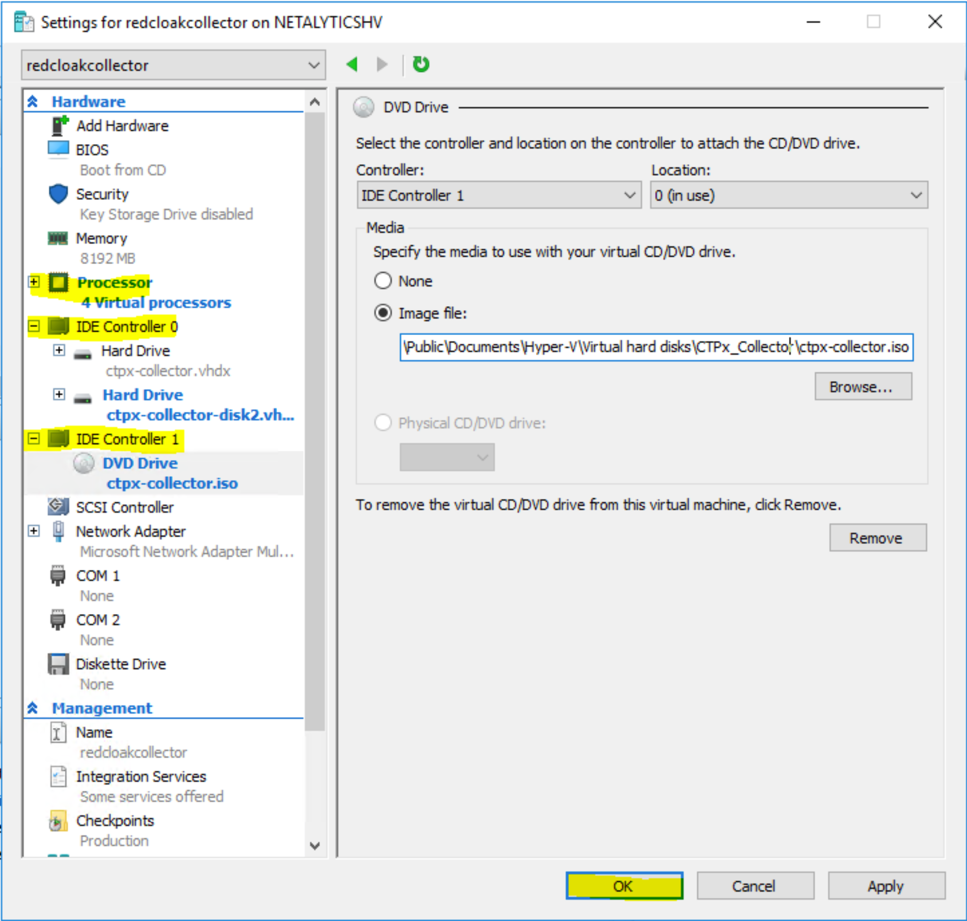
Verify Settings Once verified, click on OK. The Settings menu closes.
-
Select the virtual machine on under Virtual Machines in the Hyper-V Manager, right-click or otherwise bring up the context menu, and select Start.
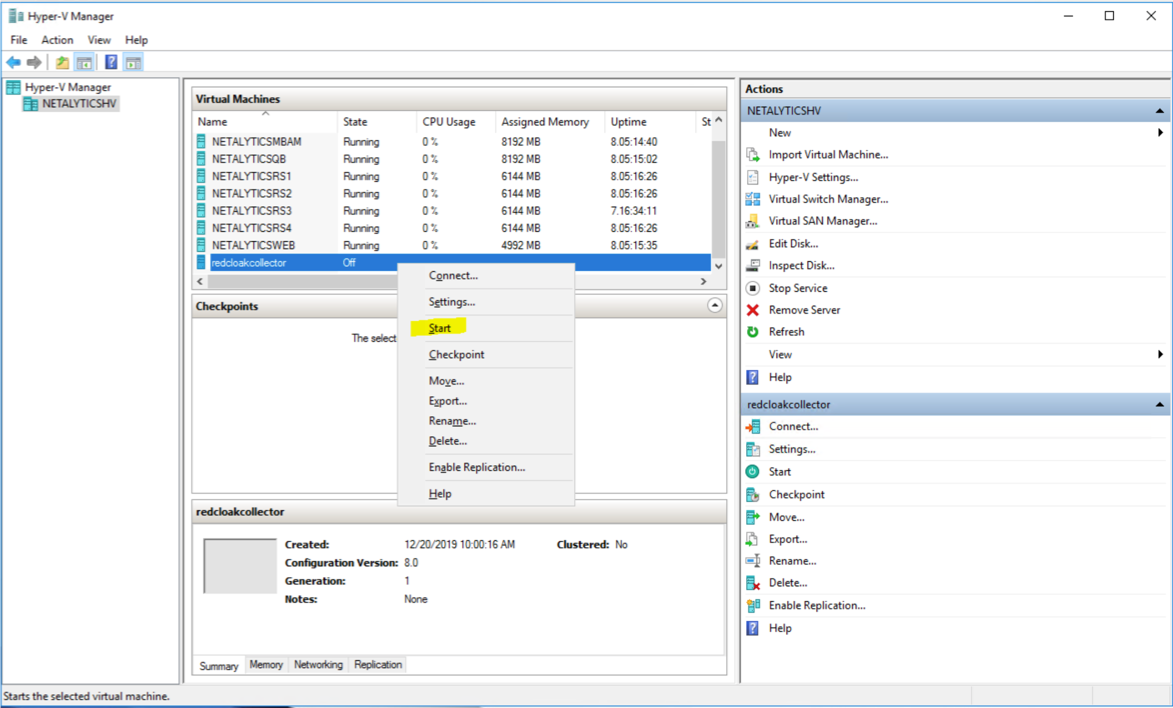
Start -
The XDR On-Premises Data Collector is now running.
Set Up On-Premises Data Collector with Nutanix🔗
The following steps guide you through installation of the XDR On-Premises Data Collector in a Nutanix environment. It is assumed you have downloaded the .qcow2 disk, preferred for Nutanix collectors, and have the ctpx-collector-nutanix.zip file on hand. If you still need those, navigate to Integrations > Data Collectors in XDR or contact your XDR representative.
Install the On-Premises Data Collector on Nutanix Prism🔗
- It is assumed you have downloaded the
.qcow2disk, preferred for Nutanix collectors, and have thectpx-collector-nutanix.zipfile on hand. If you still need that, navigate to Integrations > Data Collectors in XDR or contact your XDR representative. - Unzip the
ctpx-collector-nutanix.zipfile downloaded from XDR On-Premises Data Collector when you created your On-Premises Data Collector. - Place
ctpx-collector.qcow2andctpx-collector-disk2.qcow2in the same folder with thectpx-collector.iso, as it needs to be mounted to the CD drive.
Upload Images files🔗
The disk image files and configuration ISO need to be uploaded to the Nutanix system using the Nutanix Web UI.
- Navigate to the Nutanix web console and log in.
- Select Settings from the top dropdown menu.
- Select Image Configuration from the left side Settings menu.
-
Select Upload Image and follow these steps:
- Enter a name for the image, such as
scwx-collector1. You will need this name in a later step. - Select DISK as the Image Type.
- Select Choose File to upload
ctpx-collector.qcow2and select Save.

Create Image One - Enter a name for the image, such as
-
Repeat the same for
ctpx-collector-disk2.qcow2with a name such asscwx-collector2. You will need this name in a later step.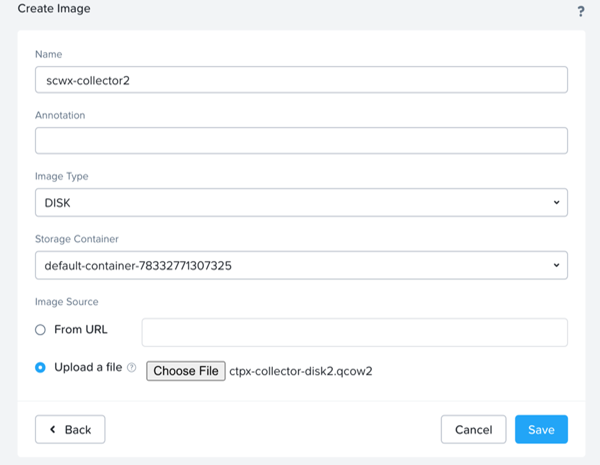
Create Image Two -
Repeat for the .iso file with a name such as
collector-isoand the Image Type as ISO.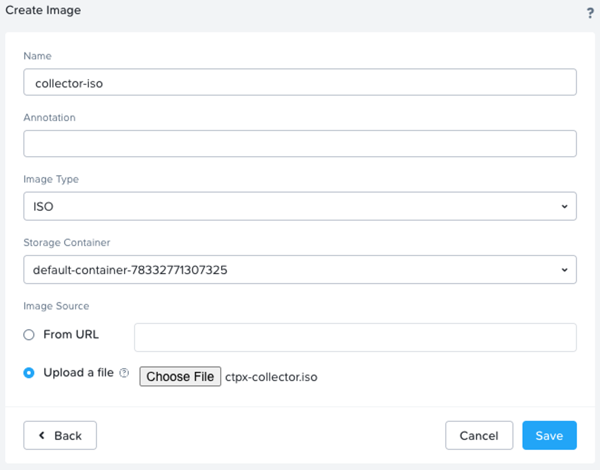
Create Image Three -
Once the upload is complete, all three files appear on the Image Configuration page.
Setting Up the VM🔗
- Select VM from the top dropdown menu of the web console.
- From the VM page, select + Create VM.
-
Enter the details of the VM:
- A Name, such as
Taegis-datacollector - Timezone = UTC
- vCPUs = 4
- Number of cores per vCPU = 1
- Memory = 8
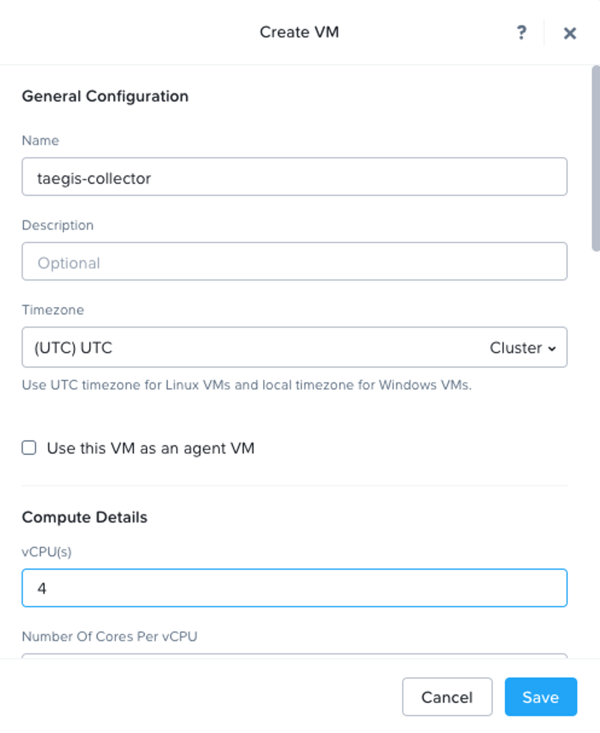
Create VM - A Name, such as
-
Scroll down to the Disks section and select the Edit pencil icon for the existing CD-ROM.
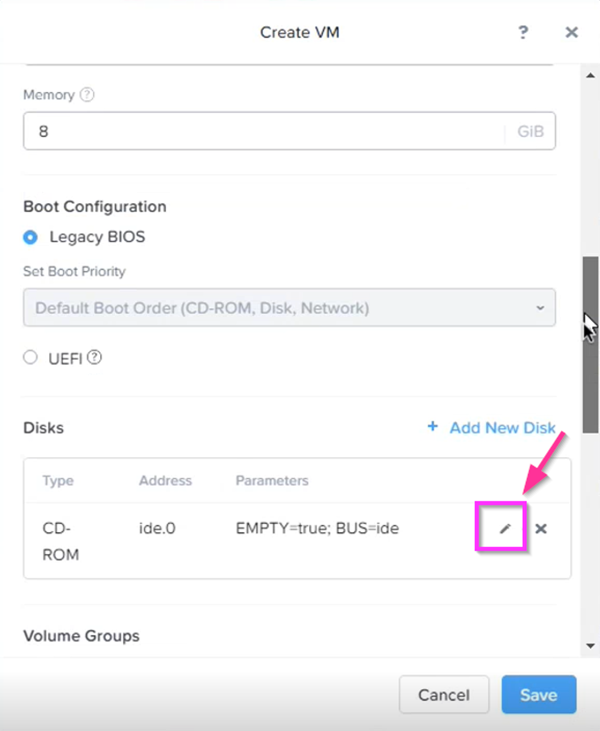
Edit Disk -
Modify the CD-ROM disk to use the .iso file as follows:
- Operation = Clone from Image Service
- Bus Type = IDE
- Image = collector-iso
- Select Update
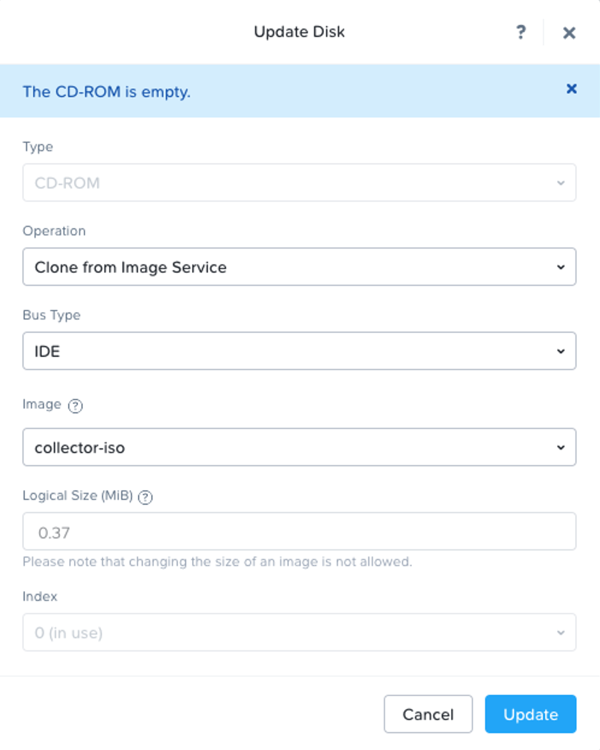
Update Disk -
Add the two additional disk images to the VM by clicking + Add New Disk.
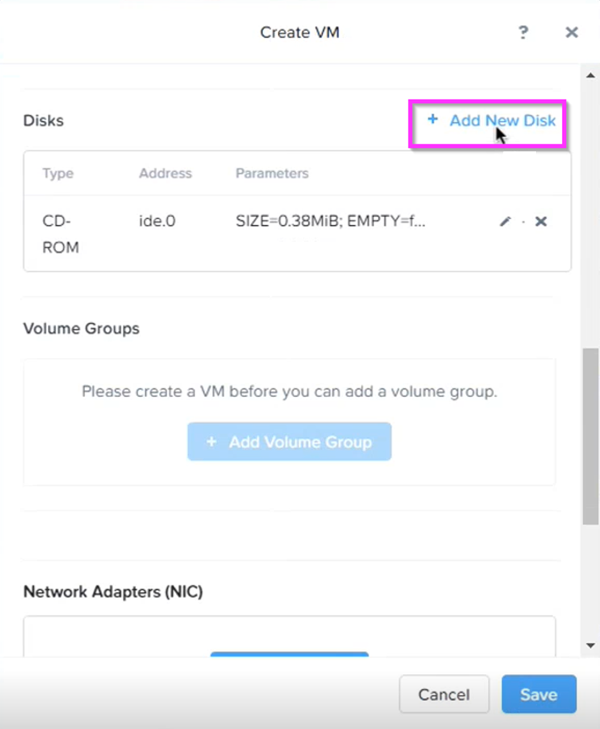
Add New Disk -
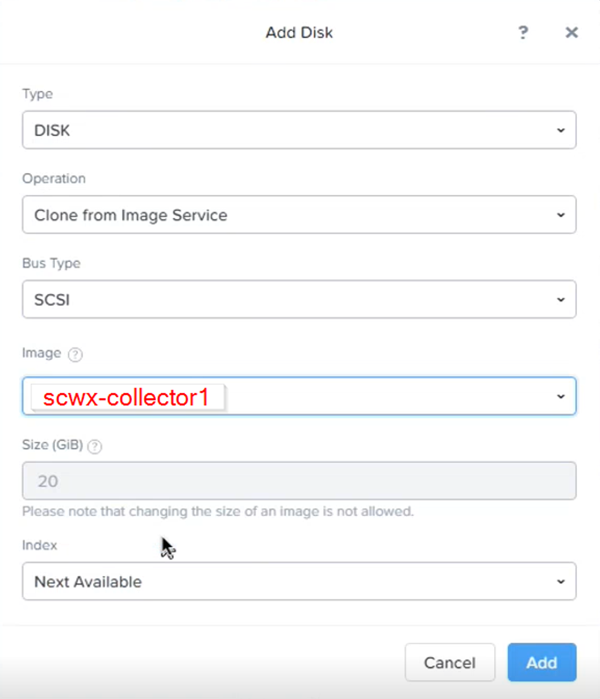
Add the first virtual disk file previously created, such as
scwx-collector1:- Type = DISK
- Operation = Clone from Image Service
- Bus Type = SCSI
- Image =
scwx-collector1or whatever you named ctpx-collector.qcow2 in the previous section - Select Add
Add First Virtual Disk -
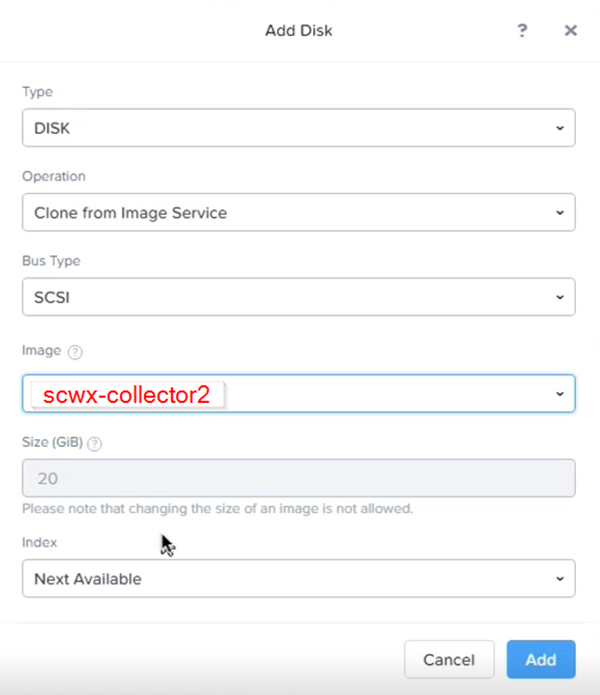
Repeat the previous step for the second disk file, such as
scwx-collector2:- Type = DISK
- Operation = Clone from Image Service
- Bus Type = SCSI
- Image =
scwx-collector2or whatever you named ctpx-collector-disk2.qcow2 in the previous section - Select Add
Add Second Virtual Disk -
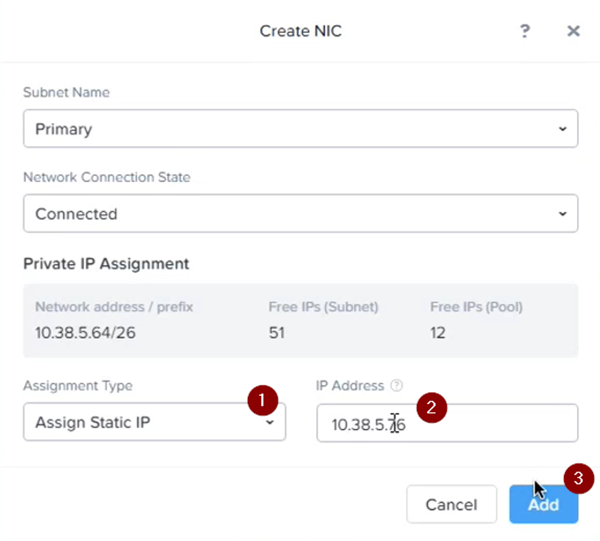
Scroll down to the Network Adapters (NIC) section, choose the network adapter you are going to use with the virtual machine. You can configure a network adapter by selecting + Add New NIC:
If Static IP is used to configure the collector, modify the Assignment Type to Assign Static IP, enter in the assigned IP address for this VM as defined during collector configuration, and select Add.
Static NIC If DHCP is used, use an appropriate subnet configured in the Nutanix portal that has DHCP enabled.
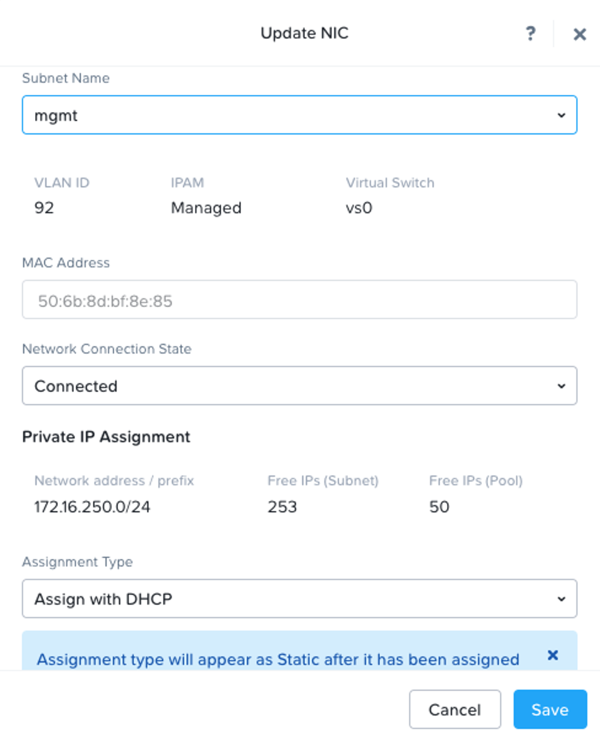
DHCP NIC -
Select Save and then Power On VM and your implementation is complete.

Power On VM
Access Troubleshooting Console🔗
The Admiral console allows you to access information about a deployed XDR Collector locally. The tools provided within Admiral assist in device setup and troubleshooting of common problems such as network connectivity.
For more information, see Admiral Console.
Edit Your XDR Collector Configuration🔗
Important
Making changes to the XDR On-Premises Data Collector configuration of a live system carries the risk of rendering the device inoperable. The XDR On-Premises Data Collector will make every attempt possible to rollback to the previous configuration when a configuration change is unsuccessful. XDR On-Premises Data Collector configuration changes should be treated with the same level of caution used for any other kind of change in your environment according to your risk and change management guidelines. You should always be prepared to redeploy the device.
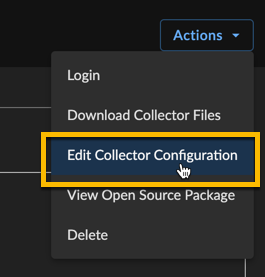
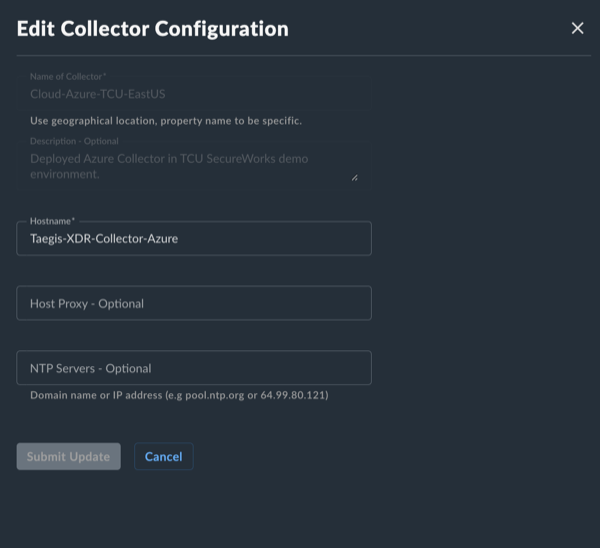
Certain configuration parameters of a running and healthy XDR On-Premises Data Collector can be changed on a live collector. To edit these parameters, select Actions and choose Edit Collector Configuration from a collector details page. Editable fields include the hostname, proxy settings, NTP server, and, for XDR On-Premises Data Collectors that have a static IP configuration, DNS servers. Modifications to the network interface configuration such as Static/DHCP, IP Address, Netmask, and Gateway are not editable fields on a XDR On-Premises Data Collector. If you require a change to the network interface configuration, it is required to provision a new XDR On-Premises Data Collector.
After submitting a XDR On-Premises Data Collector configuration change, a banner will appear to indicate that the change is pending and the edit action will no longer be available until the change has completed. The pending changes will be pushed to your XDR On-Premises Data Collector where they will be applied and connectivity testing conducted.

If the pending changes result in the XDR On-Premises Data Collector no longer able to successfully connect, the change will be rolled back to the previous configuration and a failure message will appear in the banner.

If the change is successful, you will receive a successful message in the banner once the change has completed.

In rare circumstances, it’s possible that the configuration change and rollback are both unsuccessful. Example scenarios include, but are not limited to, changes to the underlying network during the change or network connectivity failures to the backend during an inflight change. In these circumstances, you will see a failure banner and the XDR On-Premises Data Collector will need to be redeployed.

Once the change is complete, download the updated ISO for your records should you ever need to redeploy the XDR On-Premises Data Collector in the future. It is not necessary to attach the new ISO to the current running instance.

XDR Collector Frequently Asked Questions🔗
Do I need to take action to update the security of my XDR Collectors? What is the XDR Collectors patching process?
XDR Collectors update automatically and require no user intervention. Typically, XDR Collectors update every 24 hours based on the latest available published packages. If your collector is connected and healthy, it will automatically receive and apply these updates.
Are XDR Collectors configured with a secure baseline configuration?
Yes, XDR Collectors are designed utilizing DISA STIG guidelines.