Microsoft Azure Activity Log Integration Guide🔗
The following instructions are for configuring an integration of Azure Activity Logs to facilitate ingestion into Secureworks® Taegis™ XDR.
XDR supports two integration paths for Azure Activity Logs:
- (Preferred) Integrate via Azure Event Hubs — This option is preferred due to it providing the fastest and highest throughput of data, however it may incur additional costs to enable.
- Integrate via Azure Monitor API (REST) — This option provides equivalent data to event hubs, but due to the polling nature of a REST-based API in addition to Microsoft rate-limiting, there may be limitations with how quickly data can be collected. See Office 365 and Azure Data Availability for information on our polling practices.
Start Event Hub Integration🔗
Configure Azure Monitor Diagnostic Settings🔗
Follow the Microsoft instructions to enable Azure Monitor diagnostic settings:
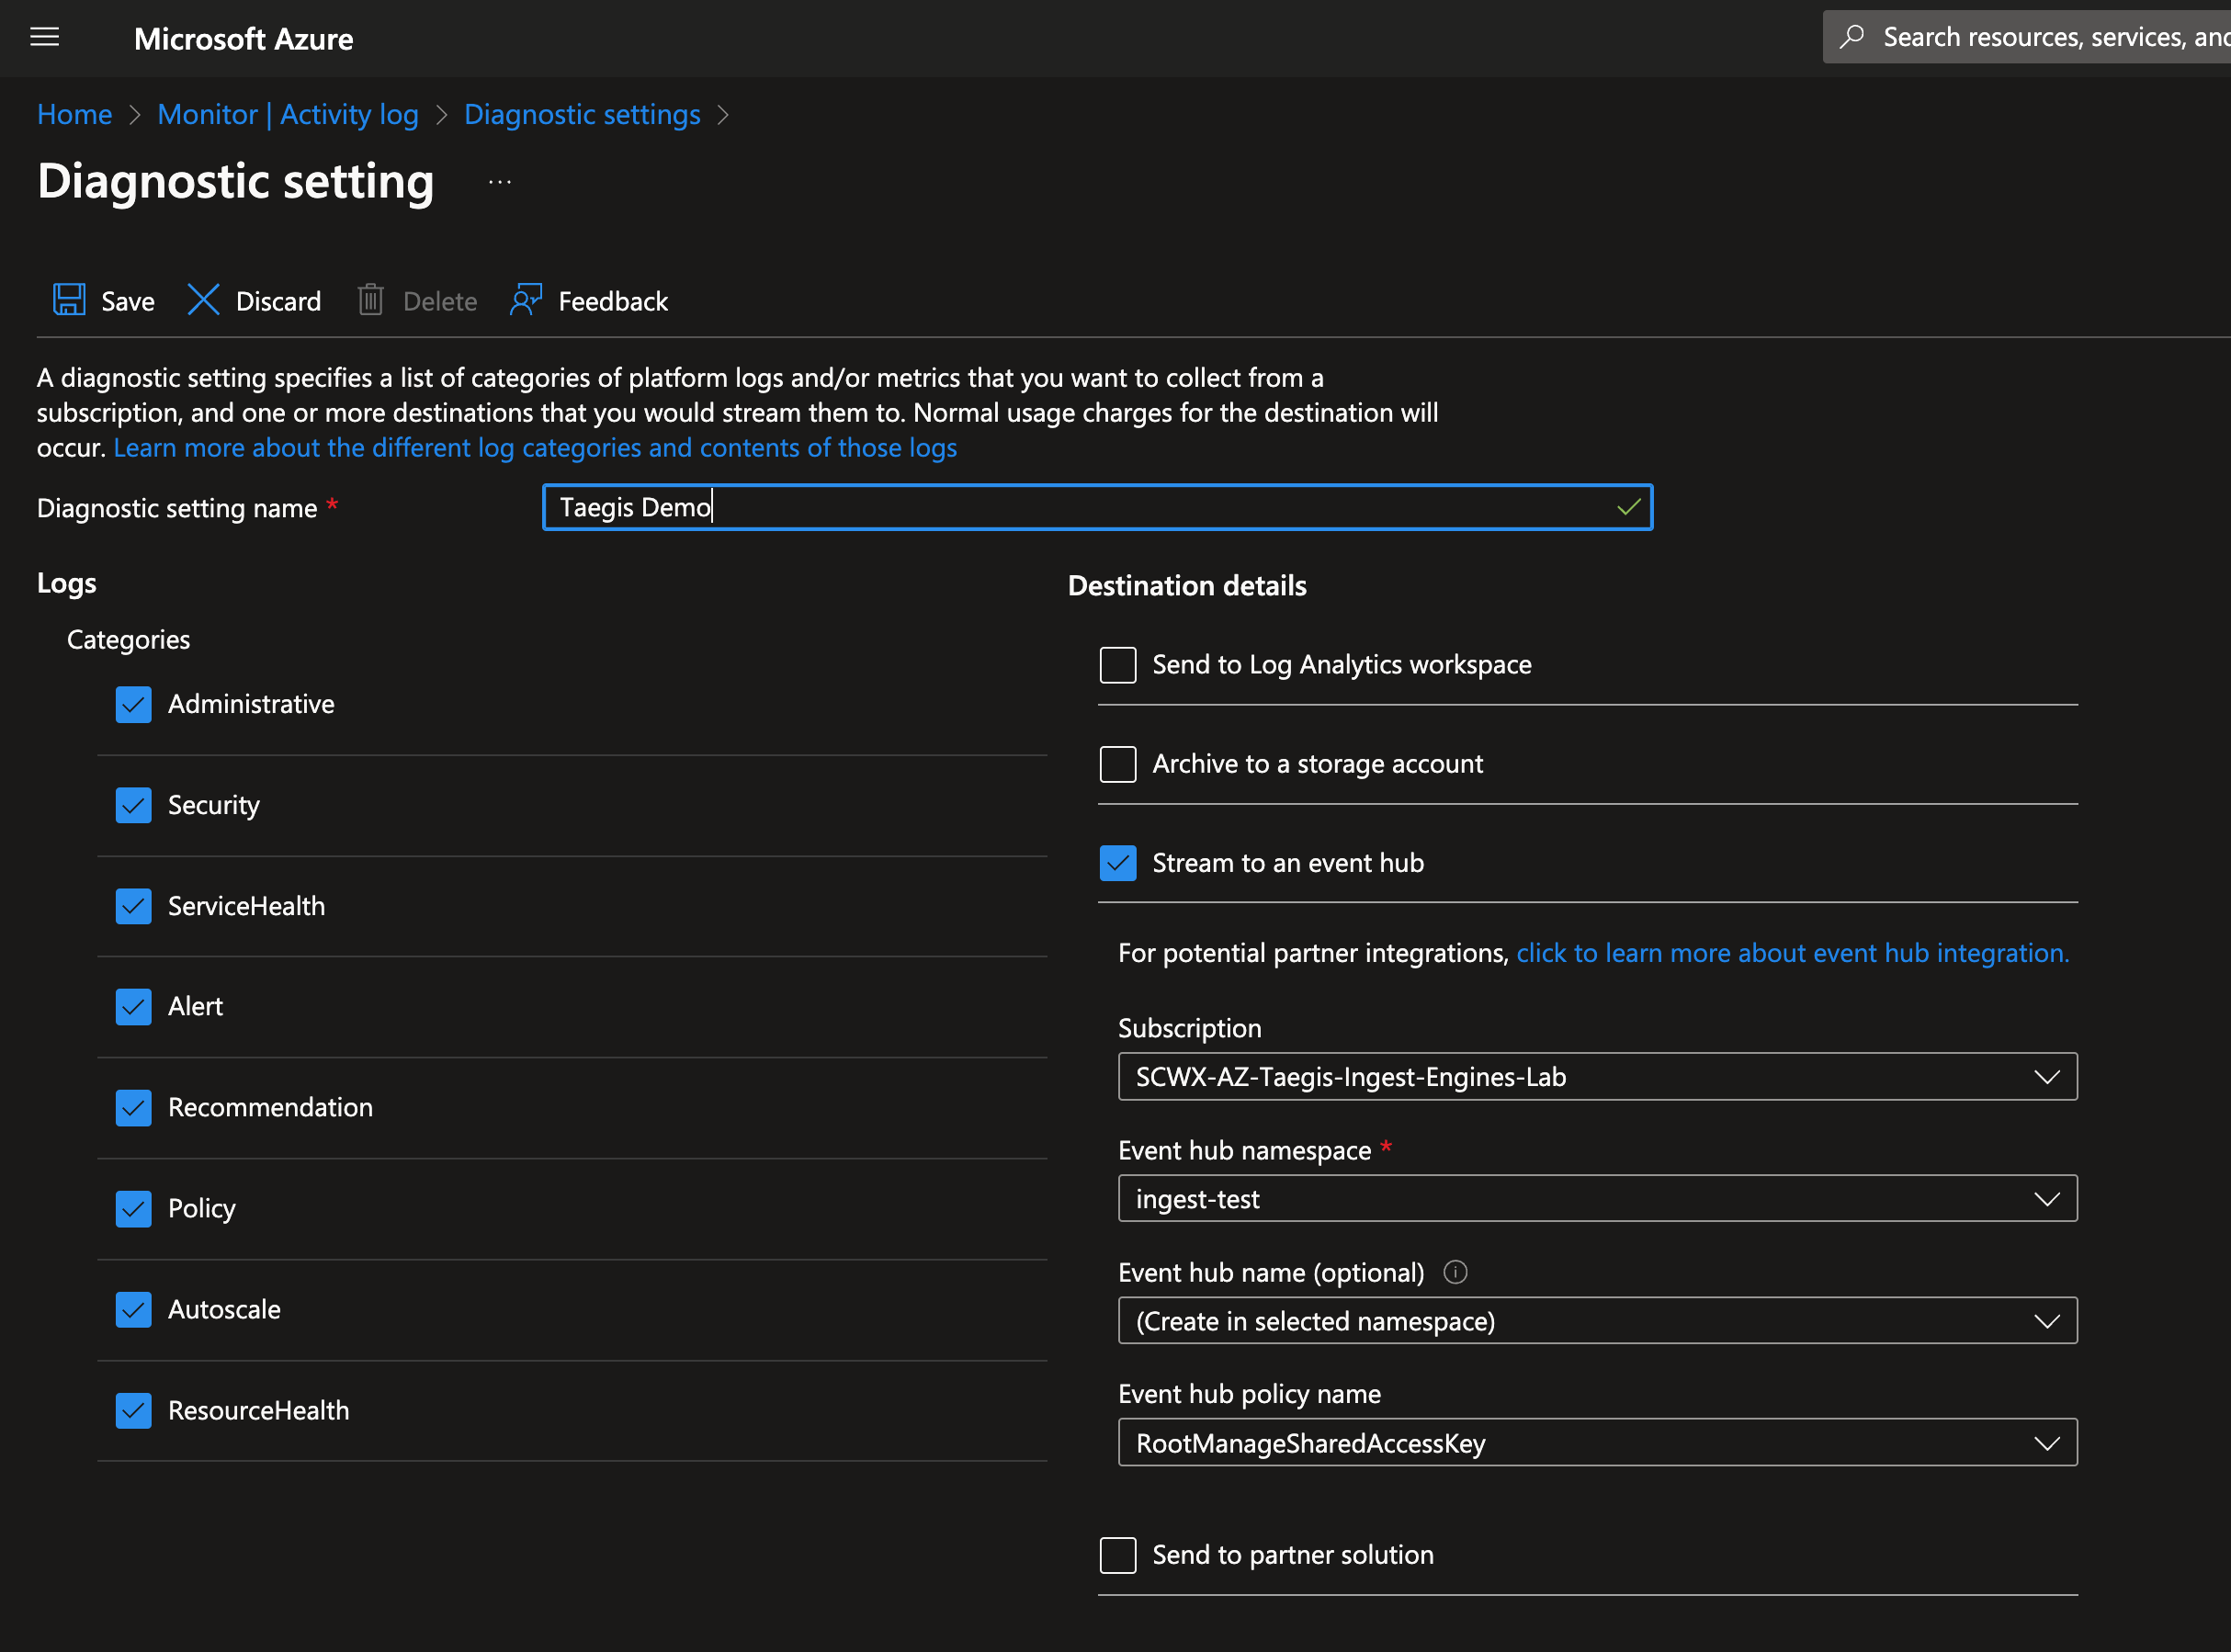
XDR supports the following diagnostic categories for data normalization:
Optimized Structured Logs Categories🔗
Note
All other logs will normalize to the Generic schema. A custom parser may be needed to enable normalization of other data sources beyond the Generic schema. It is not recommended to forward metric data to XDR as it will be treated as all other log data and not metrics.
Forward to Event Hub and Enable Integration with XDR🔗
- Once the desired log categories are selected, choose to Stream to an event hub and enter the desired event hub destination.
- Follow the integration instructions for an event hub to complete the integration with XDR and to begin data ingestion.
Data Provided from Integration🔗
| Normalized Data | Out-of-the-Box Detections | Vendor-Specific Detections | |
|---|---|---|---|
| MS Azure Activity Logs | CloudAudit |
Note
XDR detectors are not guaranteed to be triggered, even if a data source's logs are normalized to a schema associated with a given detector. However, you can create Custom Detection Rules to generate detections based on normalized data from a data source.
Start Azure Monitor API🔗
Note
Azure integrations are supported in US and EU regions, but may not be supported by Microsoft in other regions. Contact Microsoft directly to verify their support of services in other regions.
Note
The integration collects subscription-level activity logs from Azure. Please see the vendor documentation for more details.
Register an Application in Azure🔗
-
Register an application in the Azure portal.
- Name — Any descriptive string
- Supported account types — Accounts in this organizational directory only
Note
Record the following values as they are used to create the integration in XDR: Directory (tenant) ID and Application (client) ID.
-
Provide credentials for the application by uploading a certificate.
Important
Certificates will expire and need to be renewed both with Microsoft Entra ID and with XDR to allow for continued functionality before their expiration date.
Important
XDR supports ONLY the Privacy-Enhanced Mail (PEM) format. More information on the PEM format can be found in RFC 7468.
Encrypted keys and client secrets are NOT supported.
Note
Self-signed certificates are supported.
Use one of the following commands to generate a self-signed PEM (.pem extension) certificate using PowerShell or OpenSSL:
# Prompt user for input

$certname = Read-Host -Prompt "Enter certificate name"
$keyname = Read-Host -Prompt "Enter key name"
$mypwd = Read-Host -Prompt "Enter password" -AsSecureString
$location = Read-Host -Prompt "Enter location"
$cert = New-SelfSignedCertificate -Subject "CN=$certname" -CertStoreLocation "Cert:\CurrentUser\My" -KeyExportPolicy Exportable -KeySpec Signature -KeyLength 2048 -KeyAlgorithm RSA -HashAlgorithm SHA256
Export-PfxCertificate -Cert $cert -FilePath "$location\$certname.pfx" -Password $mypwd
Install-Module -Name PSPKI -Scope CurrentUser
Import-Module -Name PSPKI
Convert-PfxToPem -InputFile "$location\$certname.pfx" -Outputfile "$location\$certname.pem"
# Read the PEM file content

$pemContent = Get-Content "$location\$certname.pem" -Raw
# Extract private key and certificate

$privateKey = $pemContent -replace "(?ms).*?(-----BEGIN PRIVATE KEY-----.+?-----END PRIVATE KEY-----).*", '$1'
$certificate = $pemContent -replace "(?ms).*?(-----BEGIN CERTIFICATE-----.+?-----END CERTIFICATE-----).*", '$1'
# Save private key and certificate to separate files

$privateKey | Set-Content "$location\$keyname.pem"
$certificate | Set-Content "$location\$certname.pem"
Write-Host "Files located at: $location"
pause
Note
Copy and paste the preceding code into a text file, save the file with a .ps1 extension (e.g., CertGen.ps1), and run the script using PowerShell.
Note
Depending on the PowerShell version being used, you may need to replace -Subject with -SubjectName if there are any errors with -Subject.
Add the Azure Application to the Subscription to be Monitored🔗
- Go to the Subscriptions Resource in Microsoft Azure Portal.
- Click Access Control (IAM) in the left-hand pane.
- Click Add, then choose Add role assignment.
- Select the Monitoring Reader role, then click Next.
- Under Assign access to, keep the selection for User, group, or service principal.
- In the Members section, choose a member to add.
- In the right-hand pane, search for the service principal of the application that was created.
- Click Review and Assign to assign the user to the subscription.
Add Integration in XDR🔗
- From the Taegis Menu, go to Integrations → Cloud APIs.
-
Click Add an Integration from the top of the page.

Add an Integration -
From the Optimized tab, click Office 365/Azure.
Create the Integration -
Choose Set Up under Azure Activity Logs.
- Enter a name for the integration. This can be any string.
- Enter the following, all of which must be in GUID format:
- Upload the certificate and its associated private key.
- Select Done to complete the integration with XDR.
Tip
To add additional subscriptions, repeat the steps in Add the Azure Application to the Subscription to be Monitored and Add Integration in XDR for each.
Data Provided from Integration🔗
| Normalized Data | Out-of-the-Box Detections | Vendor-Specific Detections | |
|---|---|---|---|
| MS Azure Activity Logs | CloudAudit |
Note
XDR detectors are not guaranteed to be triggered, even if a data source's logs are normalized to a schema associated with a given detector. However, you can create Custom Detection Rules to generate detections based on normalized data from a data source.
Link Secureworks as a Microsoft Partner🔗
Linking Secureworks as a Solution Provider for Security is an optional process that enables Microsoft to better understand what customers Secureworks is enabling to achieve their security goals and realize the value of the Microsoft ecosystem. This allows Secureworks better access to Microsoft as a partner, enabling us to provide you, our customer, with better products and services. If you have successfully added access to your Azure environment to allow Secureworks to help enable your business through improved security, we would appreciate if you would additionally add us as a partner link to show that this is in place.
To link Secureworks as a partner, follow these steps:
- Navigate to Link to a partner ID in the Azure Portal.
- Use a user with eligible roles or permissions, see Roles and Permissions Required to Receive Credit.
- In the Microsoft Partner ID box, enter the value:
4834104 - Click on the Link a partner ID button to complete the process.