Google Cloud Platform (GCP) Data Collector🔗
Secureworks® Taegis™ XDR has a collector that can be set up in Google Cloud Platform (GCP). The Taegis™ XDR Collector for GCP is provided as a Terraform configuration for use with GCP Infrastructure Manager. Each collector is uniquely identified by its configuration. For convenience, configuration data is injected into the Terraform configuration by way of custom data. The configuration creates the following resources:
- Compute Instance: Defines the compute instance parameters used when launching the instance, which includes the correct image for the region and user data.
- Persistent Data Disk: A 200 GB persistent disk attached to the instance.
- Network Interface: A network interface for the instance provisioned with appropriate network and subnet parameters.
- Firewall Rules: A set of firewall rules provisioned for the instance to run as an XDR Collector.
XDR provides options to download the Terraform configuration. The configuration should work in most GCP environments, but you must carefully review it before use to ensure it conforms to all relevant network and security policies. Advanced users can extract the Terraform configuration and user data to incorporate into their own IaC or automation tools.
Configuration Notes🔗
-
The generated configuration creates the network interfaces for the compute instance and compute firewall rules for reporting, NTP, TCP-DNS, UDP-DNS, TCP-syslog, and UDP-syslog.
-
The generated configuration creates a compute engine persistent disk size 200G attached as
/dev/sdbto the collector. If you customize the configuration or implement your own automation, make sure that the device is always attached as/dev/sdbwith a minimum size of 200G. -
Infrastructure Manager requires a user-managed service account with the following roles in your GCP project:
roles/compute.instanceAdmin.v1: Create and manage compute instances and disks.roles/compute.securityAdmin: Create and manage firewall rules.roles/config.agent: Required by Infrastructure Manager.
To create one, run the following commands in Cloud Shell or the gcloud CLI:
Replace
PROJECT_IDwith your GCP project ID.gcloud iam service-accounts create infra-manager-sa \ --display-name="Infrastructure Manager" \ --project=PROJECT_ID gcloud projects add-iam-policy-binding PROJECT_ID \ --member="serviceAccount:infra-manager-sa@PROJECT_ID.iam.gserviceaccount.com" \ --role="roles/compute.instanceAdmin.v1" gcloud projects add-iam-policy-binding PROJECT_ID \ --member="serviceAccount:infra-manager-sa@PROJECT_ID.iam.gserviceaccount.com" \ --role="roles/compute.securityAdmin" gcloud projects add-iam-policy-binding PROJECT_ID \ --member="serviceAccount:infra-manager-sa@PROJECT_ID.iam.gserviceaccount.com" \ --role="roles/config.agent"Note
Infrastructure Manager does not support the Google-managed service agent (
<numeric ID>@cloudservices.gserviceaccount.com). You must use a user-managed service account as described above. -
If deploying into a GCP Shared VPC, additional project-level configuration and service account permissions are required. See Shared VPC Support (Optional) for details.
Note
The XDR Collector can support up to 200K EPS (events per second) for properly configured cloud and on-premises collectors.
Note
Third-party tools or applications cannot be installed on any XDR Collector.
Connectivity Requirements for Data Collectors🔗
Note
Some configuration specifics of XDR depend on the region you are deployed in (US1, US2, US3, EU1, EU2).
Any device that uses its own SSL certificate, including Cloud-based and On-Premises Data Collectors, must safelist the following destination IP addresses or domains in order to avoid conflict. If using an AWS data collector, please refer to the AWS table.
For Most Data Collectors🔗
| Source | Destination | Port/Protocol | Notes |
|---|---|---|---|
| Data Collector IP or hostname | US1collector.ctpx.secureworks.com18.217.45.178/32 3.16.4.173/32 18.224.219.97/32 13.59.146.90/32 3.16.16.254/32 18.223.74.238/32 US2collector.delta.taegis.secureworks.com52.14.113.127/32 3.141.73.137/32 3.136.78.106/32 US3collector.foxtrot.taegis.secureworks.com44.229.101.49 35.166.77.47 34.214.135.78 EU1collector.echo.taegis.secureworks.com18.158.143.139/32 35.159.14.37/32 52.59.37.234/32 EU2collector.golf.taegis.secureworks.com54.217.251.111/32 54.194.78.20/32 52.50.215.147/32 |
TCP/443 | Safelisting device access to XDR |
| Data Collector IP or hostname | NTP severs IP/Hostnames provided during provisioning | UDP/123 | Safelisting device access to NTP servers This rule is only necessary when custom NTP servers are provided during provisioning. |
| Data Collector IP or hostname | 0.pool.ntp.org 1.pool.ntp.org 2.pool.ntp.org 3.pool.ntp.org |
UDP/123 | Safelisting device access to default NTP server. This rule is only necessary when custom NTP servers are not provided during provisioning. |
| Data Collector IP or hostname | DNS server IPs provided during provisioning | UDP/53 TCP/53 |
Safelisting device access to DNS servers |
Note
If using local NTP, the access must be safelisted both to and from the data collector on those networks.
For AWS Data Collectors🔗
| Source | Destination | Port/Protocol | Notes |
|---|---|---|---|
| AWS Data Collector IP or hostname | US1collector.ctpx.secureworks.com18.217.45.178/32 3.16.4.173/32 18.224.219.97/32 13.59.146.90/32 3.16.16.254/32 18.223.74.238/32 US2collector.delta.taegis.secureworks.com52.14.113.127/32 3.141.73.137/32 3.136.78.106/32 US3collector.foxtrot.taegis.secureworks.com44.229.101.49 35.166.77.47 34.214.135.78 EU1collector.echo.taegis.secureworks.com18.158.143.139/32 35.159.14.37/32 52.59.37.234/32 EU2collector.golf.taegis.secureworks.com54.217.251.111/32 54.194.78.20/32 52.50.215.147/32 |
TCP/443 | Safelisting device access to Taegis XDR via hostname |
| AWS Data Collector IP or hostname | NTP severs IP/Hostnames provided during provisioning | UDP/123 | Safelisting device access to NTP servers This rule is only necessary when custom NTP servers are provided during provisioning. |
| AWS Data Collector IP or hostname | 169.254.169.123 | UDP/123 | Safelisting device access to default NTP server. This rule is only necessary when custom NTP servers are not provided during provisioning. |
| AWS Data Collector IP or hostname | DNS server IPs provided during provisioning | UDP/53 TCP/53 |
Safelisting device access to DNS servers |
Proxy Support🔗
Cloud-based and On-Premises Data Collectors attempt to discover local proxy settings on the host if they are unable to connect directly to the internet.
Cloud-based and On-Premises Data Collectors also support a hard-coded proxy. If you need to create a data collector that contains a hard-coded proxy, please submit a support request with the following required information:
- Proxy IP
- Proxy Port
If the proxy is configured but is unavailable or not reachable, the data collector will fall back to a direct connection.
Note
Cloud-based and On-Premises Data Collectors do not support hard-coded authenticated proxies at this time. A proxy with man in the middle (MITM) capability needs to safelist the above network connections.
Install and Configure a XDR GCP Collector🔗
Start the process to configure your XDR GCP Collector in XDR from Integrations > Data Collectors. Follow the prompts to create and then download the Terraform configuration. The configuration must be applied using GCP Infrastructure Manager and the gcloud CLI to complete the deployment.
Prerequisites🔗
Before deploying, ensure the following:
- The Infrastructure Manager API is enabled in your GCP project.
- You have a user-managed service account with the required roles. For details, see Configuration Notes above.
- The gcloud CLI is installed, or use Cloud Shell in the GCP console.
Download the Configuration🔗
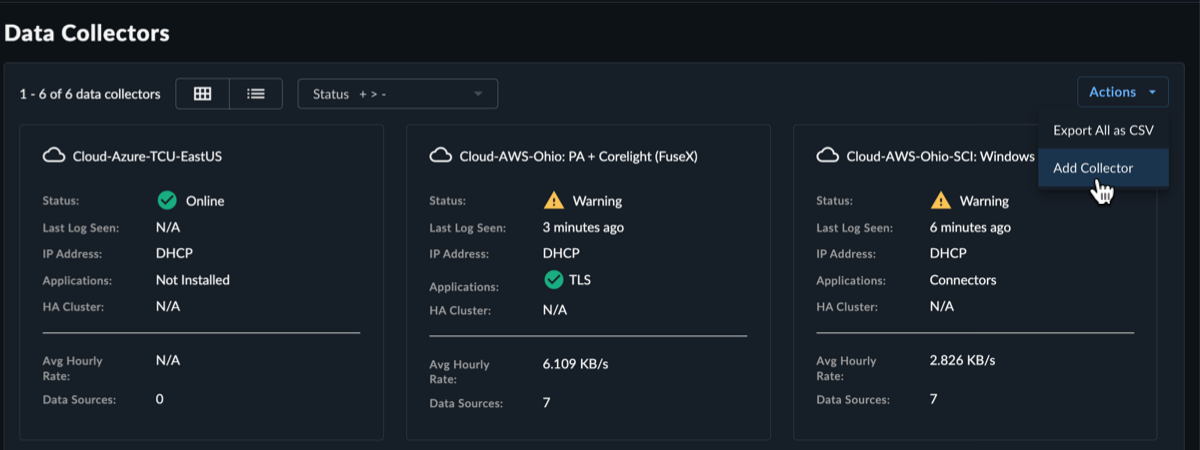
- Select Integrations from the Taegis XDR menu and then choose Data Collectors.
-
Select Actions > Add Collector from the top right.
Add New Collector -
Select Cloud-Hosted as the collector type and then select Next.
-
Fill in the required name and hostname fields, and the optional description, host proxy, and NTP servers fields, and then select Create Collector.
Note
You have the option to specify your own NTP servers if desired, and to add an HTTP proxy address, which must follow the following format:
[http\[s]://\[user:pass@]hostname\[:port]|http://<hostname>[:port]].Note
Default and custom NTP settings are only used during the bootstrap process on startup. Once connectivity is established, the Data Collector synchronizes time via the XDR backend connection. The NTP server value will be reflected as
ntp.collectorin the Admiral console once the connection is established.
Create Cloud Collector Tip
To add the eStreamer app to the collector to retrieve all security event logs from your Cisco Firepower Threat Defense (FTD) device, see eStreamer App. For more information, see the Cisco FTD Firewall guide.
-
The Install Collector section displays the following options:
- Amazon Web Services (AWS) — This option is for deploying the XDR Collector to AWS.
- Google Cloud Platform (GCP) — This option is for deploying the XDR Collector to GCP.
- Microsoft Azure — This option is for deploying the XDR Collector to Azure.
-
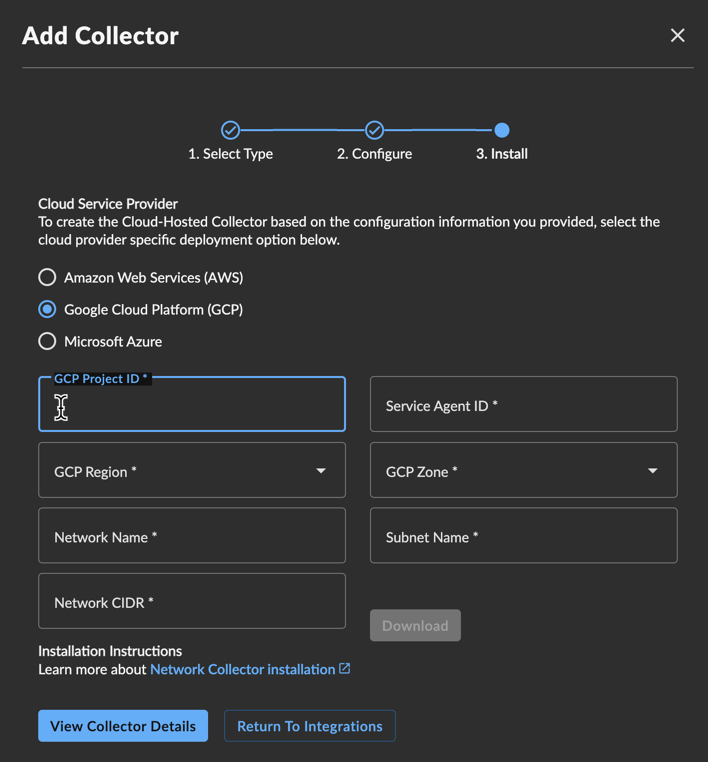
Select Google Cloud Platform (GCP).
- Enter your GCP Project ID to deploy the instance into.
- Enter your Service Agent ID.
- Select the GCP Region and GCP Zone you want to deploy from.
- Specify the Network Name that the instance is part of.
- Specify the Subnet Name that the interface is part of.
- Enter the Network CIDR or network destinations for the firewall rules.
- (Optional) Enter the Network Project ID if the VPC network is hosted in a different GCP project than the one the collector is being deployed into (Shared VPC). If left blank, the GCP Project ID is used. See Shared VPC Support (Optional).
-
Select Download to download the Terraform configuration archive (.zip).
GCP Collector Note
Carefully review the configuration to ensure it conforms to all relevant network and security policies. Advanced users can extract the Terraform files and user data to incorporate into their own IaC or automation tools.
Deploy the Configuration🔗
-
In the GCP console, open Cloud Shell using the icon on the top right.
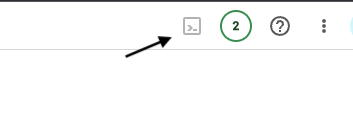
Open Cloud Shell -
Select the menu icon and choose Upload to upload the .zip file you downloaded from XDR in Step 14 above.
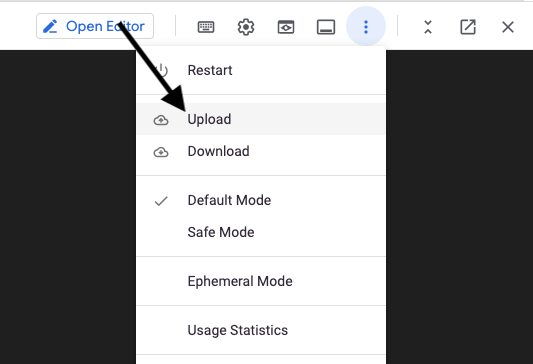
Upload Configuration Archive -
Unzip the uploaded archive:
-
Deploy the configuration using Infrastructure Manager:
gcloud infra-manager deployments apply \
  projects/PROJECT_ID/locations/LOCATION/deployments/taegis-collector \
  --service-account projects/PROJECT_ID/serviceAccounts/infra-manager-sa@PROJECT_ID.iam.gserviceaccount.com \
  --local-source="./collector-infrastructure" \
  --tf-version-constraint="1.5.7"
Note
Replace the following:
PROJECT_ID: Your GCP project ID (the service project where the collector instance will run).LOCATION: A supported Infrastructure Manager location, such asus-central1.
Tip
You can optionally preview the deployment before applying it by using
gcloud infra-manager previews createwith the same arguments. This shows what resources will be created without making any changes. -
After the command reports success, the collector should change status from Provisioning in a little under ten minutes. At this point the collector will be online and ready to receive logs. Confirm the collector status from Integrations > Data Collectors in XDR.
Shared VPC Support (Optional)🔗
A GCP Shared VPC deployment separates network ownership from workload ownership across two GCP projects:
- Host project: Owns the VPC network and subnets. Firewall rules are created here.
- Service project: Where the collector compute instance and disk are deployed.
By default, the collector assumes the VPC network and the compute instance live in the same project. To deploy into a Shared VPC, follow the additional steps below before downloading the configuration.
Prerequisites🔗
- You must have the Shared VPC Admin role (
roles/compute.xpnAdmin) granted at the organization level (not project level) to enable Shared VPC. Contact your GCP organization administrator if you do not have this role. - Both the host project and service project must exist before proceeding.
Step 1: Enable Shared VPC on the Host Project🔗
Run the following command using the gcloud CLI or Cloud Shell:
Replace HOST_PROJECT_ID with the GCP project ID that owns the VPC network.
Step 2: Attach the Service Project to the Host Project🔗
gcloud compute shared-vpc associated-projects add SERVICE_PROJECT_ID \
  --host-project=HOST_PROJECT_ID
Replace the following:
HOST_PROJECT_ID: The GCP project that owns the VPC (network project).SERVICE_PROJECT_ID: The GCP project where the collector instance will run.
Step 3: Grant the Service Account Permissions on the Host Project🔗
The infra-manager-sa service account (created in Configuration Notes) runs in the service project, but it needs additional permissions in the host project to create firewall rules and use the shared network:
Replace HOST_PROJECT_ID and SERVICE_PROJECT_ID with your project IDs.
gcloud projects add-iam-policy-binding HOST_PROJECT_ID \
  --member="serviceAccount:infra-manager-sa@SERVICE_PROJECT_ID.iam.gserviceaccount.com" \
  --role="roles/compute.securityAdmin"

gcloud projects add-iam-policy-binding HOST_PROJECT_ID \
  --member="serviceAccount:infra-manager-sa@SERVICE_PROJECT_ID.iam.gserviceaccount.com" \
  --role="roles/compute.networkUser"
| Role | Purpose |
|---|---|
roles/compute.securityAdmin on host project |
Allows creating and managing firewall rules in the host project |
roles/compute.networkUser on host project |
Allows the collector instance to attach to the shared VPC network and subnet |
Step 4: Download and Deploy🔗
When downloading the Terraform configuration in the XDR wizard, enter the Network Project ID field with the host project ID. Leave all other fields pointing to the service project.
When deploying with Infrastructure Manager, the PROJECT_ID in the deploy command should remain the service project (where the instance runs):
gcloud infra-manager deployments apply \
  projects/SERVICE_PROJECT_ID/locations/LOCATION/deployments/taegis-collector \
  --service-account projects/SERVICE_PROJECT_ID/serviceAccounts/infra-manager-sa@SERVICE_PROJECT_ID.iam.gserviceaccount.com \
  --local-source="./collector-infrastructure" \
  --tf-version-constraint="1.5.7"
Access Troubleshooting Console🔗
The Admiral console allows you to access information about a deployed XDR Collector locally. The tools provided within Admiral assist in device setup and troubleshooting of common problems such as network connectivity.
For more information, see Admiral Console.
Edit Your XDR Collector Configuration🔗
Important
Making changes to the XDR Collector configuration of a live system carries the risk of rendering the device inoperable. The XDR Collector makes every attempt possible to rollback to a previous configuration when a configuration change is unsuccessful, but XDR Collector configuration changes should be treated with the same level of caution used for any other kind of change in your environment and you should follow your risk and change management guidelines. Always be prepared to redeploy the device.
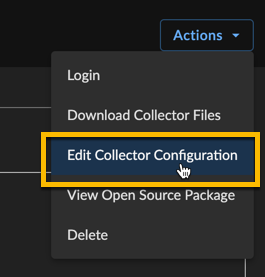
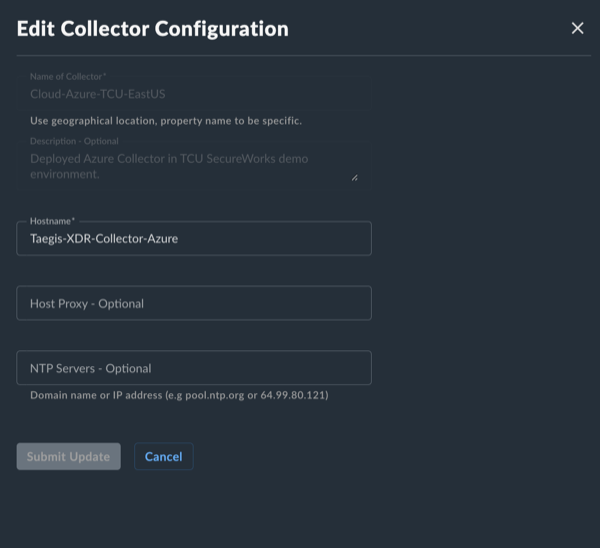
Certain configuration parameters of a running and healthy XDR Collector can be changed on a live collector. To edit these parameters, select Actions and choose Edit Collector Configuration from a collector details page. Editable fields include the hostname, proxy settings, and NTP server. If you need to change to the network interface configuration, you must provision a new XDR Collector.
After submitting a XDR Collector configuration change, a note appears that indicates the change is pending. The edit action is not available until the change has completed. Pending changes are pushed to your XDR Collector where they are applied and connectivity testing is conducted.

If pending changes cause the XDR Collector to be unable to successfully connect, the change is automatically rolled back to the previous configuration and a failure message appears in the banner.

A notification displays when a change is successfully implemented.

In rare circumstances, it’s possible that the configuration change and rollback are both unsuccessful. Example scenarios include, but are not limited to, changes to the underlying network during the change or network connectivity failures to the backend during an inflight change. In these circumstances, a failure banner displays and the XDR Collector must be redeployed.

Once the change is complete, download the new Terraform configuration and update your deployment using gcloud infra-manager deployments apply with the same arguments used during initial setup. This ensures that your new configuration persists if and when a new instance is created.
