Work a Case🔗
Note
The terms Alerts and Investigations have recently been changed to Detections and Cases in Taegis XDR. You may still see references to the old terms while we continue to work towards platform convergence of Sophos and Taegis technologies. For more information, see Taegis Terminology Updates.
As you examine detections and events in Secureworks® Taegis™ XDR, use cases to gather related information together and share it with your team. Other users in your tenant can view and work on the cases by making comments, adding related data, changing the status of the case, and more.
If you subscribe to Secureworks® Taegis™ MDR, cases are also how Secureworks documents, shares, and escalates threat related activity to your organization.
Note
Cases are retained for the life of your contract. However, by default detection and event data is retained for 12 months and no longer appears in Cases beyond the retention period. Customers can extend the retention period for an additional fee as outlined in the XDR Data Retention Policy.
Get to the Cases Page🔗
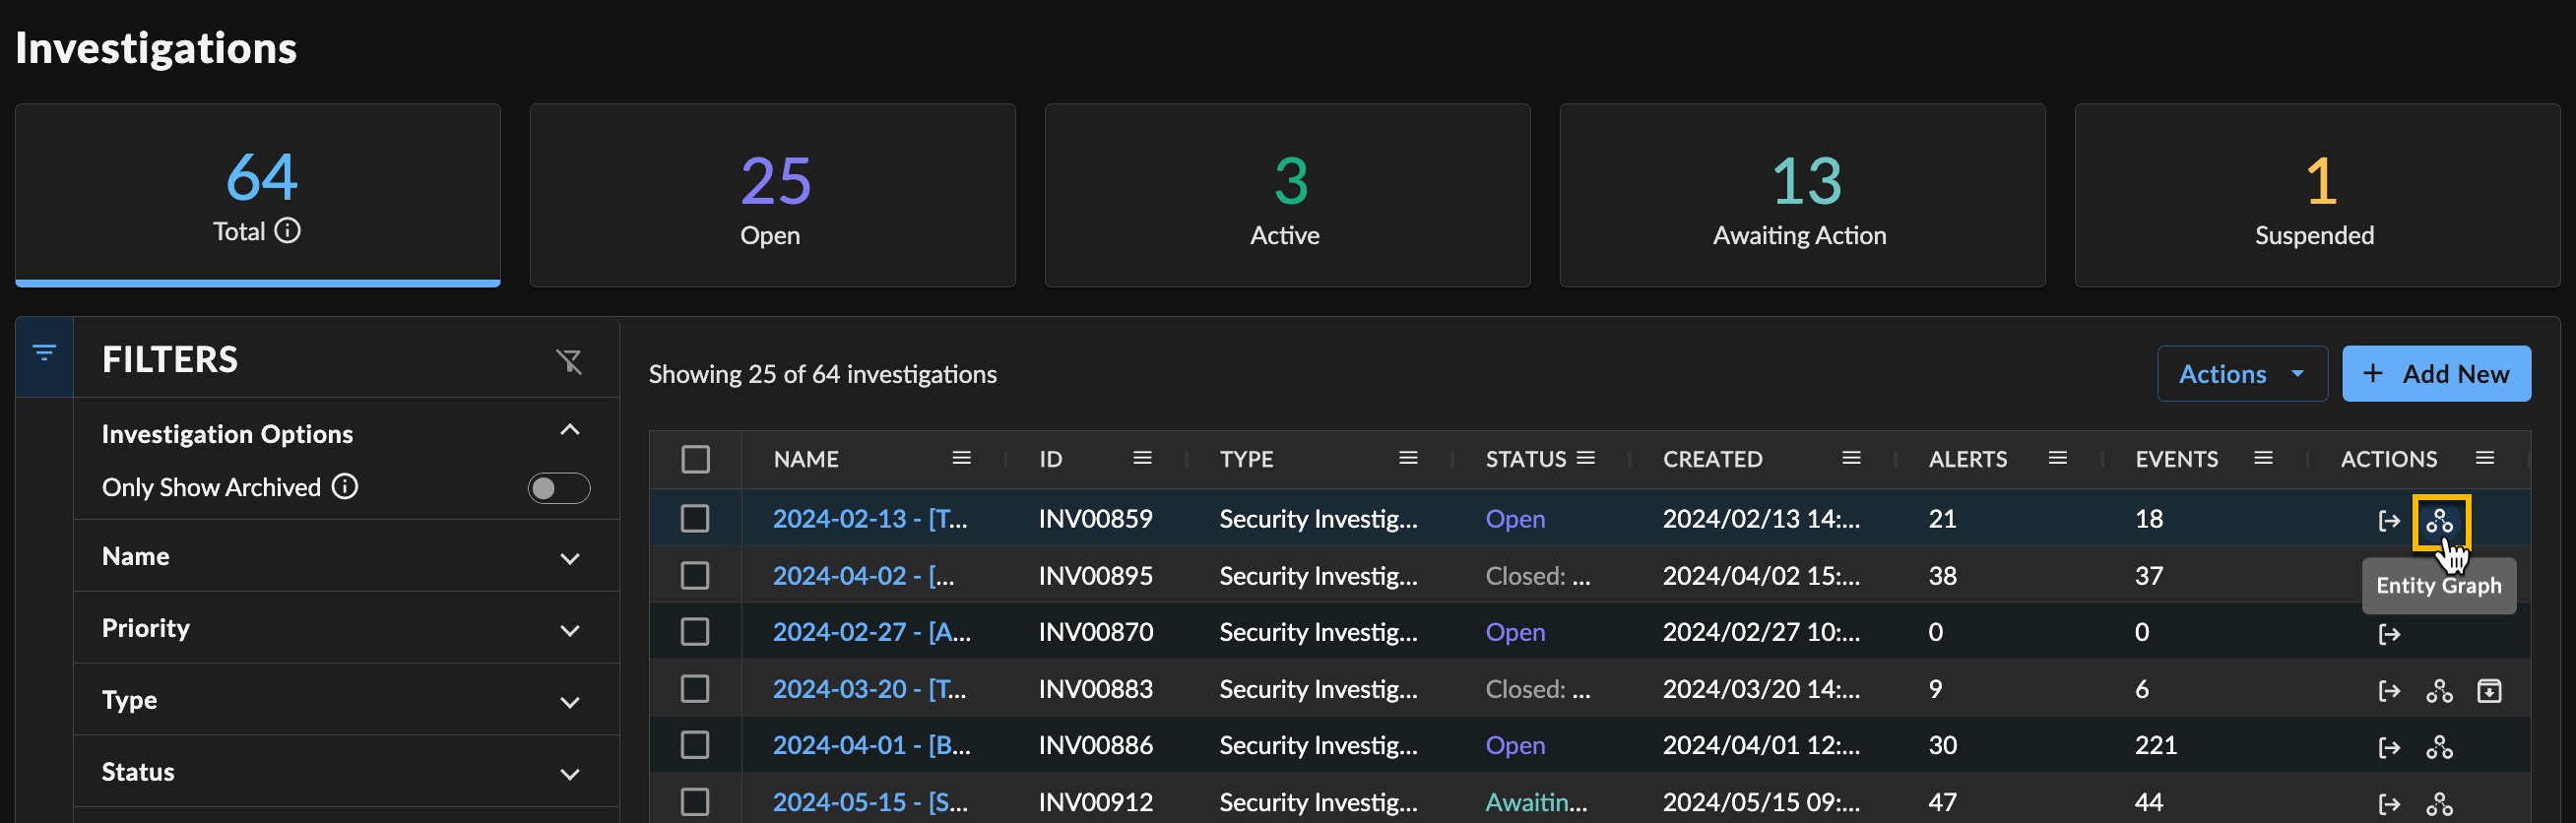
Select Cases from the Taegis Menu to view all cases in the current tenant, including information about who initially created it and when; the current status; when it was last updated; involved entities; and how many detections, events, or agents are related.
Tip
Cases can also be accessed from the Recent Cases widget on the Detection Triage Dashboard, and the Ongoing Cases widget on the Taegis MDR Dashboard.
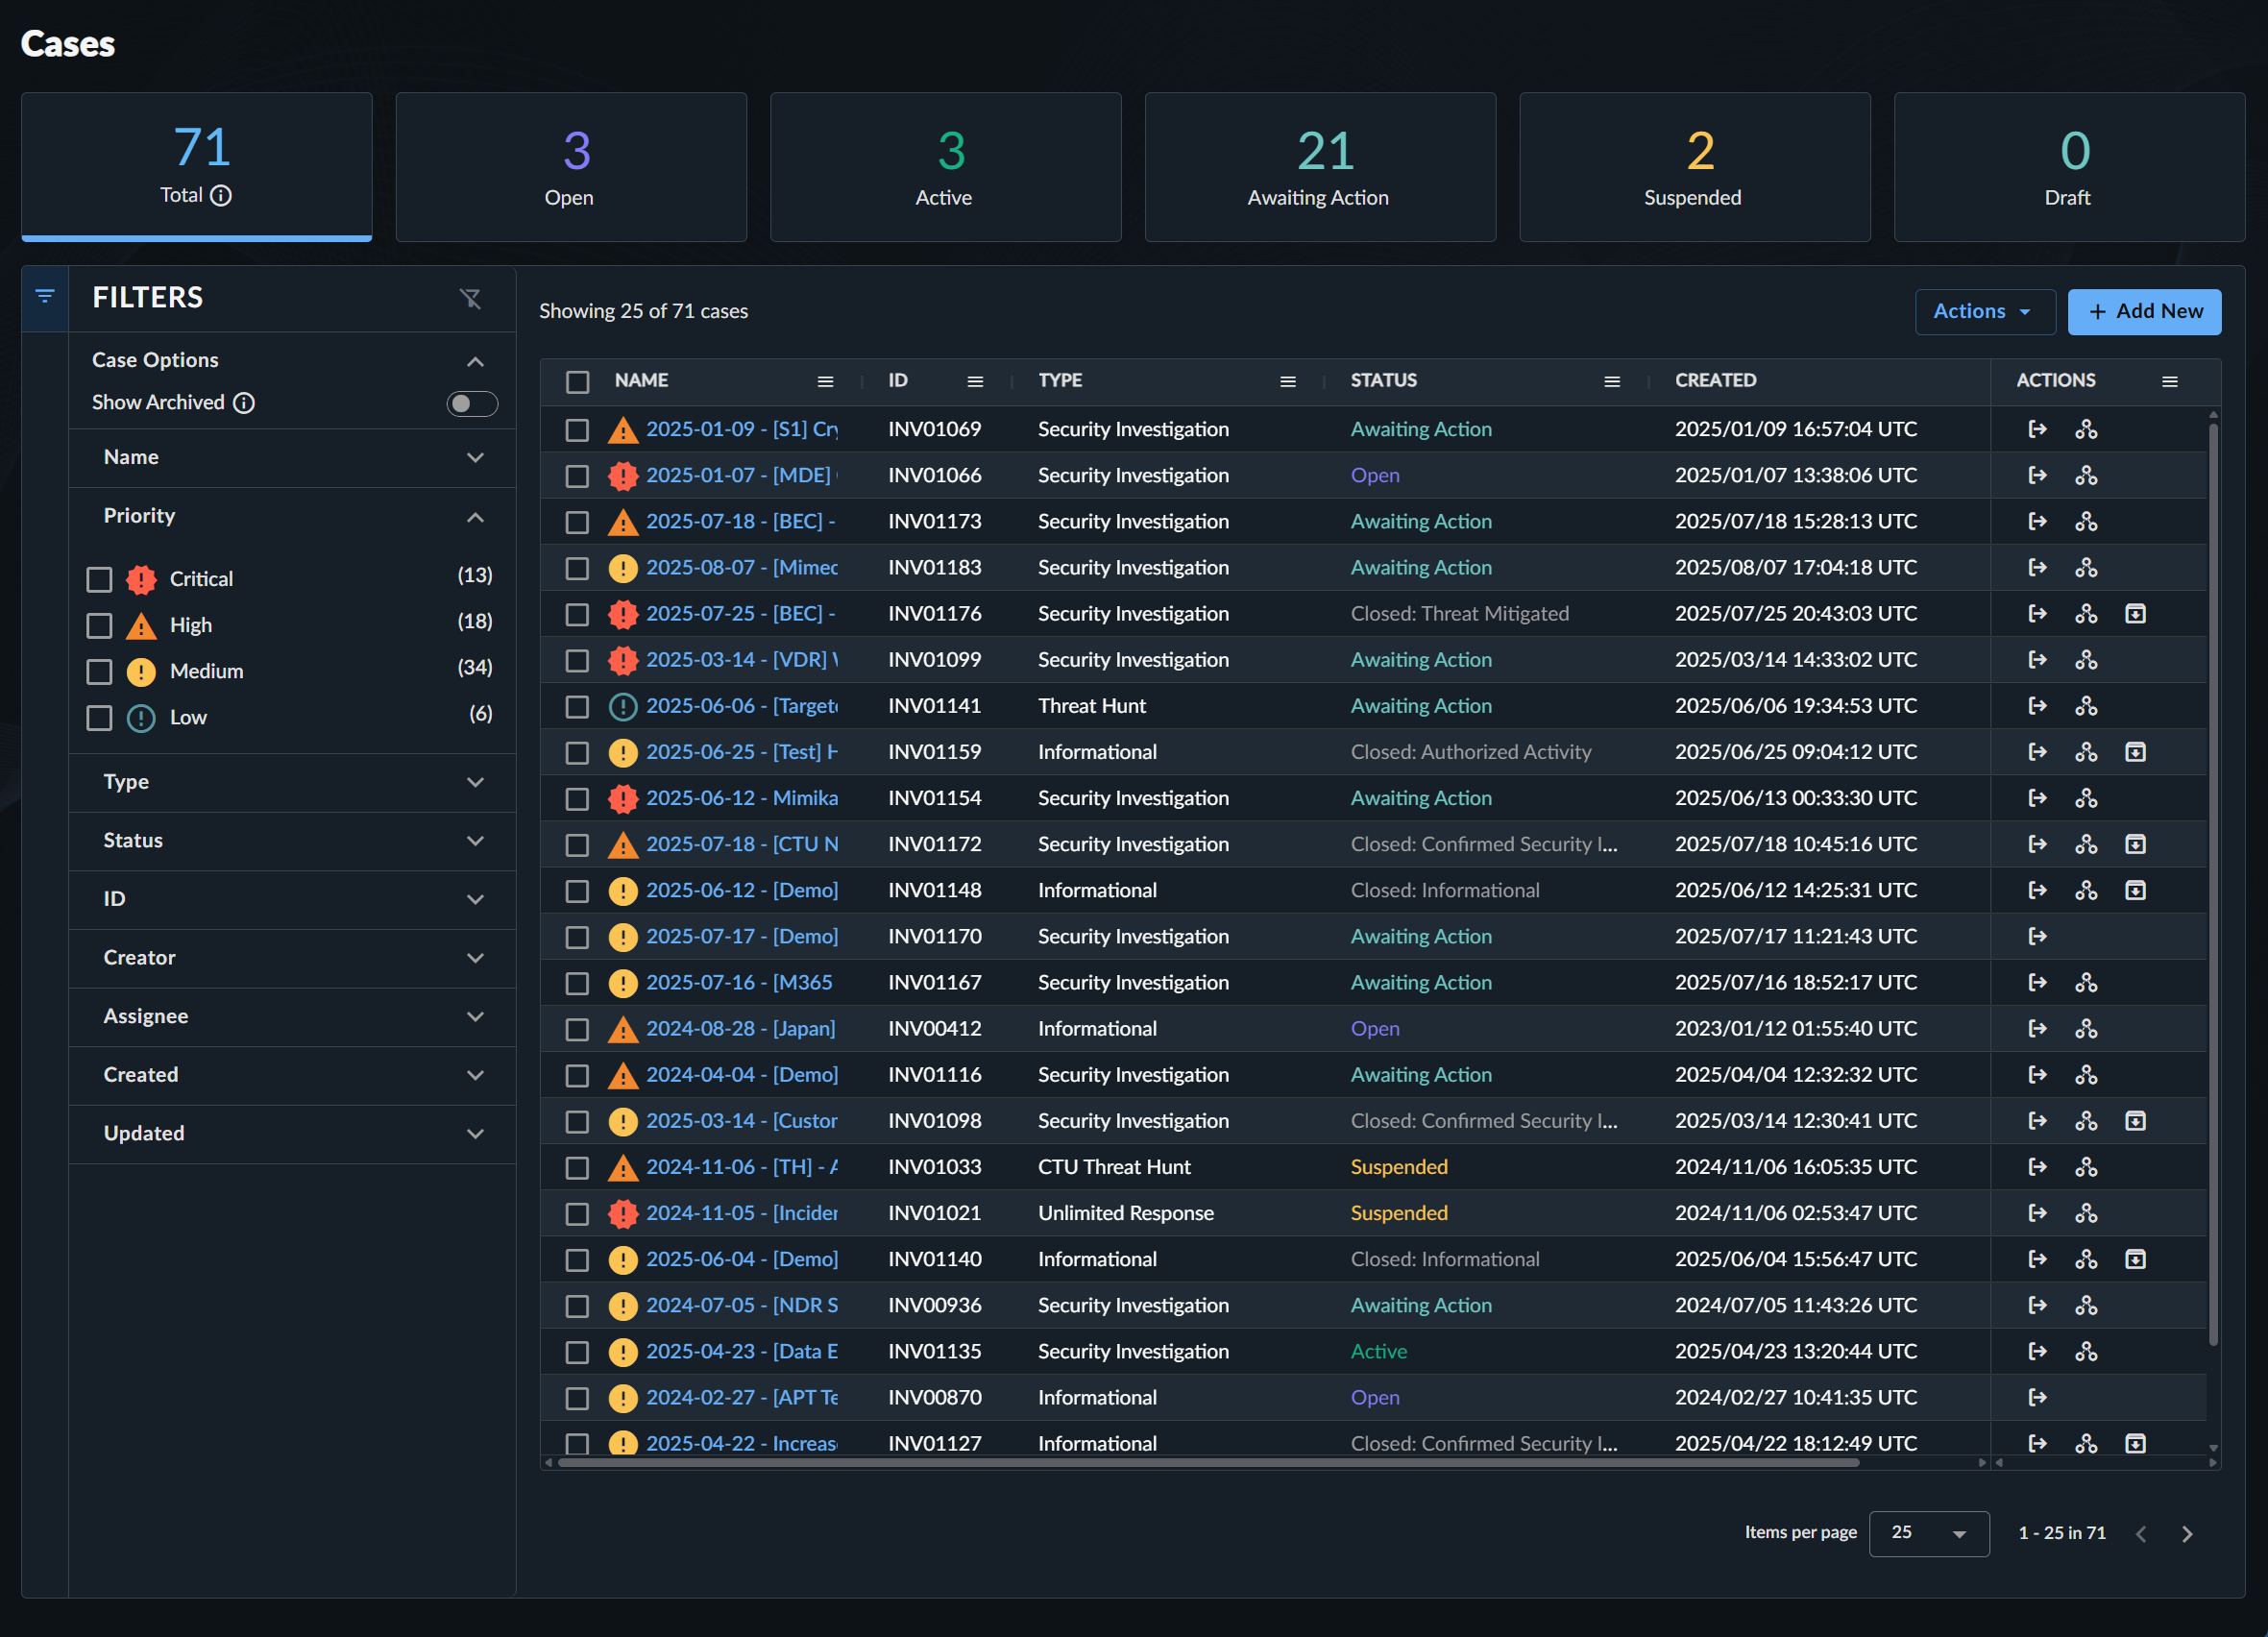
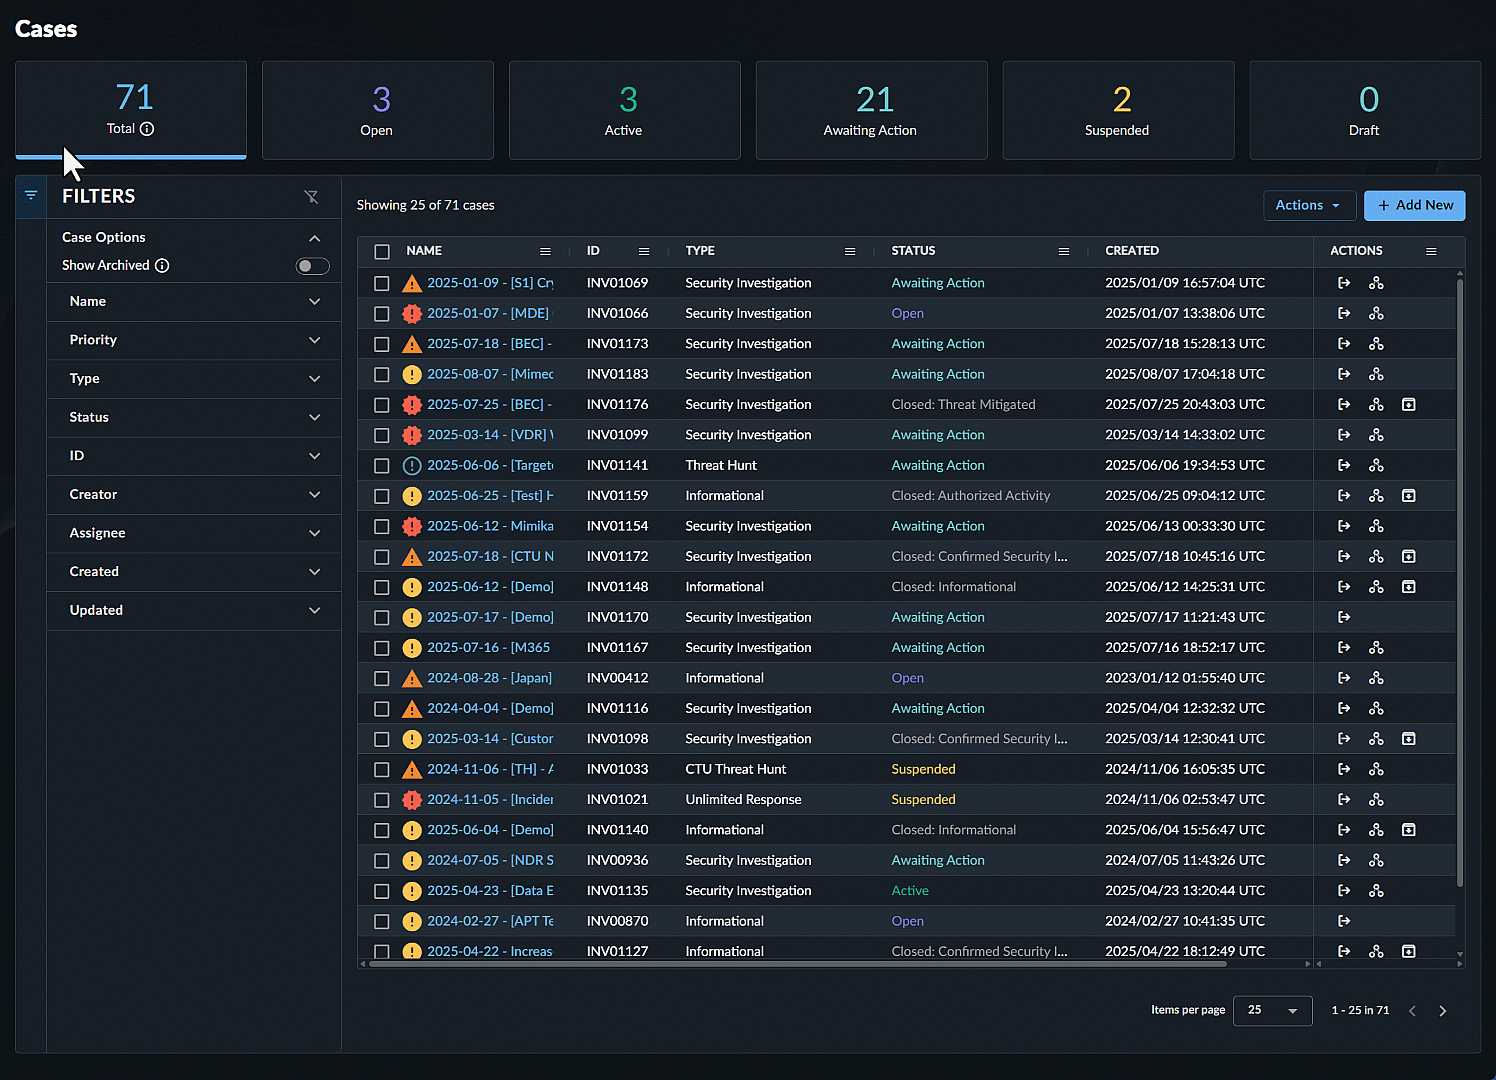
Filter Cases🔗
By default, the table shows all cases created in the past year that have not been archived. To filter the table of cases:
-
Select the status cards above the Cases table, which provide a count of all cases by that status. The number indicates how many cases are in that state.
- Total — All cases, except those that have an Archived status.
- Open — Cases with an Open status.
- Active — Cases with an Active status.
- Awaiting Action — Cases with an Awaiting Action status.
- Suspended — Cases with a Suspended status.
-
Use the collapsible filter menu at the left of the table to narrow down the list of matching cases.
- As you select filters, the table updates dynamically and the count of results reflects the updated filtered list.
- Select the Reset Filter Selection icon at the top right of the filter menu to clear all filters at once.
- The open or close state of the menu is saved as a user preference when you navigate away.
-
Edit and filter the columns in the table by selecting the menu icon at the right of a column header.
- Select the Show Archived filter to update the table with archived and closed cases. See Archived Cases for more information.
Tip
When hovering over a case title in the cases table, a tooltip will be displayed with the full case title.
Manage a Case🔗
Users with the required user role can take the following actions on cases:
- Start a New Case
- Add to an Existing Case
- Hand Off a Case
- Attach Files to a Case
- Comment on a Case
- Explore a Case in Detail with Entity Graph
- Close a Case
- Archive a Case
Note
The following affects how a case can be edited:
- Cases with any Closed status are read only, except for the Status field and the Archive action.
- Archived Cases are read only, except for the Unarchive action.
Select a case title anywhere throughout XDR to view its details. You can rename the case by selecting the Edit icon next to the name.
The case risk score shows in the cases table and in case details next to the name. For details, see Case Risk Score.
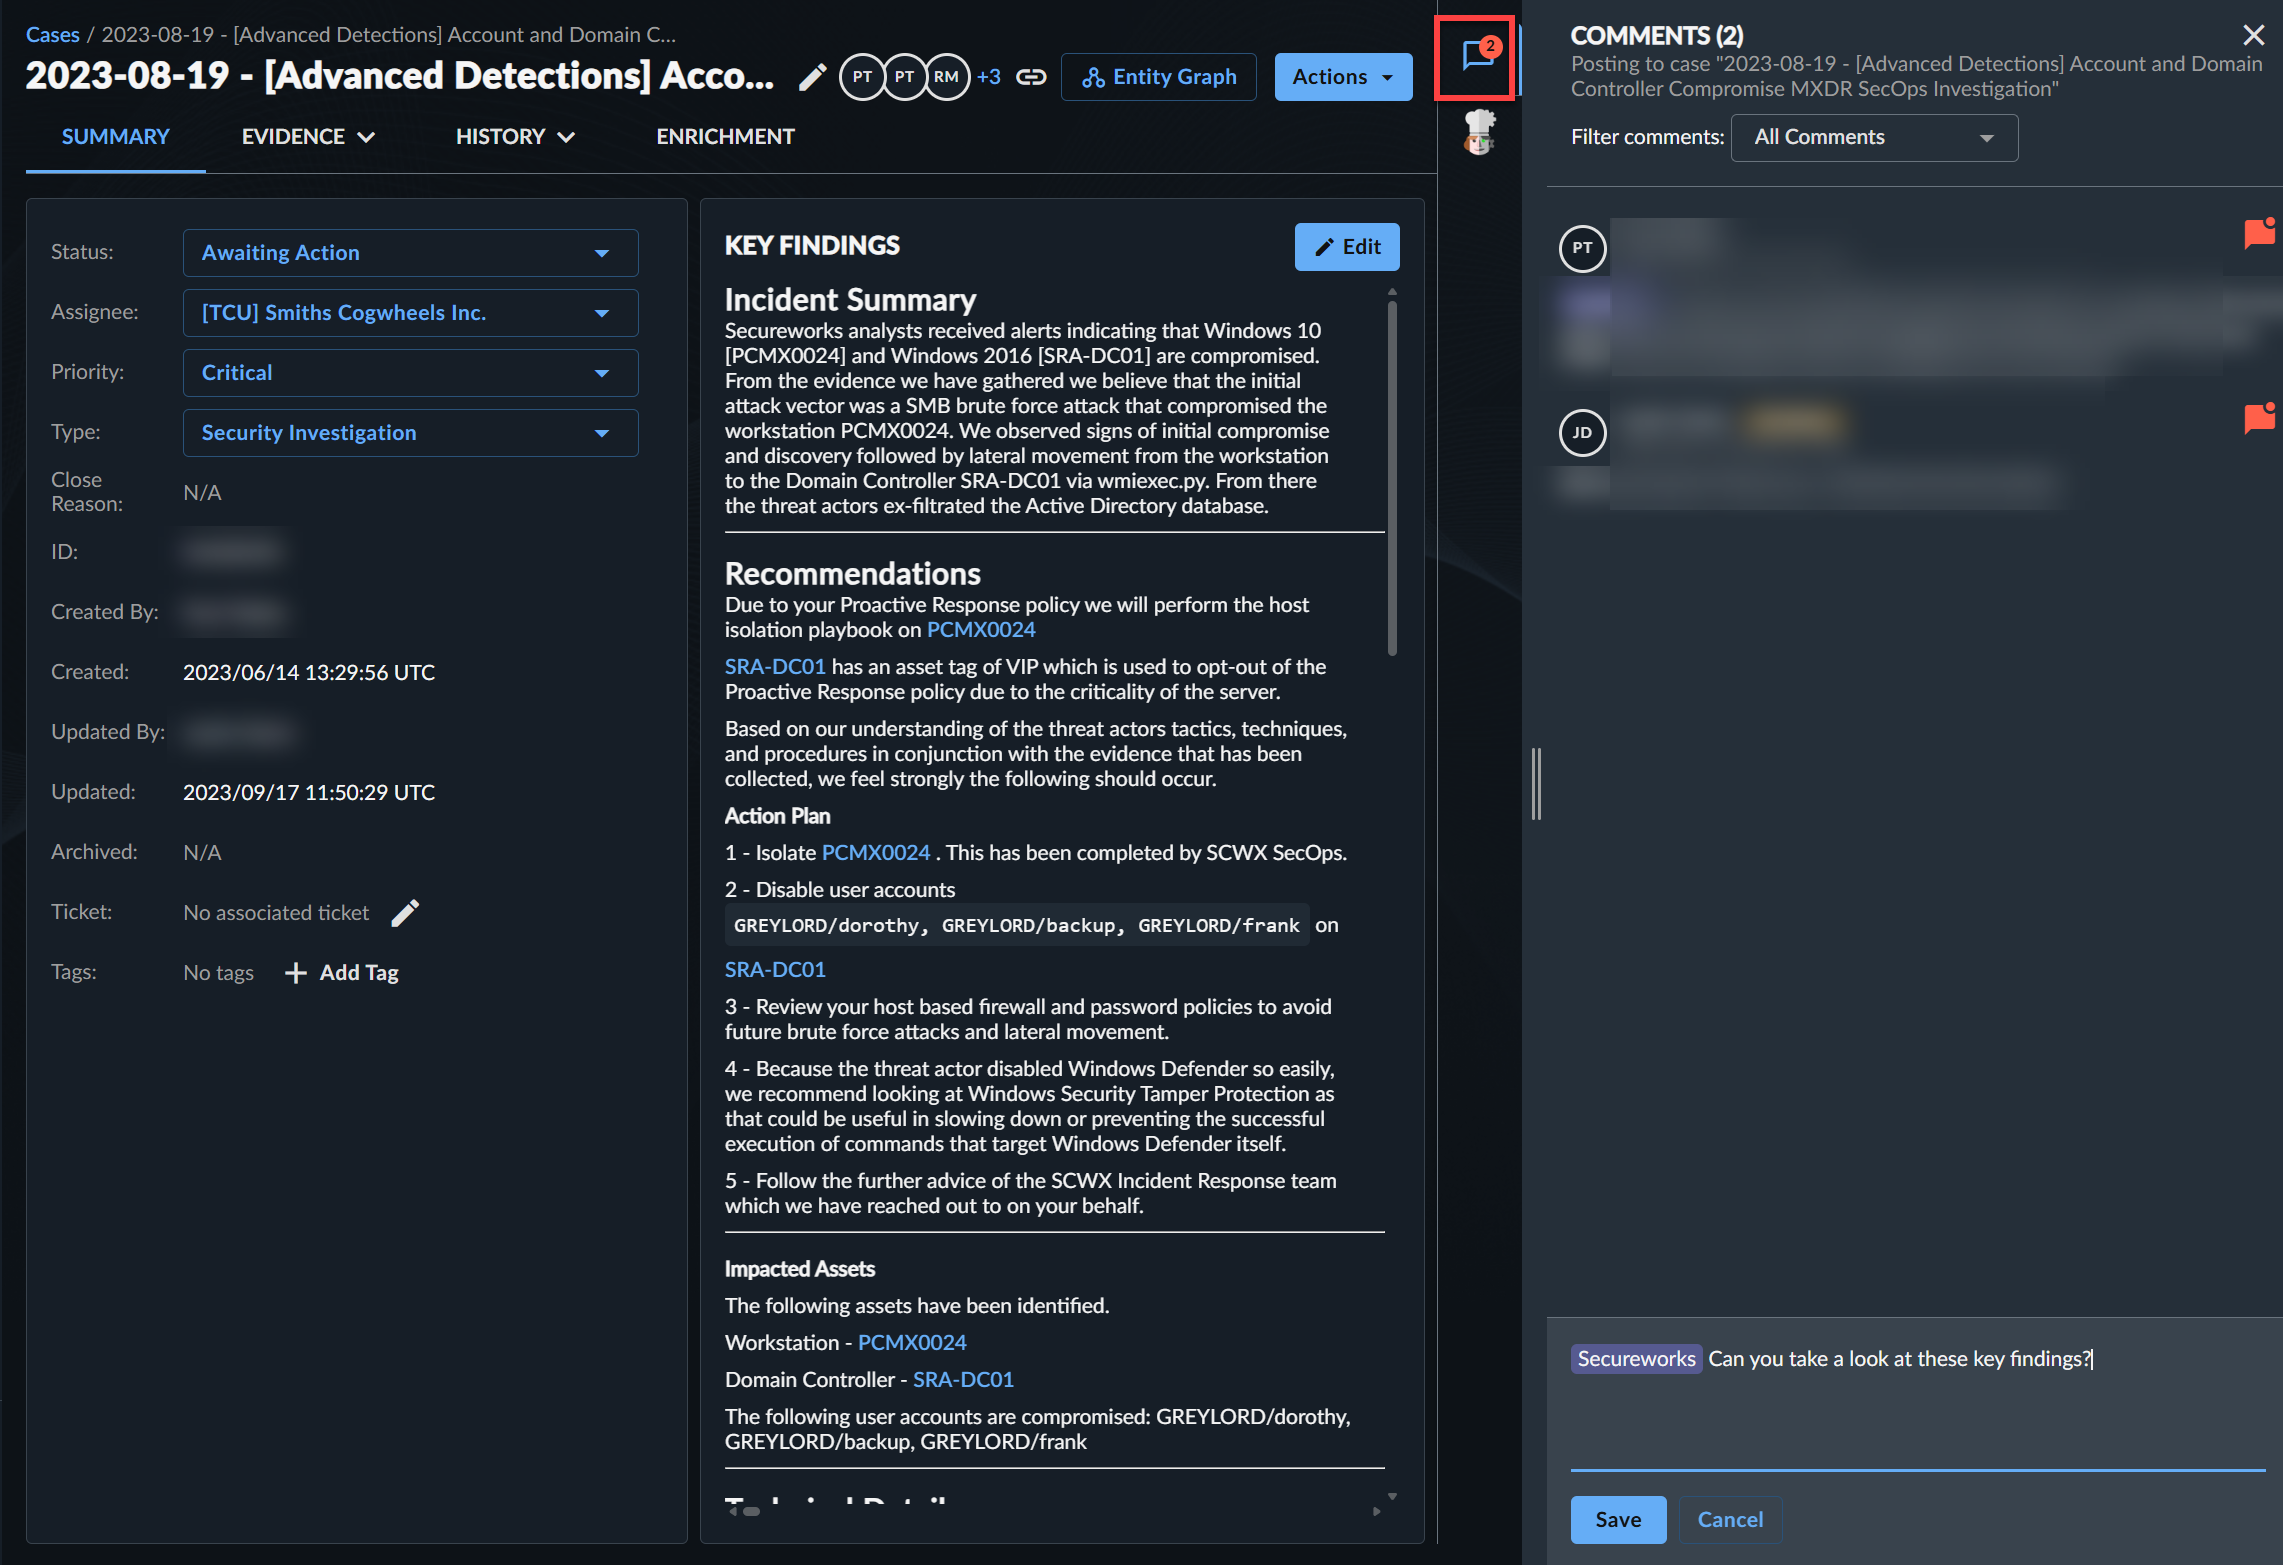
The full details of a case are divided into four tabs: Summary, Evidence, History, and Enrichment.
Tip
Hover over the Evidence or History tab to display a dropdown list of sub-tabs and quickly navigate to any section.
Ask Sophos AI🔗
Tenant Admins can click Ask Sophos AI at the top of a case to use the Sophos AI assistant to investigate the case.
For help with using the assistant, see AI Assistant Overview.
Summary Tab🔗
The Summary tab shows the following sections.
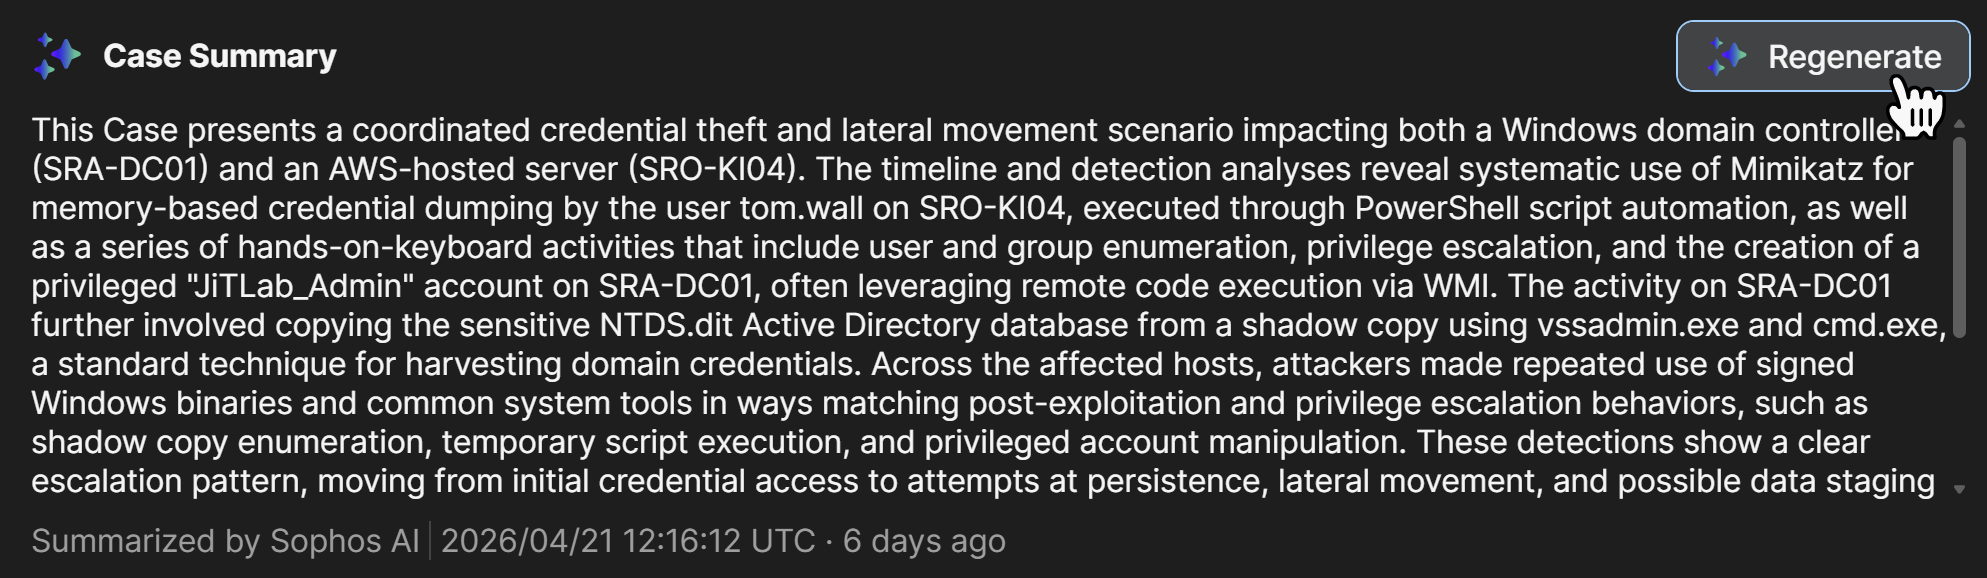
Case Summary🔗
The Case Summary section uses Sophos AI to generate a natural language summary based on available case data. The summary is automatically generated when the case is first created, but does not automatically refresh when the case is updated.
To update the summary to reflect any changes made to the case since the summary was last generated, click Regenerate at the top of the section.
The date and time the summary was last generated shows at the bottom of the section.
Note
The quality of the summary depends on available case data, such as the detections and events added to the case and the contents of the Key Findings.
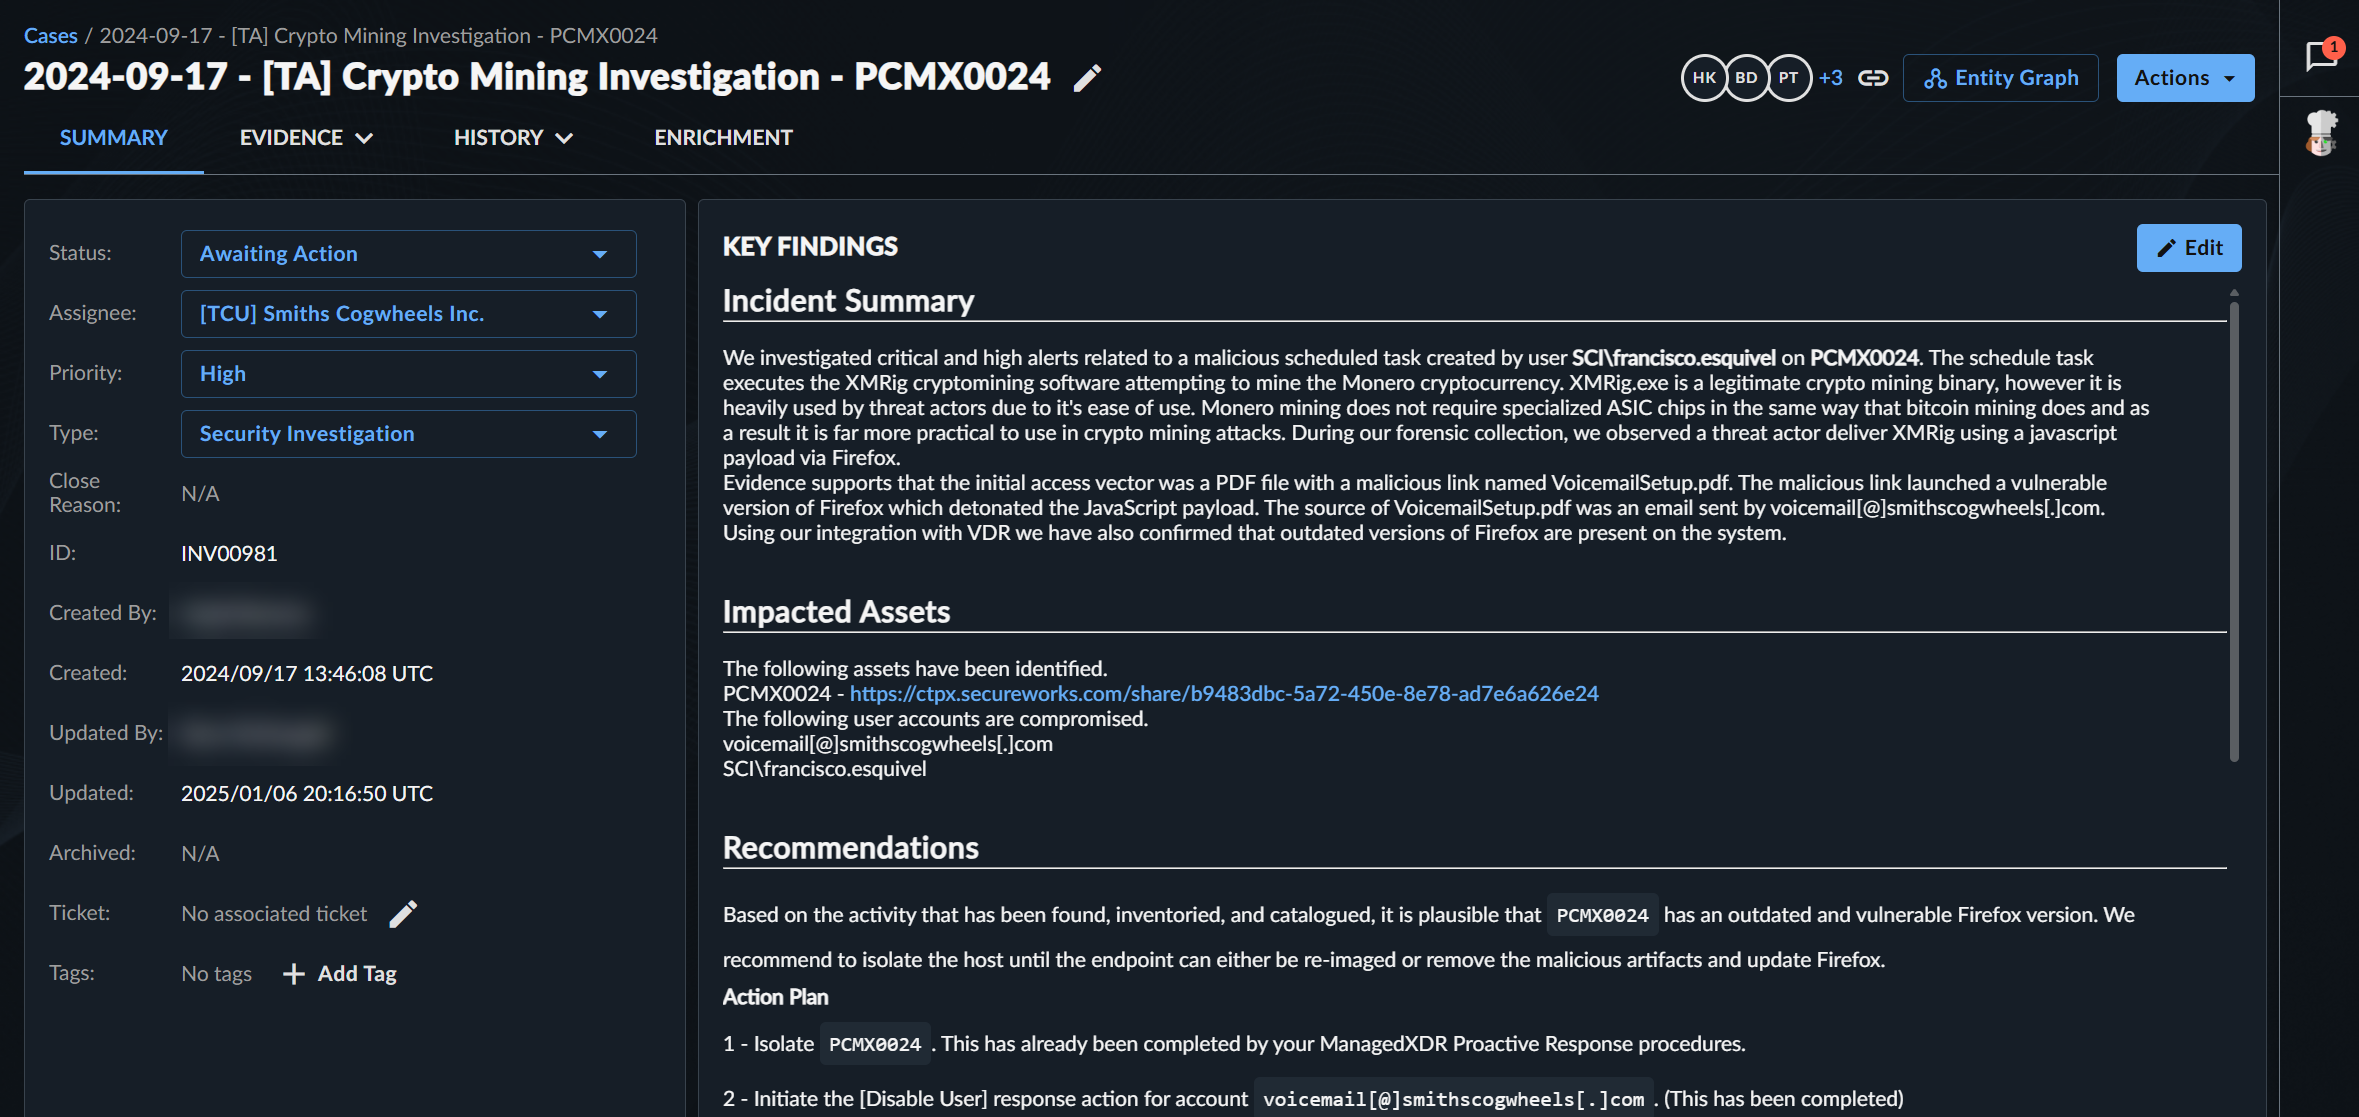
Case Details🔗
The details in the Summary tab include the following information about the case:
- Status — The current status of the case. See Case Status for more information.
- Assignee — To whom the case is currently assigned.
- Priority — An indication that highlights the importance and potential impact of the activity to your organization. See Case Priority for more information.
- Type — Category of the case. See Case Type for more information.
- Close Reason — The optional reason entered when the case was closed, if applicable. See Close a Case for more information.
- ID — The unique identifier number of the case (e.g. INV00001).
- Created By — The user who originally created the case.
- Created — The date and time that the case was created.
- Updated By — The user who last updated the case.
- Updated — The date and time that the case was last updated.
- Archived — The date and time that the case was archived, if applicable.
- Ticket — A reference number from your organization or your ticketing system, like Zendesk.
Note
Manual changes to this field may be overwritten by playbooks or other automated processes that are integrated with your ticket provider.
- Tags — Tags that can be added to the case.
Case Status🔗
The status of a case changes as the case is triaged, worked, and resolved, enabling you to track your team’s workflow.
| Status | Description |
|---|---|
| Open | The case has been created. |
| Active | The case is underway. |
| Awaiting Action | Some additional action is required for the case to continue. See Change Case to Awaiting Action for more information. |
| Suspended | The case has been paused. |
| Closed: Confirmed Security Incident | Your organization’s systems or data have been compromised or measures put in place to protect them have failed. The case is completed. |
| Closed: Authorized Activity | The activity is authorized or expected. The case is completed. |
| Closed: Threat Mitigated | The threat associated with the security incident has already been mitigated by a security control. The case is completed. |
| Closed: Not Vulnerable | The targeted system is not vulnerable to the exploit in question and therefore the case does not constitute a security incident. The case is completed. |
| Closed: False Positive Detection | The activity the detection indicated did not occur. This is not a security incident, so the case is closed as a false positive. |
| Closed: Inconclusive | The activity’s root cause has not been identified and there is no further activity detected. The case is completed. |
| Closed: Informational | Analysis conducted of the activity did not lead to any notable findings. The case is completed. |
Note
Cases may have a Draft status while they are triaged and are not viewable from Cases in XDR. Upon verification of need to escalate the case, the Draft status is removed and the case is escalated and viewable.
Tip
If you subscribe to Taegis MDR, your Taegis MDR Dashboard relies on the resolution of cases to generate the included statistics.
Case Priority🔗
When you create a case, use the case priority as described in the following table to highlight the importance and potential impact of the related activity to your organization, as well as to determine the order in which each case should be addressed. You can also alter the priority as you work a case.
For cases created by Secureworks, analysts manually set the priority based on the assessed threat and potential impact of the related activity. The priority may also be set by an Auto Case Template for cases that are automatically created.
| Priority | Description |
|---|---|
| Critical | Activity that poses an imminent threat that requires immediate attention. May be a ransomware outbreak, threat actor hands on keyboard, data exfiltration, credential dumping, internal domain and network enumeration, persistence creation and execution, etc. |
| High | Potentially significant activity that requires prompt attention; for example, host infection, stolen credentials, successful exploitation, etc. |
| Medium | Activity that may escalate impact, such as login failures, vulnerability scanning, etc. |
| Low | Activity unlikely to cause impact, like instant messaging, adware, port scanning, etc. |
Case Type🔗
Categorize the different types of cases that your organization is conducting.
| Type | Description |
|---|---|
| Security Investigation | The default type for cases identified via detections in XDR. |
| Incident Response | Used to collect evidence and case details related to Incident Response engagements. |
| Threat Hunt | Used for examining unidentified, hidden threats. |
| OT Case | Used for OT-related cases. |
| Informational | Used only to communicate information. Cases of this type are not indicative of a security-related incident. |
Secureworks may also use the following case types that are only available to Secureworks users.
| Type | Description |
|---|---|
| Taegis MDR Threat Hunt | Taegis MDR Service monthly proactive Threat Hunt. |
| CTU Threat Hunt | Threat Hunting performed by the Secureworks Counter Threat Unit (CTU™). |
| Taegis MDR Elite Threat Hunt | Used as part of the Elite Threat Hunting Service. |
| Secureworks Incident Response | Used to automate escalations to Secureworks IR. |
| Unlimited Response | Used as part of Unlimited Response for Taegis MDR customers. |
| Taegis MDR OT Case | Used for OT-related cases as part of the Taegis MDR for OT Service. |
Key Findings🔗

The Key Findings section provides a space for you and your collaborators to record your analysis of the case. Select Edit to write your own report as the case develops.
When you create a new case, you can choose whether the Key Findings section is blank or you can choose the Security Investigation template. This template populates the key findings with the following sections:
- Incident Summary
- Recommendations
- Technical Details
- References
Tip
The Key Findings section supports Markdown formatting so you can easily format your case and findings.
Evidence Tab🔗
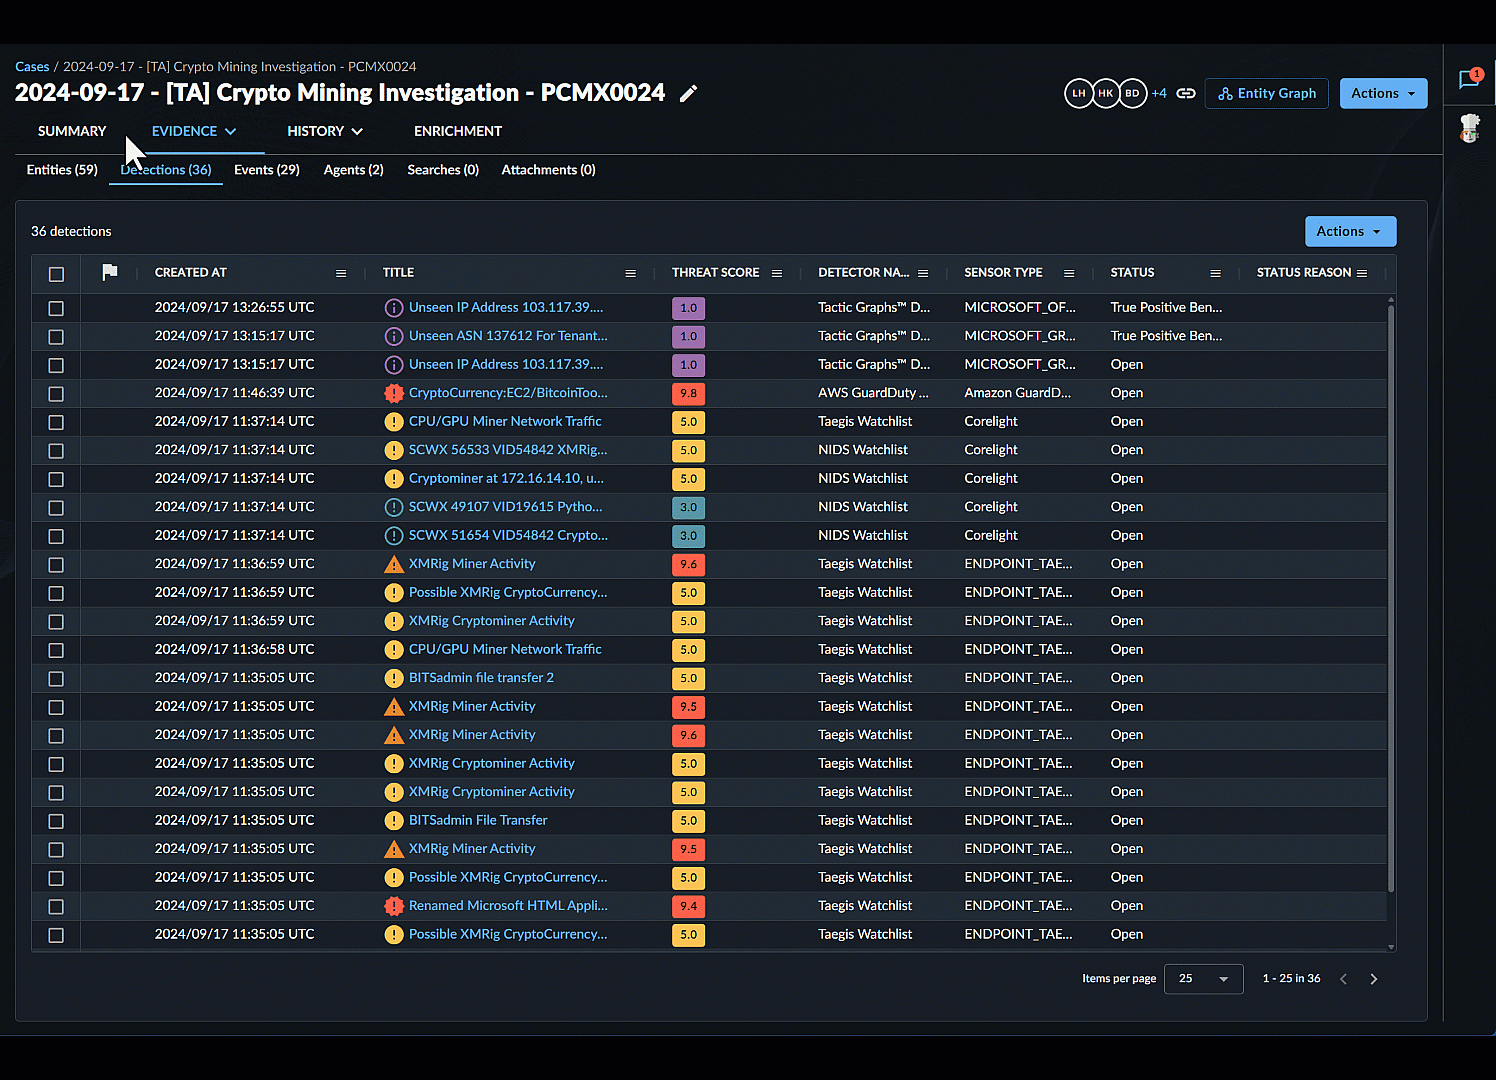
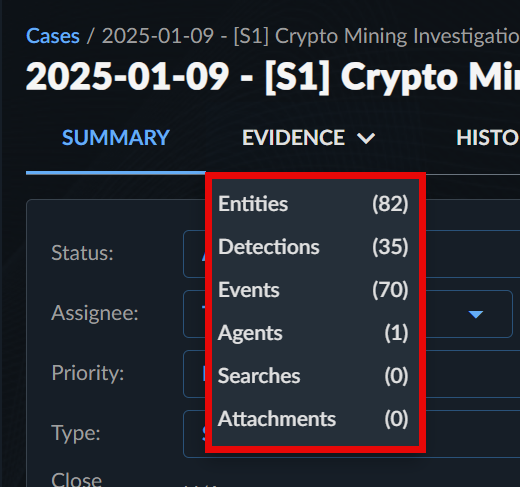
The Evidence tab presents all of the gathered documentation related to the case in one place and includes the following sub-tabs:
- Entities — All entities extracted from the events that are part of the case. Entities are data that played a role in the incident, including usernames, hostnames, IP addresses, and files. See Entities for more information.
- Detections — Detections added to the case. The first detection(s) used to start the case have a flag icon indicating they are Genesis Detections.
-
Events — Events added to the case. The first event(s) used to start the case have a flag icon indicating they are Genesis Event(s).
Note
Events added to the case can be filtered and sorted in various columns.
-
Agents — Devices affected by the detections or events in the case.
-
Searches — Search queries linked to the case. Select one to open the search.
Note
Removing a search query from a case does not delete the search query itself; it merely unlinks the two.
-
Attachments — View and manage file attachments related to the case. 2GB max file size.
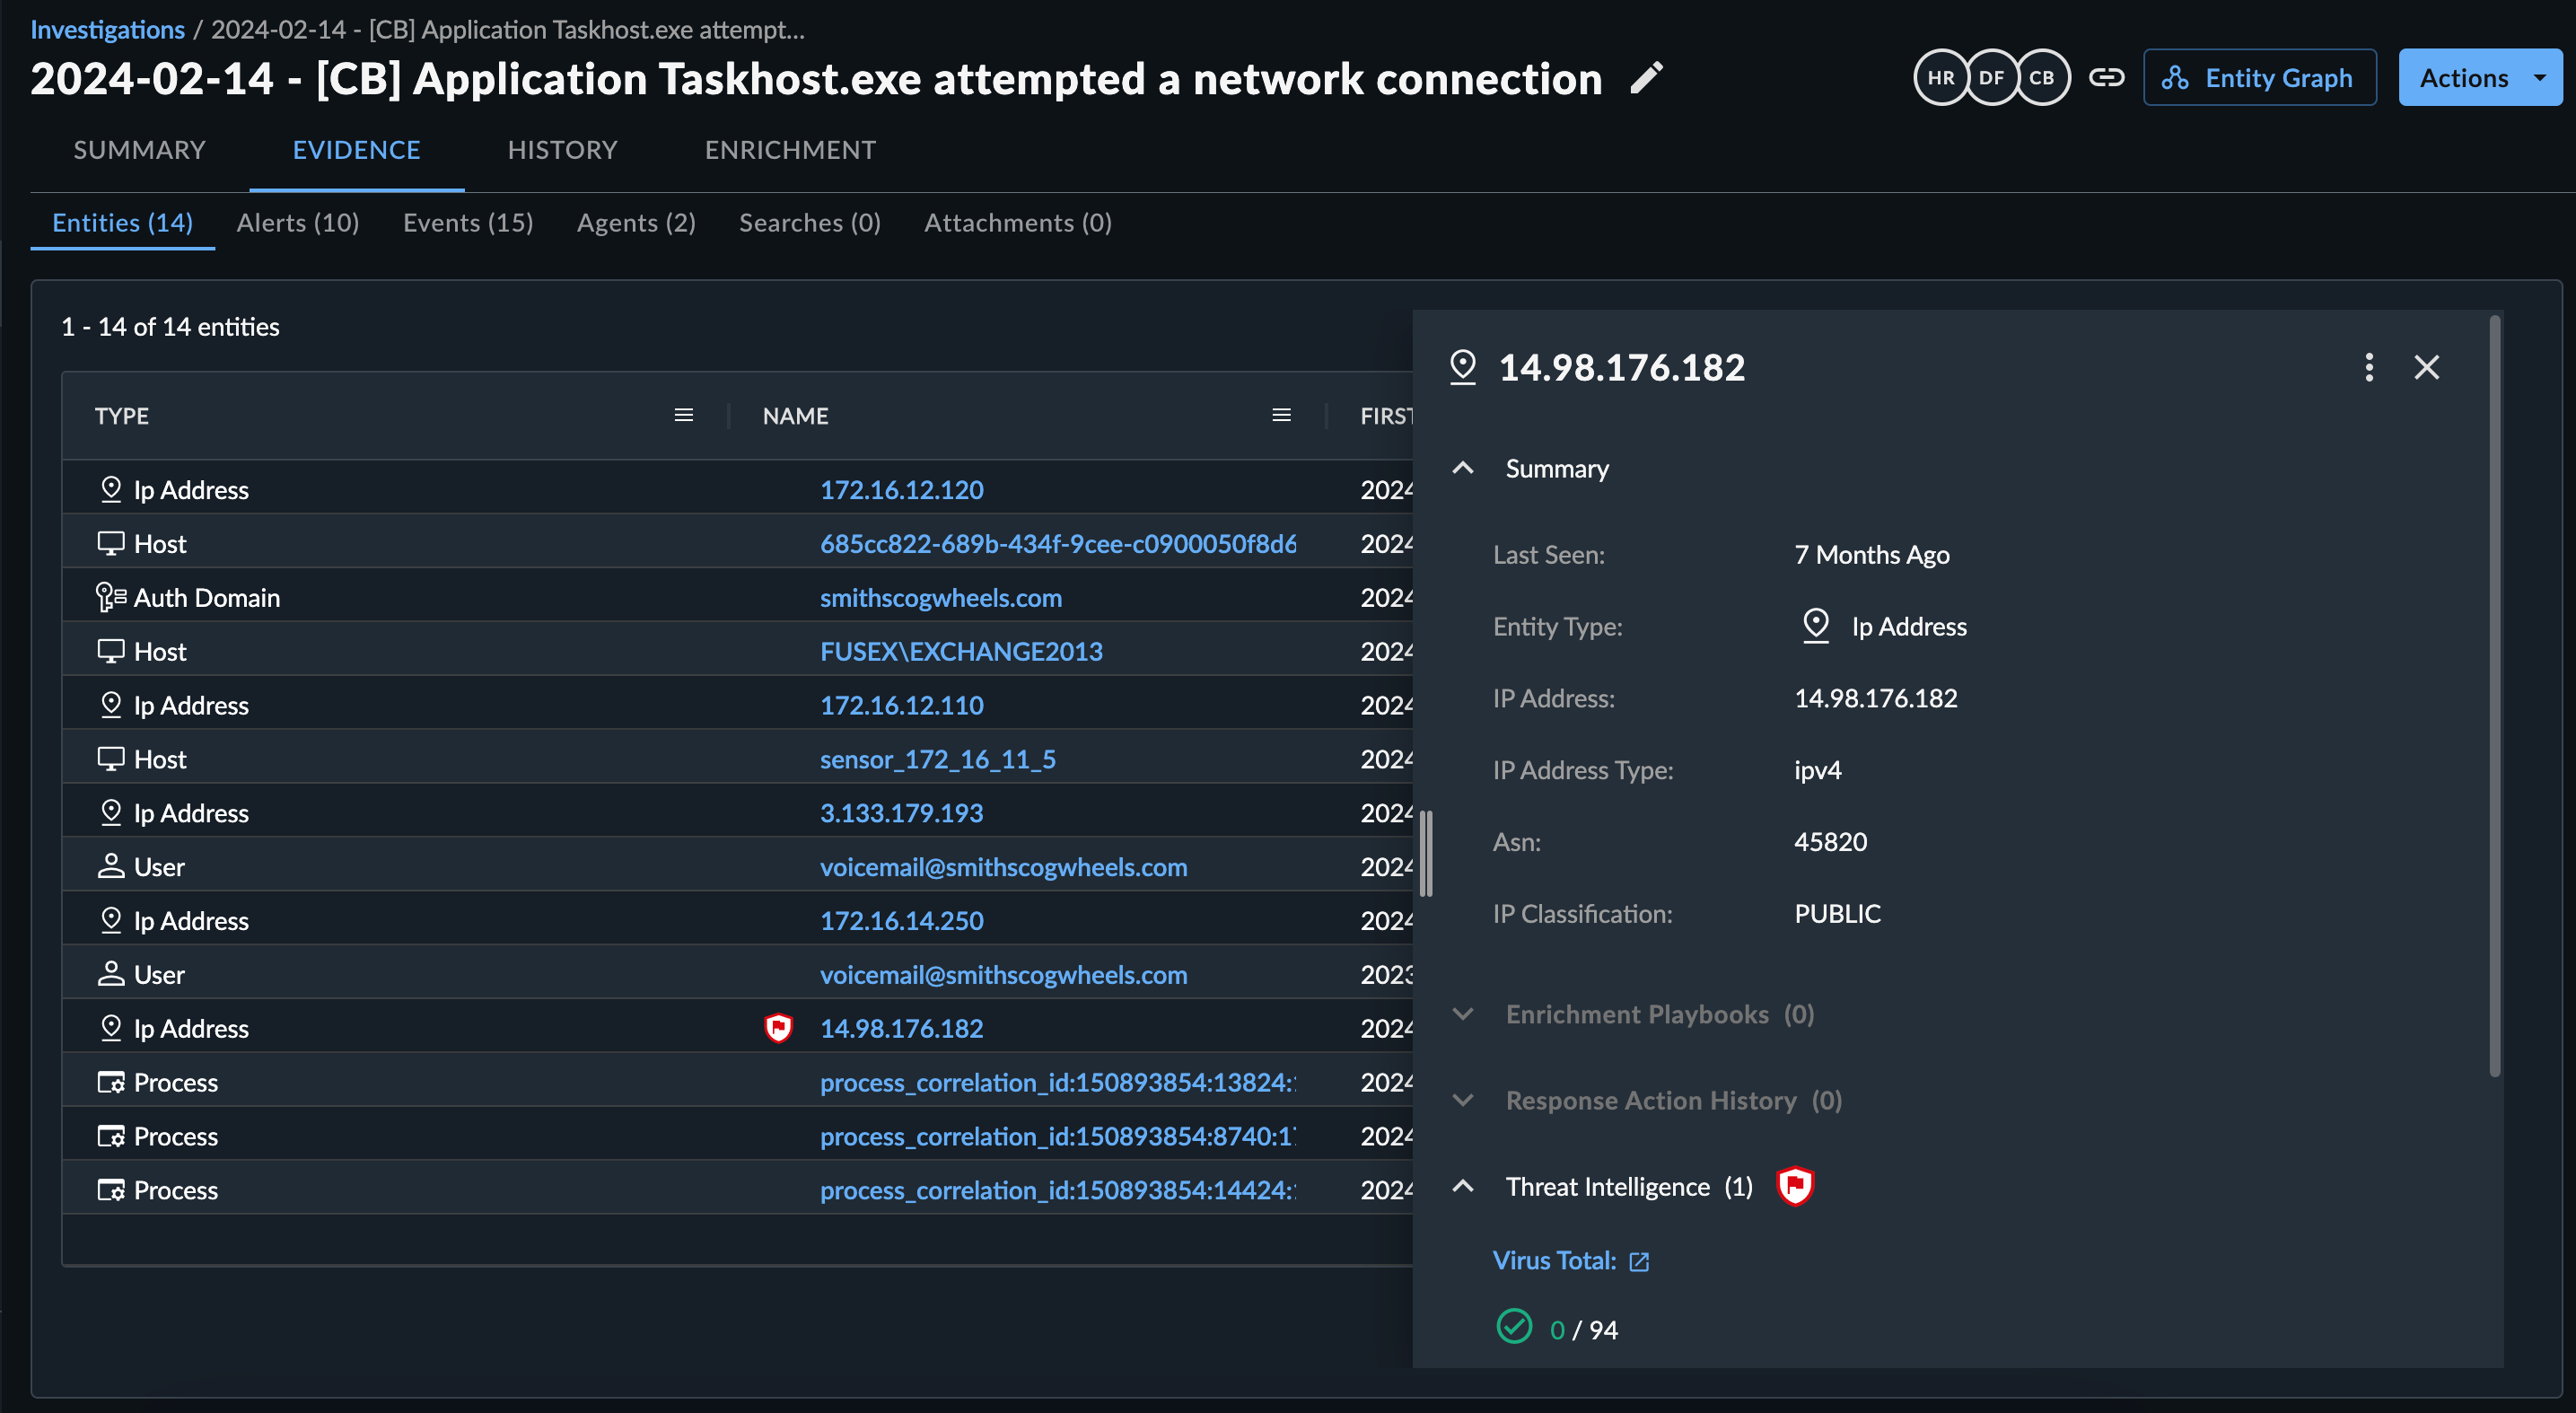
Entities🔗
From the table in the Entities sub-tab, select an entity name to open the entity details side drawer on the right. The entity details include additional information about the entity depending on the type, such as when the entity was first seen and last seen, related entities, related detections, and threat intelligence, if available. Select the New Tab icon from the side drawer view to open the full entity details page.
Tip
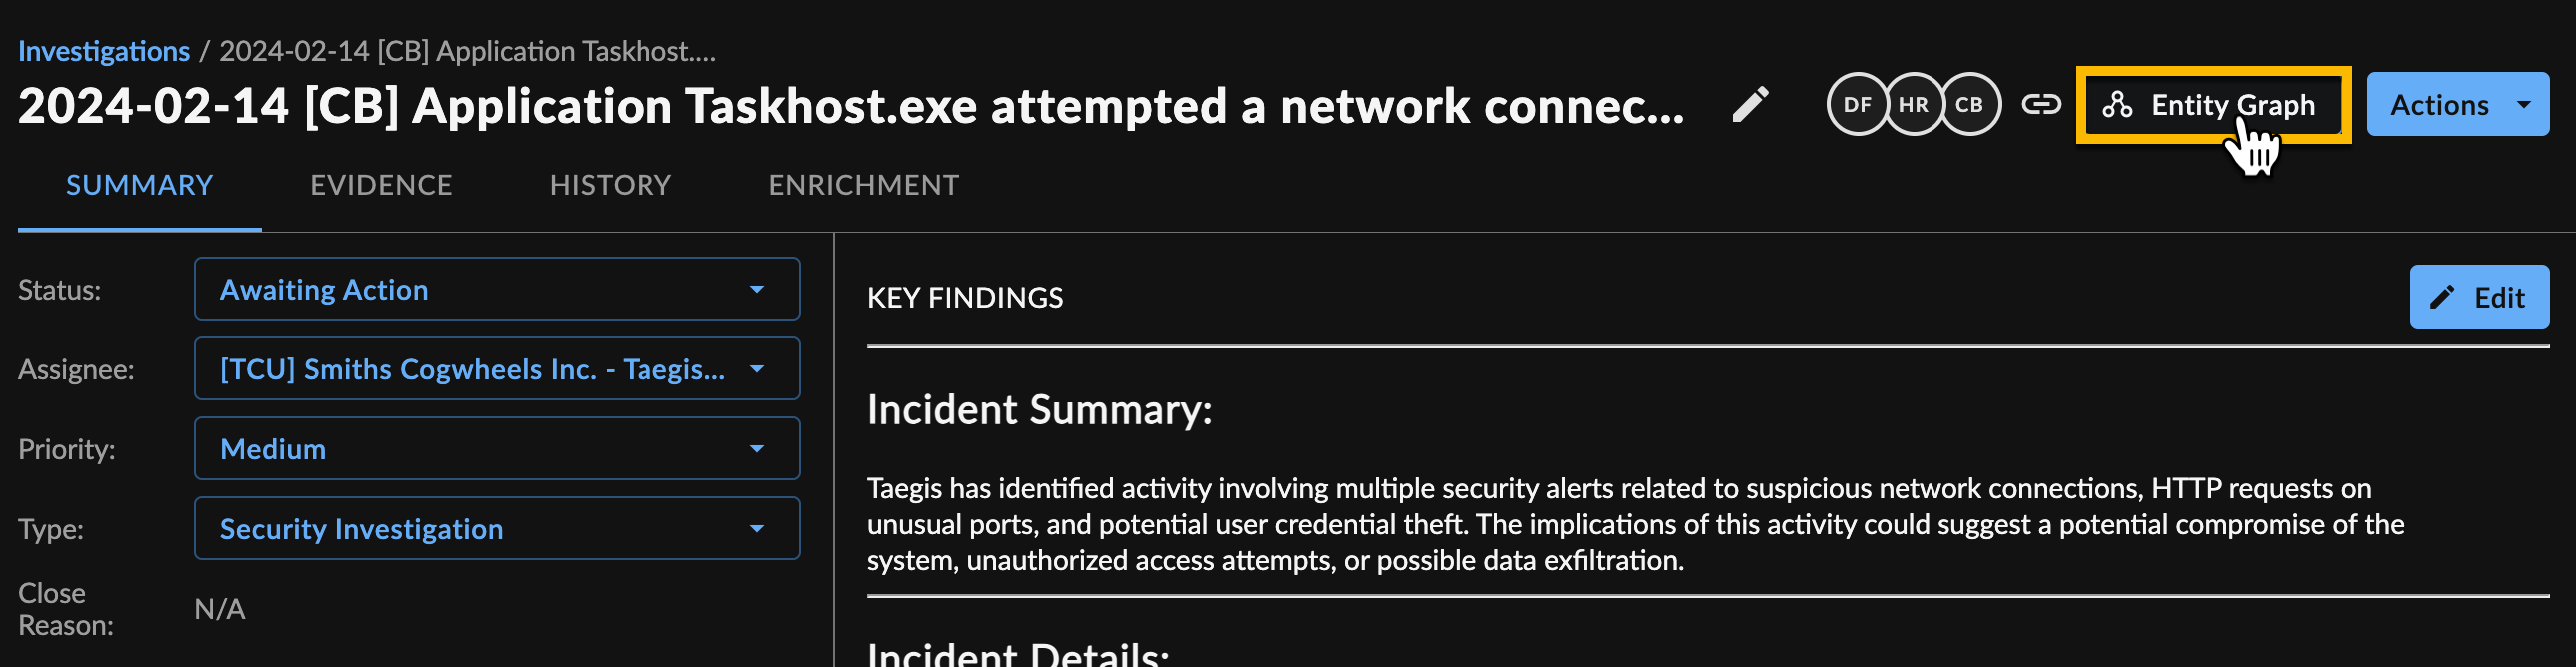
Select Entity Graph from the top right of the case to launch Entity Graph and visually explore the case's associated entities and their relationships and details. See Explore a Case in Detail with Entity Graph for more information.
Sort and Filter Entities🔗
To customize the Entities table:
- Select the menu icon next to a column header to pin, autosize, and reset columns.
- Choose the column icon to choose which columns appear in the table.
Take Response Actions on Entities🔗
If relevant automations have been configured in your tenant, you can perform response actions on an entity. Select the vertical ellipses from either the Actions column of the Entities table or from an entity details side drawer.
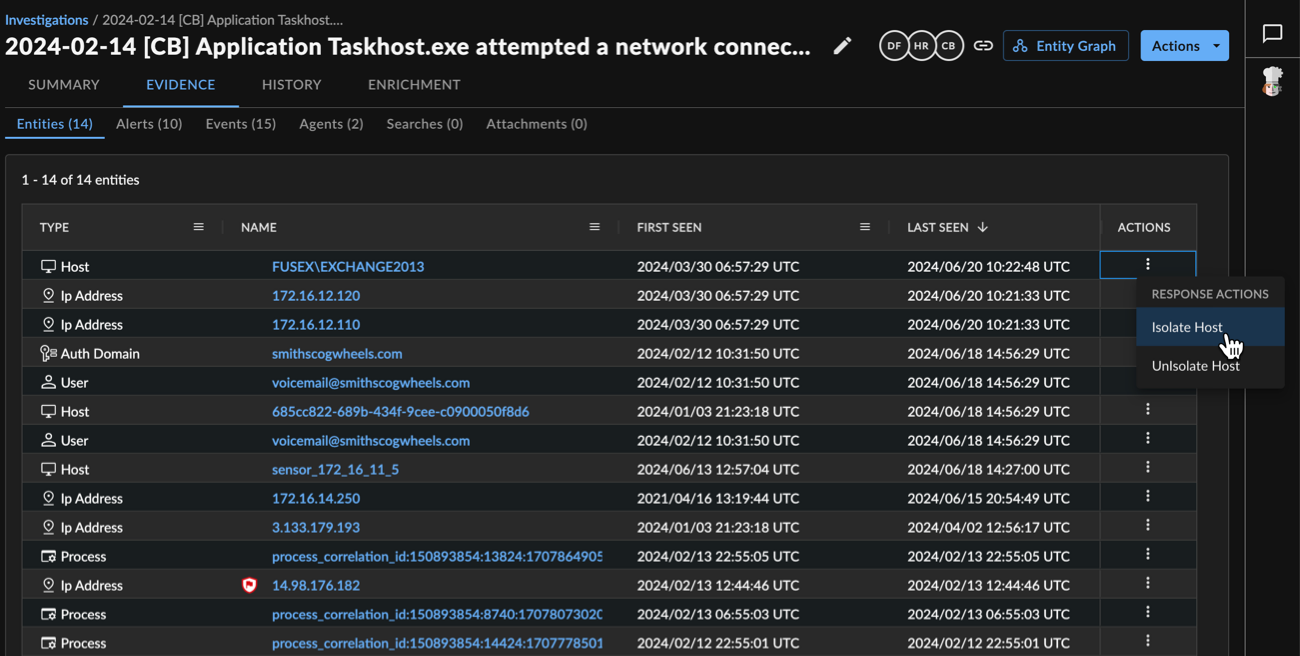

Tip
You can also take response actions on entities from the Entity Graph. See Explore a Case in Detail with Entity Graph.
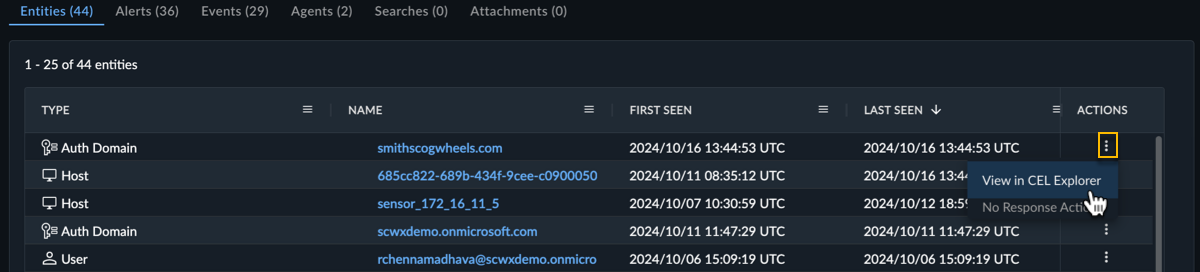
View Entities in CEL Explorer🔗
From the Actions menu, select View in CEL Explorer to test the outcome of CEL expressions against the data being viewed for use in Automations configurations. For more information, see CEL Explorer.
History Tab🔗
The History tab presents data related to the history of the case in one place and includes the following sub-tabs:
Timeline🔗
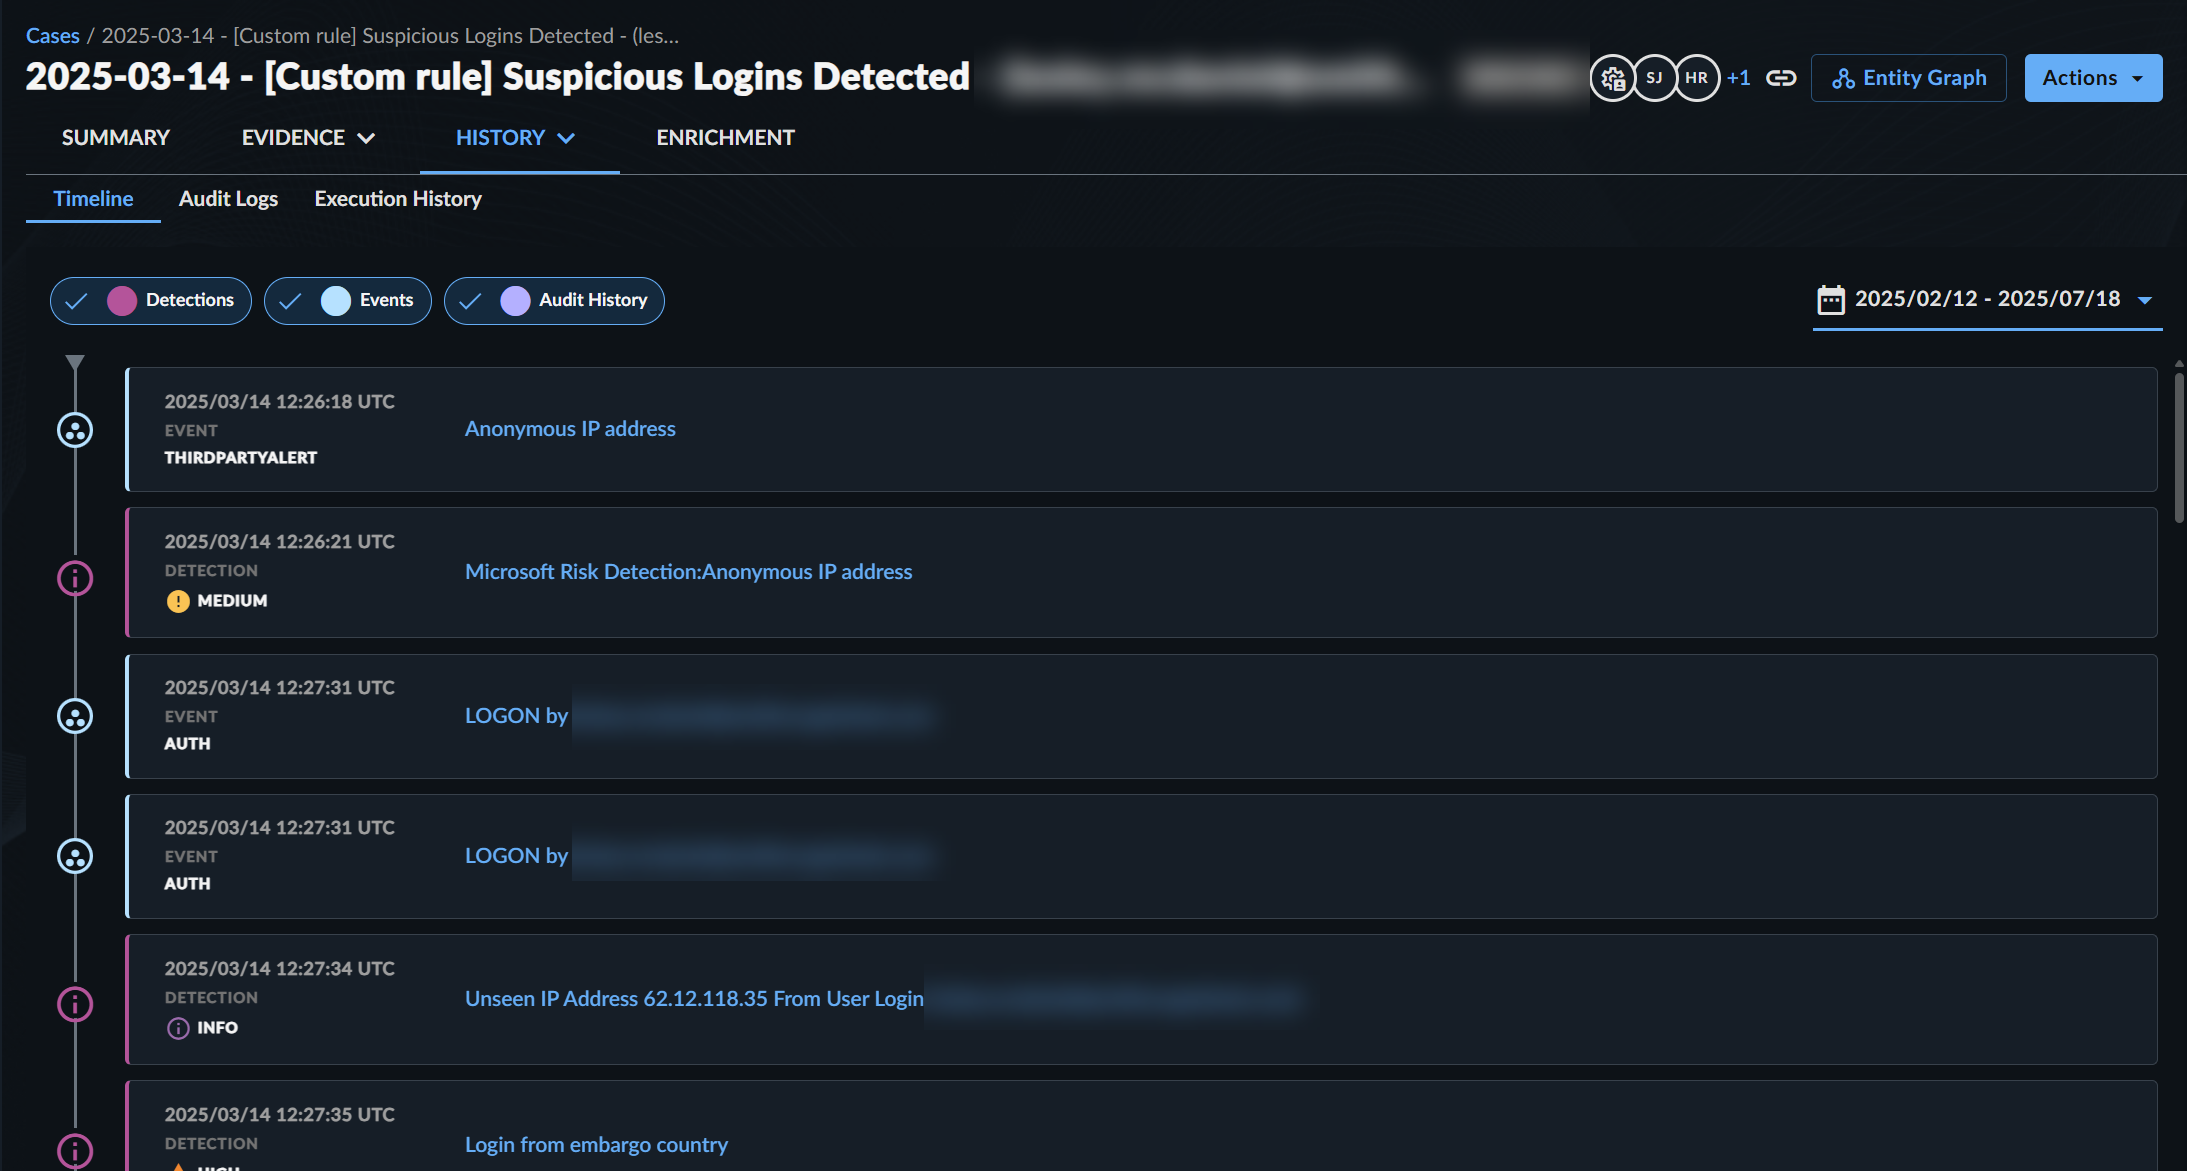
The Timeline sub-tab shows a chronological view of case detections, events, and actions to help you visualize the case's scope and progress.
- By default, the timeline displays all detections, events, and audit history actions 30 days before the case was created, and 30 days after the last case update. Use the date/time picker to change the time frame.
- Use the filters to include or exclude by activity type: Detections, Events, and/or Audit History.
Note
The case timeline only supports detections that were created since the new Detections interface became generally available.
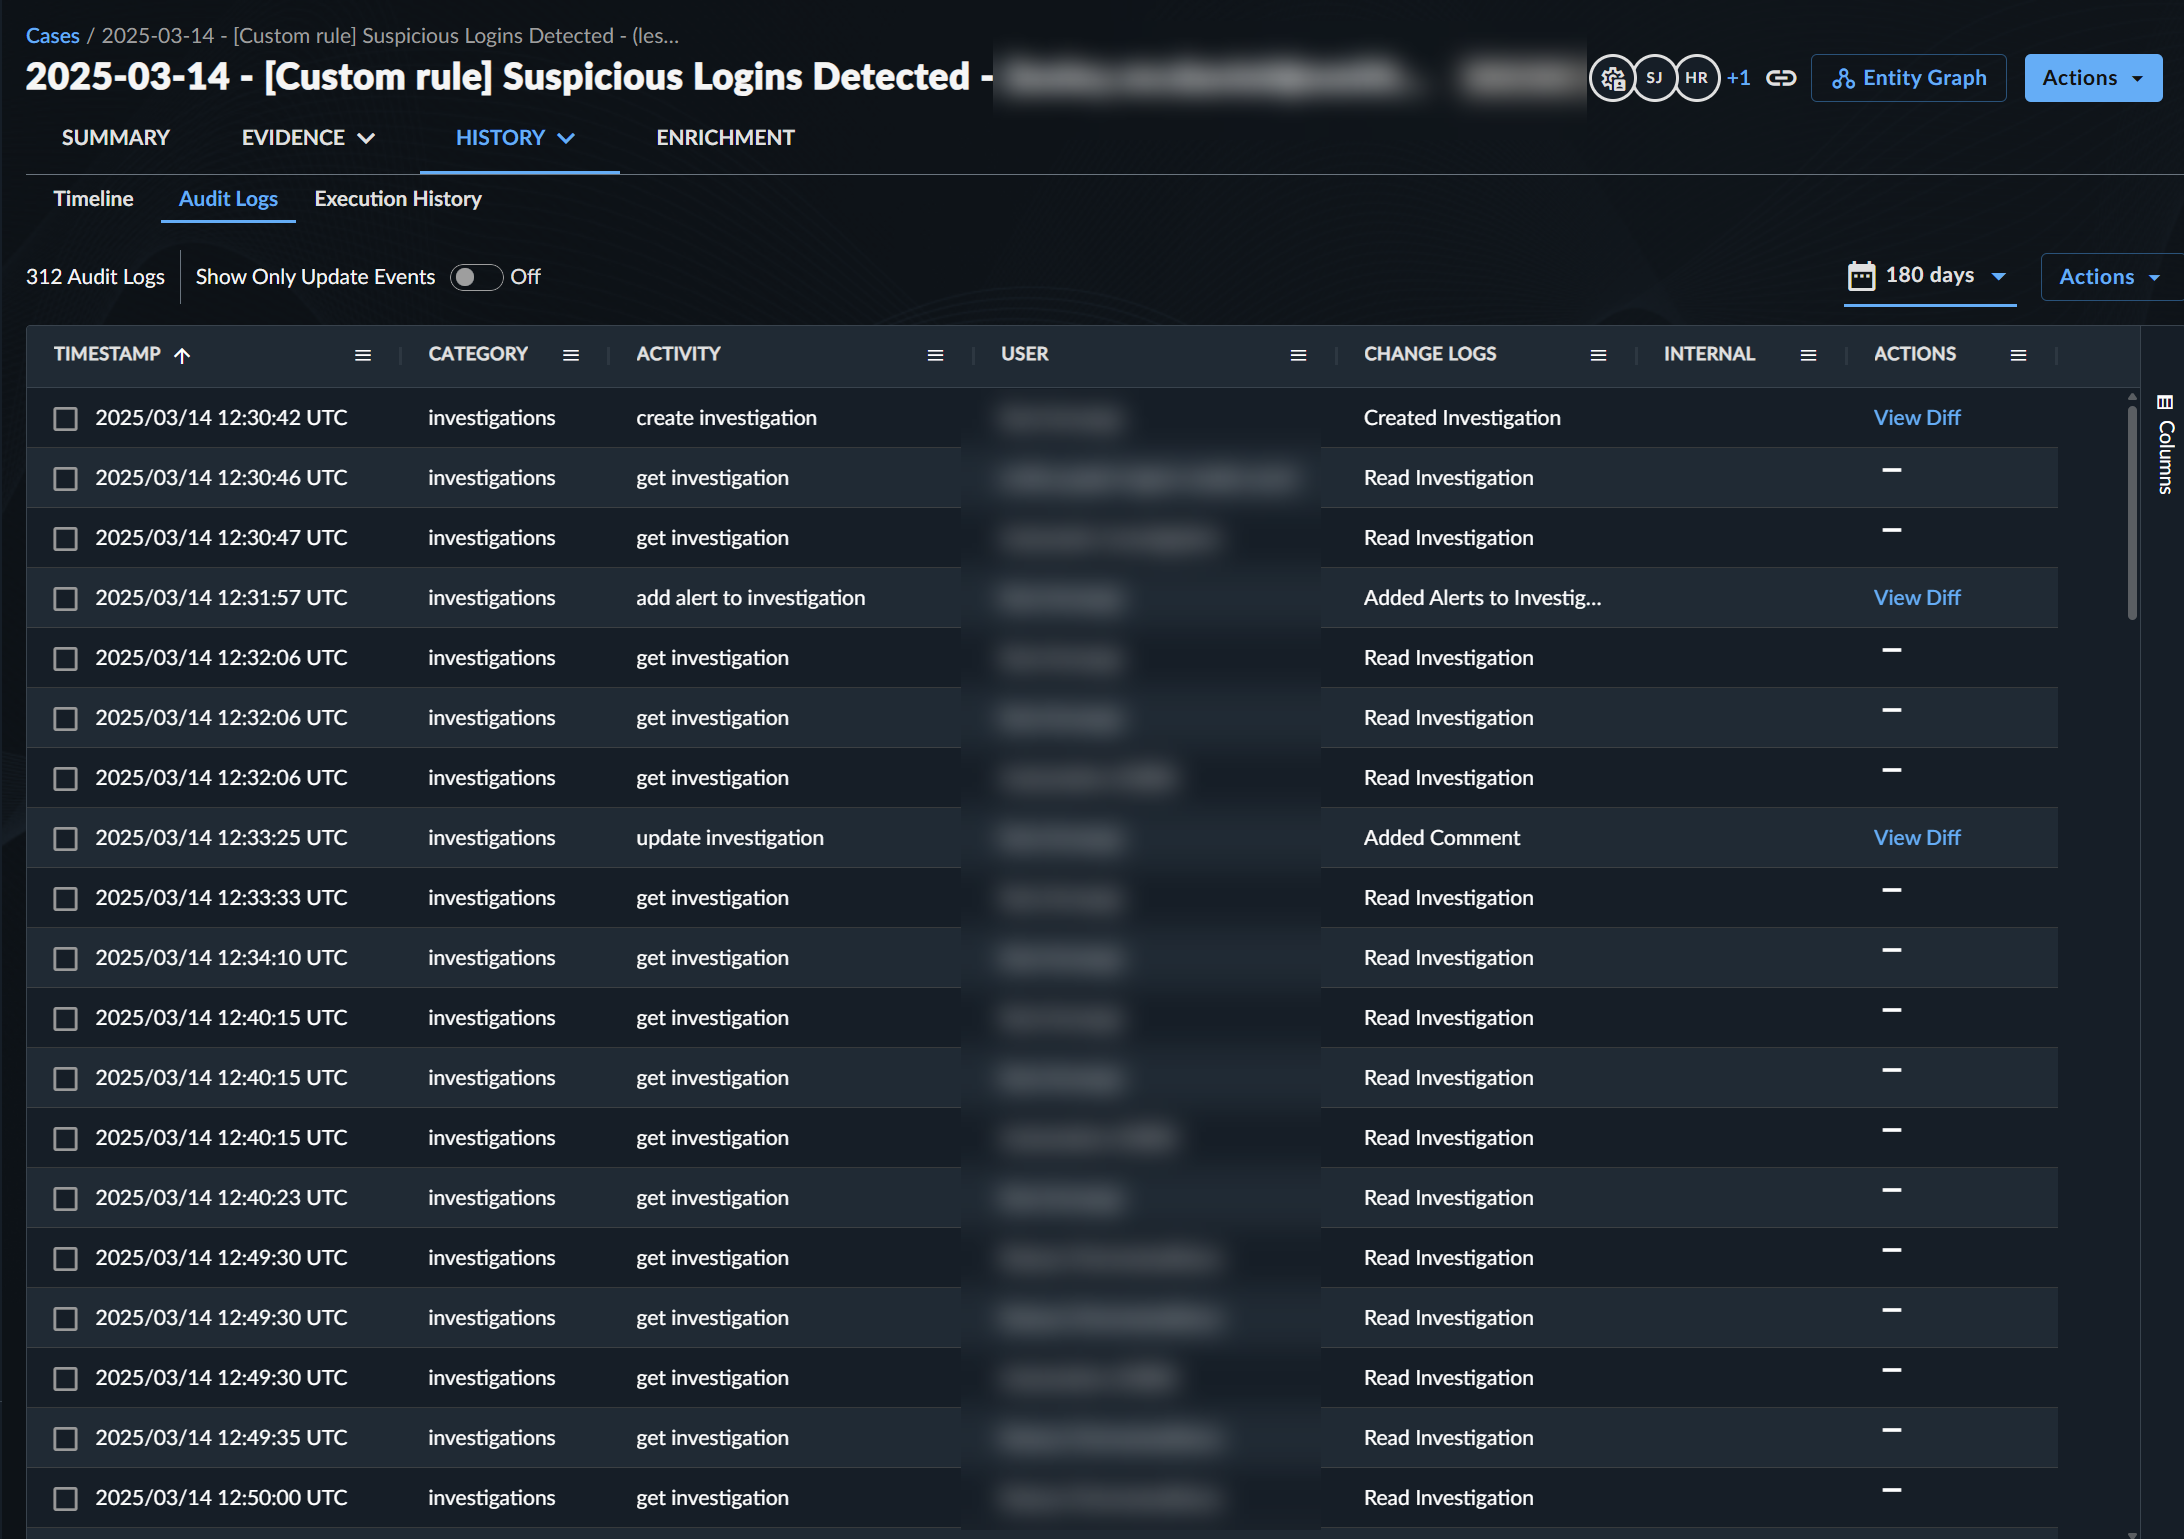
Audit Logs🔗
The Audit Logs sub-tab presents a table of audit logs related to the case.
Execution History🔗
The Execution History sub-tab shows the history of playbook executions for the case. Click a row’s timestamp to open a details side drawer displaying the playbook execution logs.

Enrichment Tab🔗
The Enrichment tab shows any enrichment playbook instances that have executed on that case. Click an entry to view the output of the playbook and its execution history.
Explore a Case in Detail with Entity Graph🔗
To deep dive into the case's associated entities and explore their relationships and details, select Entity Graph from the top right of the case to launch Entity Graph.
Tip
You can also launch Entity Graph by selecting the Entity Graph icon from the Actions column of the Cases table.
Add Comments to a Case🔗
You can view all the comments made on a case in the collapsible sidebar.
To add your own comments to a case, follow these steps:
- Open the case details page.
- Select the comment icon in the right-hand utility tray.
-
Type your message.
Tip
The Case Comments text entry field supports basic HTML tags, as well as emoji, so you can 🙂 , 🤔, or even 😱 where needed.
Tip
@ mention other users to send them a notification in XDR, so they can reply.
If you have a subscription for Taegis MDR, you can communicate directly with your Secureworks Threat Hunter team by adding @secureworks to your comment. This notifies your support team and includes them in your discussion.
When replying to a comment that used an @ mention, the new comment automatically starts with an appropriate @ mention to ensure the party receives a notification. This automatic mention can be removed if unwanted.
-
Choose Save.
Tip
Drag the handle to adjust the width of the comments panel.
Hand Off a Case🔗
The current owner of a case is called the assignee. Other users that add comments or modify the case are collaborators. The assignee and collaborators avatars display in the header of the case. Each case has one assignee at a time. This is either someone from your organization or Secureworks.
There are two ways to hand off a case to a specific user:
Choose an Assignee🔗
- Open the case details page.
- Select the current Assignee’s name.
- Choose an assignee. Start typing to narrow down the list by their name or their email address. This can be yourself, the entire tenant, or a specific user. Taegis MDR subscribers can also assign the case to Secureworks.
- The case's status changes to Awaiting Action, or to Active if you assigned it to yourself. The new assignee is notified via their in-app notifications and by email if they have opted to receive these.
Change Case to Awaiting Action🔗
- Select Awaiting Action from the status drop-down list on a case.
- In the pop-up modal, select a user whose action you are waiting for.
- Choose Assign Case.
- The case's status changes to Awaiting Action. The new assignee is notified via their in-app notifications and by email if they have opted to receive these.
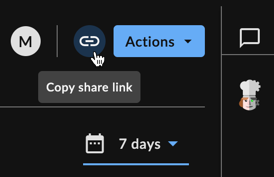
Share a Case🔗
To share a case with another user within the tenant, select the Copy share link icon for a direct URL.
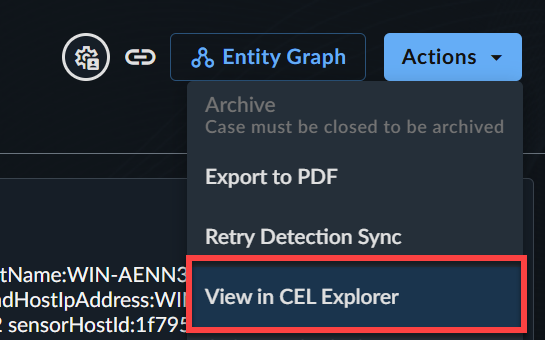
View Case in CEL Explorer🔗
From the Actions menu, select View in CEL Explorer to test the outcome of CEL expressions against the data being viewed for use in Automations configurations. For more information, see CEL Explorer.
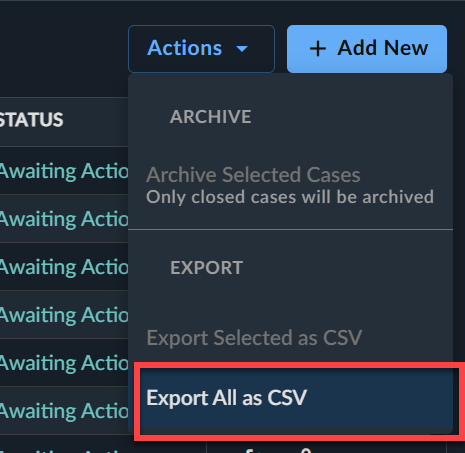
Export Cases🔗
Export All to CSV🔗
To download a CSV file of the table of cases, follow these steps:
- Select Cases from the Taegis Menu to view the Cases page.
-
Filter the table if needed.
Tip
While you can filter according to column content, all possible columns will be included in the final CSV file.
-
Select Actions → Export All as CSV. When your download is ready, it appears in the Data Exports table.
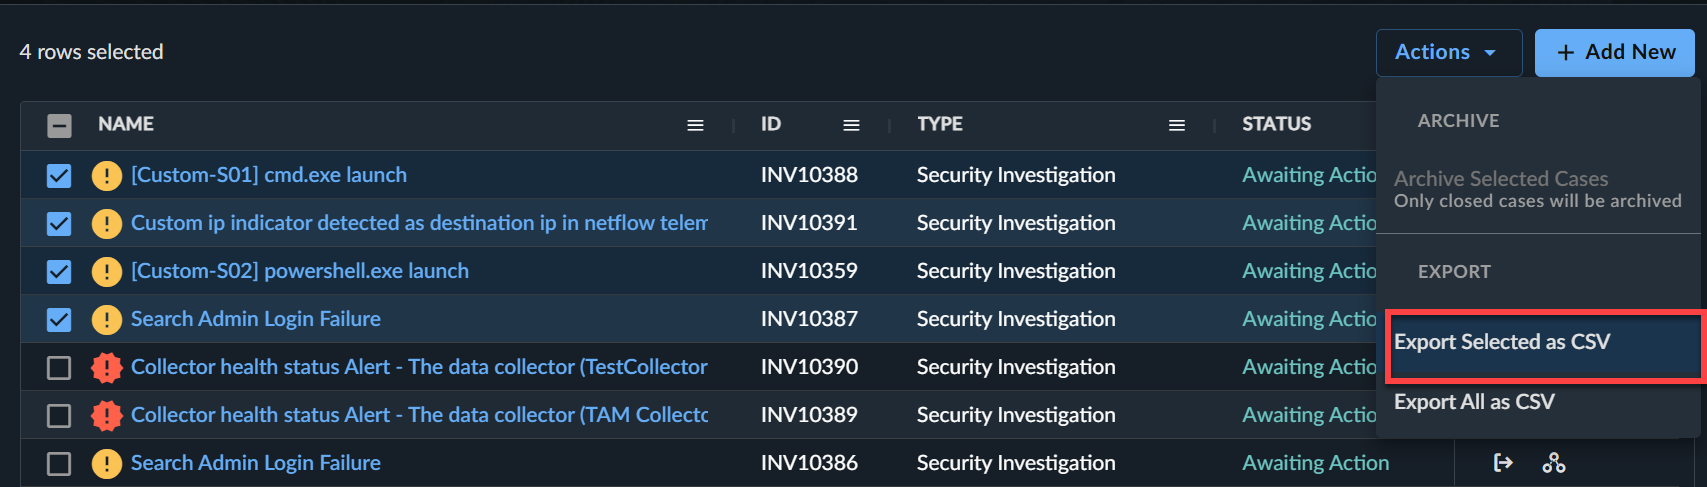
Export Selected to CSV🔗
To download a CSV file of a single row from the table, choose the export icon from the Actions column for the desired row.
To export multiple selected rows, follow these steps:
- Select Cases from the Taegis Menu to view the Cases page.
-
Filter the table if needed.
Tip
While you can filter according to column content, all possible columns will be included in the final CSV file.
-
Select the checkboxes at the left of the rows you wish to export.
- Select Actions → Export Selected as CSV. When your download is ready, it appears in the Data Exports table.
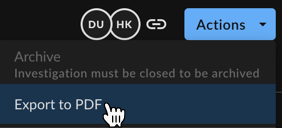
Export Case Details to PDF🔗
You can also export a PDF file of an individual case's details. To do so, follow these steps:
- Select Cases from the Taegis Menu to view the Cases page and then select the name of the case you wish to export.
-
From the case's details page, select Actions → Export to PDF.
Exporting a PDF of a Case -
Choose to include Top Level Findings and/or Key Findings in the report and select Print.
- When your download is ready, it appears on Completed Reports.
Archived Cases🔗
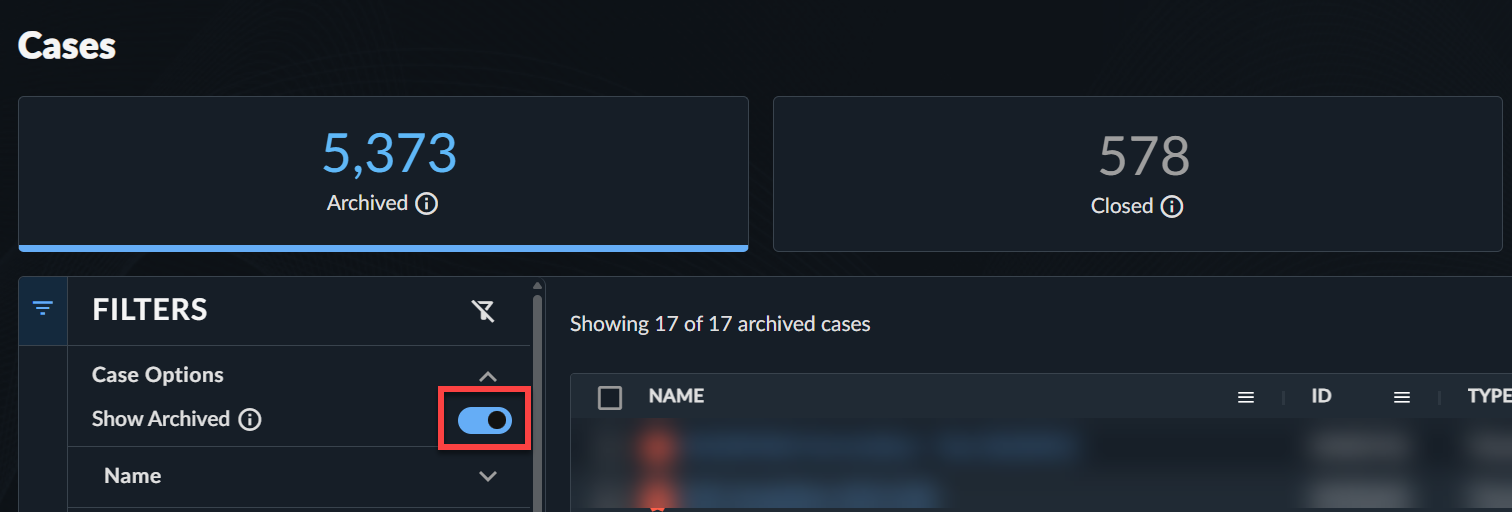
If cases are no longer relevant or may have been created by mistake, you can archive them.
To view archived cases:
- From the filters menu, select Show Archived to update the table with archived and closed cases.
- Use the status cards to view by state:
- Archived — Cases that have been archived.
- Closed — Cases that have been closed using one of the close codes.
- Use the filters menu to further narrow down the results.
Note
The following affects how a case can be edited:
- Cases with any Closed status are read only, except for the Status field and the Archive action.
- Archived Cases are read only, except for the Unarchive action.
Archive an Individual Case🔗
Important
Cases must be closed first to be archived.
Archive an individual closed case in one of two ways:
-
By selecting Actions → Archive from the case's details page.

Archiving an Individual Case from Details -
By selecting the Archive icon from the Actions column of the Cases table.

Archiving an Individual Case from Table
Archive Multiple Cases🔗
Important
Cases must be closed first to be archived.
To archive multiple cases from the Cases table, follow these steps:
- Select Cases from the Taegis Menu to view the Cases page.
- Use the checkboxes to select the cases you wish to archive.
- Select Actions → Archive Selected Cases from above the table. The cases are archived.

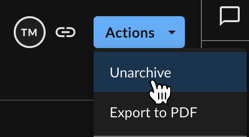
Restore Archived Cases🔗
Restore an Individual Case🔗
Restore an individual archived case in one of two ways:
-
By selecting Actions → Unarchive from the case's details page.
Restoring an Archived Case from Details -
By selecting the Unarchive icon from the Actions column of the Cases table.
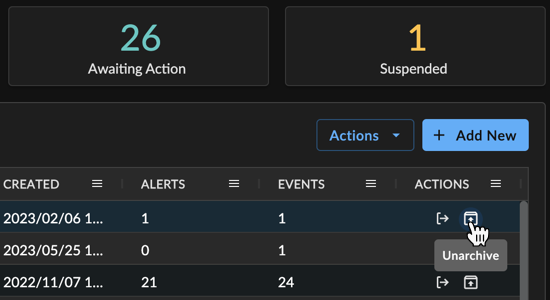
Restoring an Archived Case from Table
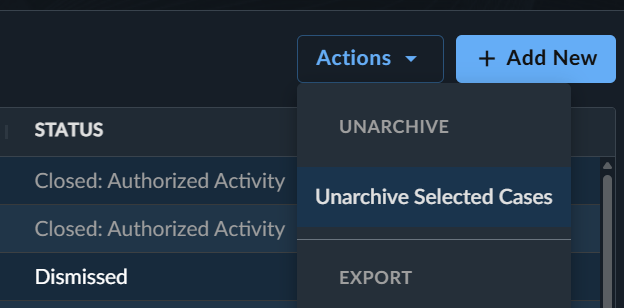
Restore Multiple Cases🔗
To restore multiple archived cases:
- Select Cases from the Taegis Menu to view the Cases page.
- Select the Show Only Archived toggle from the filter menu on the left to view all archived cases.
- Use the checkboxes to select the cases you wish to restore.
- Select Actions → Unarchive Selected Cases from above the table. The cases are restored.