Sophos Linux Sensor Installation🔗
Sophos Linux Sensor can be deployed across a wide range of Linux environments, with Helm charts providing the recommended path for Kubernetes and other containerized deployments. Use Helm to roll out SLS consistently across clusters, simplify upgrades and configuration changes, and standardize runtime threat detection and event collection at scale.
This document walks you through deploying SLS using the Helm charts method. Guidance for alternative installation options, such as Debian/RPM packages and Docker-based deployments, is available in the Sophos documentation.
For non-Kubernetes scenarios, you can still install SLS on Linux hosts running on-premises bare metal, virtual machines, or cloud instances using Debian and RPM packages from the Sophos package repository. Docker images are also available from the Sophos Docker registry for container-based workflows, while Helm charts enable repeatable, versioned deployments in Kubernetes environments. For guidance on these deployment scenarios, see Other Installation Guides.
Requirements🔗
- We recommend that you have a good understanding of Kubernetes, Docker, and command-line tools, such as kubectl, before following this documentation.
- You must have kubectl v1.18 or higher. See Kubernetes Install Tools.
Before installation, verify that your system supports SLS before attempting to deploy the agent. See Sophos Linux Sensor Distribution and Kernel Support.
Authenticating to the Sophos Package Repository🔗
After verifying that your systems support Sophos Linux Sensor, gather the credentials needed to install the agent from the Sophos package repository. The prerequisite steps to authenticate and configure your hosts to access the repository are as follows:
- Obtain the Sophos SLS Key
- Find your Sophos tenant ID and Sophos account region
- Authenticate with the Helm registry
Obtain the Sophos SLS Key🔗
- In Secureworks® Taegis™ XDR, go to Endpoint Agents > Downloads.
-
Click Copy SLS Token to copy your SLS authorization token.
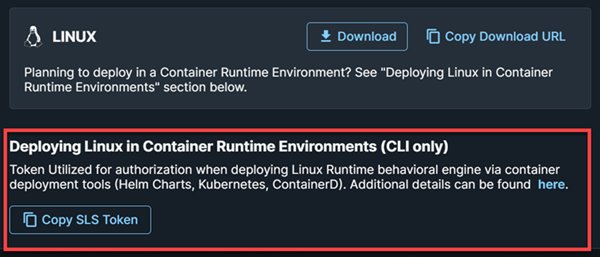
Copy SLS Token
Find Your Sophos Tenant ID and Region🔗
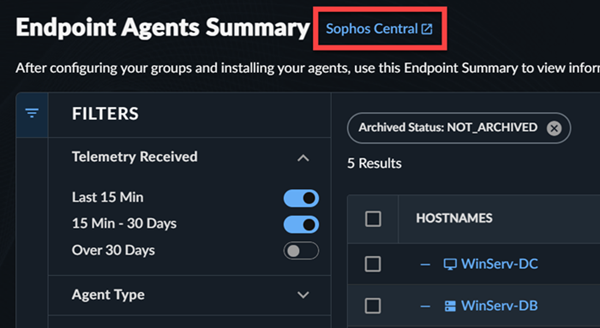
Access Sophos Central from various links throughout your XDR tenant. The easiest way is to use the Taegis Menu to navigate to Endpoint Agents > Summary, then select the Sophos Central link next to the page title. Note that the active tenant in Taegis must be a customer tenant in Sophos Central for this route to work.
-
In Sophos Central, click the Profile Menu icon and select Support Settings under Account.
Find your Tenant ID and account region at the bottom of the Support Settings page.
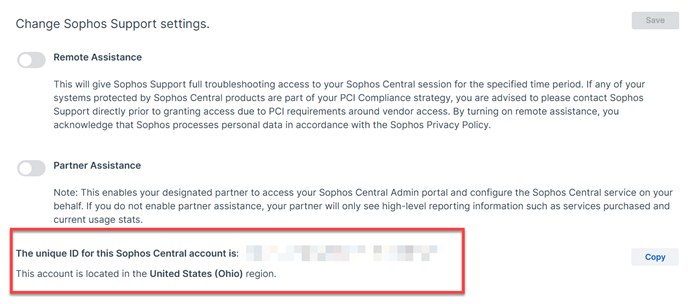
Sophos Tenant ID and Region Tip
Save these details for the steps that follow.
-
Correlate your account region name to the relevant URL from the table below:
Region MCS URL United States (Oregon) https://mcs2-cloudstation-us-west-2.prod.hydra.sophos.com United States (Ohio) https://mcs2-cloudstation-us-east-2.prod.hydra.sophos.com Ireland https://mcs2-cloudstation-eu-west-1.prod.hydra.sophos.com Germany https://mcs2-cloudstation-eu-central-1.prod.hydra.sophos.com Canada https://mcs2.stn100yul.ctr.sophos.com Australia https://mcs2.stn100syd.ctr.sophos.com Asia Pacific (Tokyo) https://mcs2.stn100hnd.ctr.sophos.com South America (Sao Paulo) https://mcs2.stn100gru.ctr.sophos.com Tip
Save this URL for use in the next section.
Authenticate with the Helm Registry🔗
Authenticate with the Helm registry by running the following command, replacing <LINUX_REPO_API_KEY> with your Sophos SLS key:
Note
Without authentication, the Helm commands in this document won't succeed.
Installation🔗
Deploy SLS using the latest chart version to ensure access to the newest capabilities, detections, security fixes, and performance improvements.
To deploy SLS with the recommended settings, do as follows:
- Create a file named
values.yaml. The location doesn't matter. -
Enter the following lines into the file, replacing
<TENANT-ID>with your Sophos Central Tenant ID,<CENTRAL-URL>with your Sophos Central account region URL, and<LINUX_REPO_SLS_TOKEN>with your Sophos Linux repository API key: -
Run the following command, replacing
<RELEASE_NAME>with a name you want to use for your deployment, such assophos-sensor-latest:helm install <RELEASE_NAME> oci://registry.sophosupd.com/release/helm-sophos-linux-sensor \ --values values.yamlThis command installs SLS with the latest chart version and Sophos' recommended baseline configuration that sends telemetry to Secureworks® Taegis™ XDR.
Upgrade🔗
This command automatically gets the latest version of SLS every time you run it. If you want to install a specific version, use the --version argument and specify the version you want to install. You can use this argument to apply version constraints that keep you on the same major version while updating to the latest patch or minor version of a chart.
Example
The following command upgrades the existing chart to 1.2.0-679:
helm upgrade <RELEASE_NAME> oci://registry.sophosupd.com/release/helm-sophos-linux-sensor \
--version ^1.2.0-679 --reuse-values
Adding Custom Profiles from Sophos Central🔗
You can apply a custom profile downloaded from Sophos Central to values.yaml. To download a custom profile from Sophos Central, do as follows:
- In your Sophos Central tenant, go to My Products > Server > Linux Profiles.
- Click the Actions button .
-
Select Export Latest Version to save the profile to your device.
Tip
You can also click the profile you want to use and click the download arrow to download the profile to your device.
-
Open the downloaded file.
- Copy the profile information you want.
- Open
values.yaml. -
Locate the following line:
-
Paste the content after that line.
-
Save your changes.
Example
This is a sample
values.yamlfile that includes a custom profile downloaded from Sophos Central.endpoint: sensor: params: customerID: ########-####-####-####-############ mcsURL: "mcs2-cloudstation-us-west-2.prod.hydra.sophos.com" mcsToken: "SLS-########" rules: | Chmod of SSH Authorized Keys: enabled: true Chown of SSH Authorized Keys: enabled: true Suspicious_Interactive_Shell-parentProgramName-allowList: operations: - behavior: remove list: - /usr/bin/sshd - /usr/sbin/sshd Suspicious_Interactive_Shell-parentProgramName-blockList: operations: - behavior: add list: - /bin/sh
Advanced Configuration🔗
Using Helm, you can configure some advanced options without making changes to the runtimedetections.yaml file. Run the following command to see all advanced configuration options available:
Important
These options may change over time. We recommend that you always run this command before making any changes to verify the available options.
To add advanced configuration options, add the options you want to values.yaml. If you have other settings under endpoint.sensor.params, make sure to include them under the same section.
Example
This is a sample values.yaml file that includes the option to override the default monitoring port 9010 with port 1111.
endpoint:
sensor:
    params:
      monitorPort: 1111
      customerID: ########-####-####-####-############
      mcsURL: "mcs2-cloudstation-us-west-2.prod.hydra.sophos.com"
      mcsToken: "SLS-########"
Uninstall🔗
To uninstall SLS using Helm, do as follows:
-
Run the following command, replacing
<RELEASE_NAME>with the name you selected during installation: -
Run the following command to verify SLS was removed:
Other Installation Guides🔗
Use the links below to find Sophos documentation for other SLS deployment scenarios.