Automatic Cases🔗
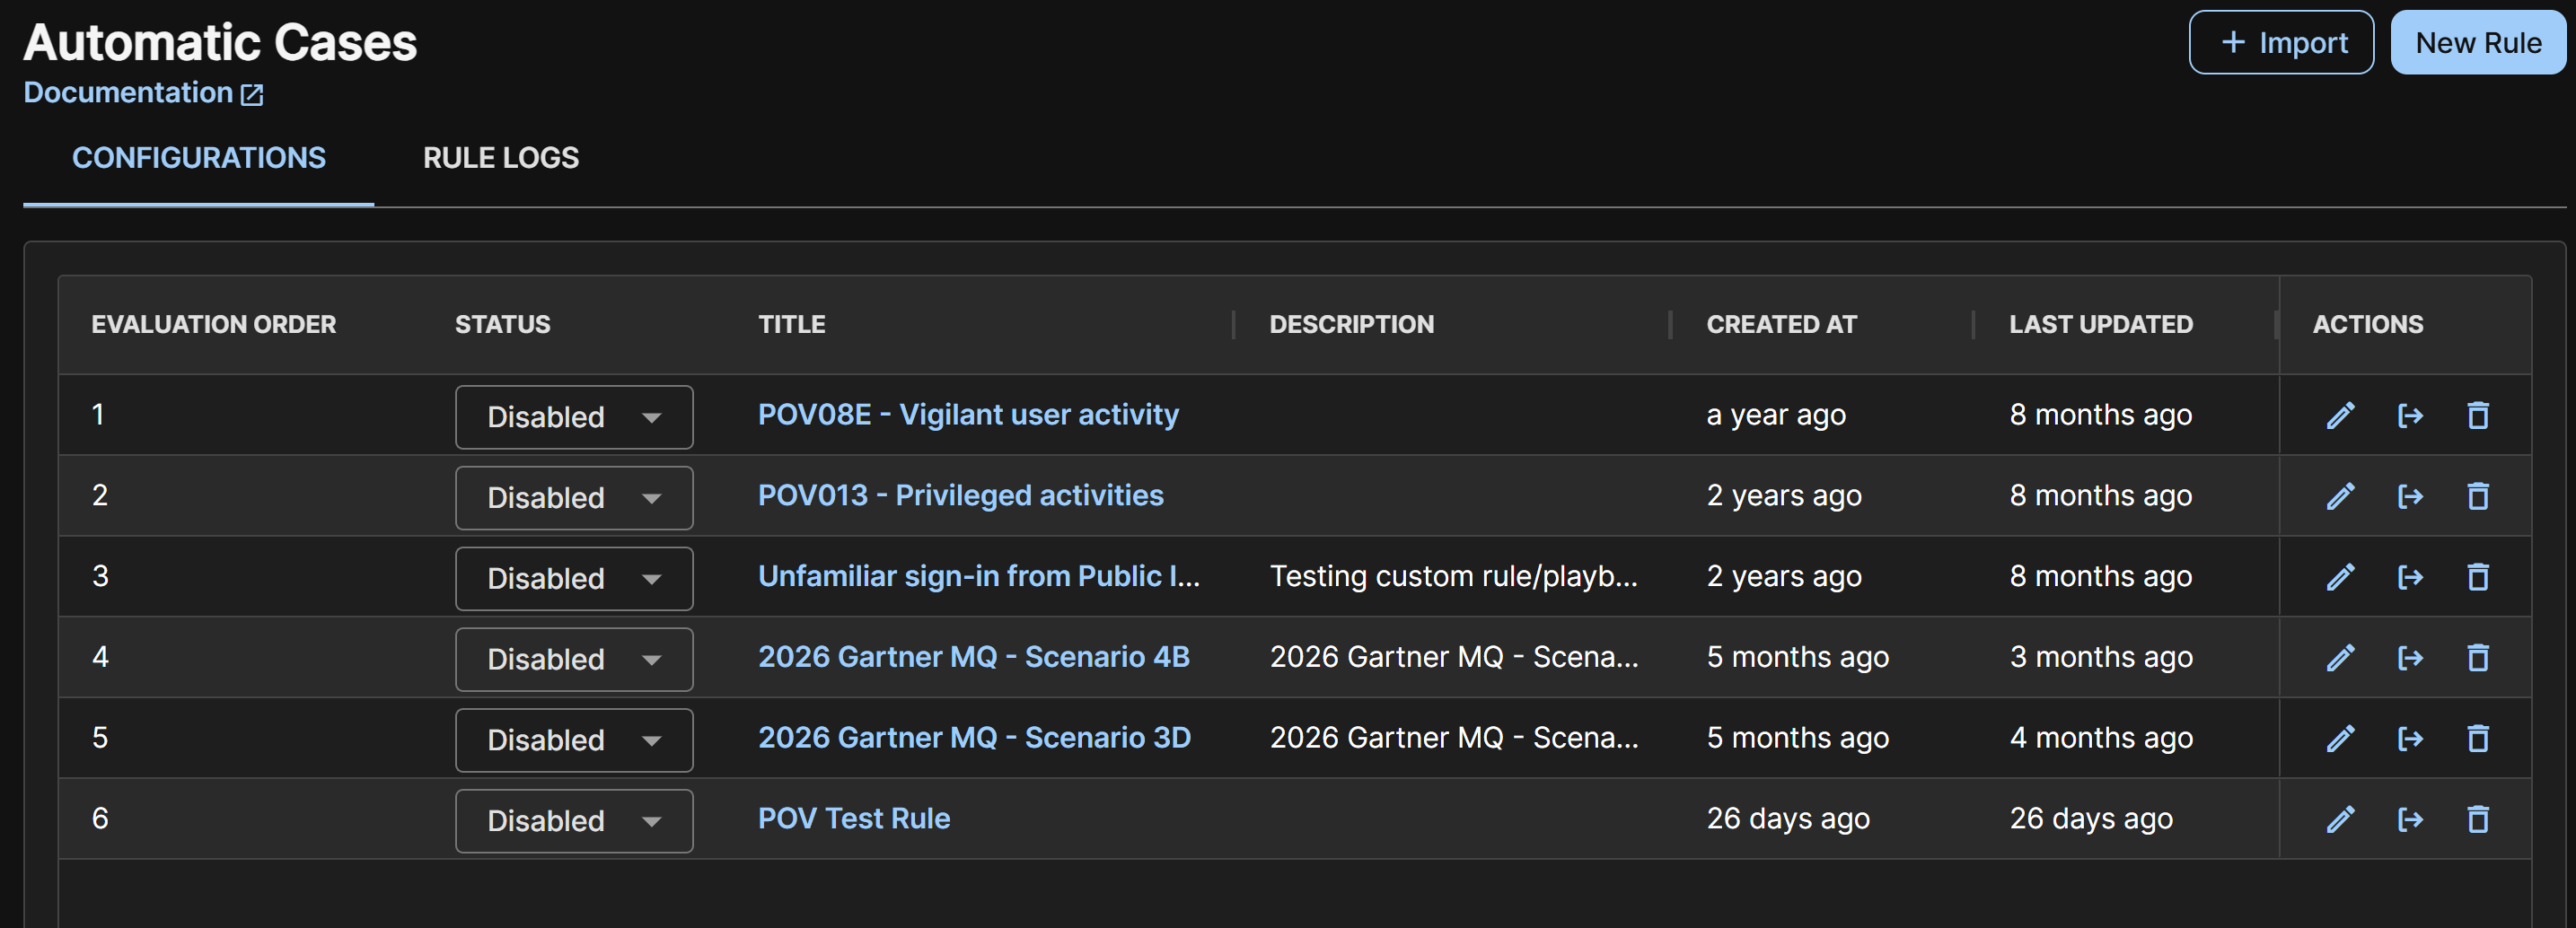
Automatic Cases in Secureworks® Taegis™ XDR can be set up to monitor newly-created detections and create a new case from detections that meet the criteria, or likewise append newly-created detections to existing cases that match specified attributes.
Important
Only newly-created detections will invoke Automatic Case rules. Detection updates, such as severity changes, do not trigger Automatic Case rules at this time.
Note
If you are opted in to Preview mode, templates have been moved from Automatic Investigations to their own page.
Rules may be defined at either the partner level and applied to all child tenants or by individual tenants. Rules define a Query Language detection query over the incoming detections stream and set of Group By definitions that group detections together into cases by attributes—for example, entities or the title—of the detections.
Create an Automatic Case Rule🔗
Tip
Create the case template that your automatic case rule will use first if you haven't already. For details, see Case Templates.
To create an automatic case rule, do as follows:
- From the Taegis Menu, select Cases > Automatic Cases.
-
Click New Rule to open the Automatic Case Rule Builder.
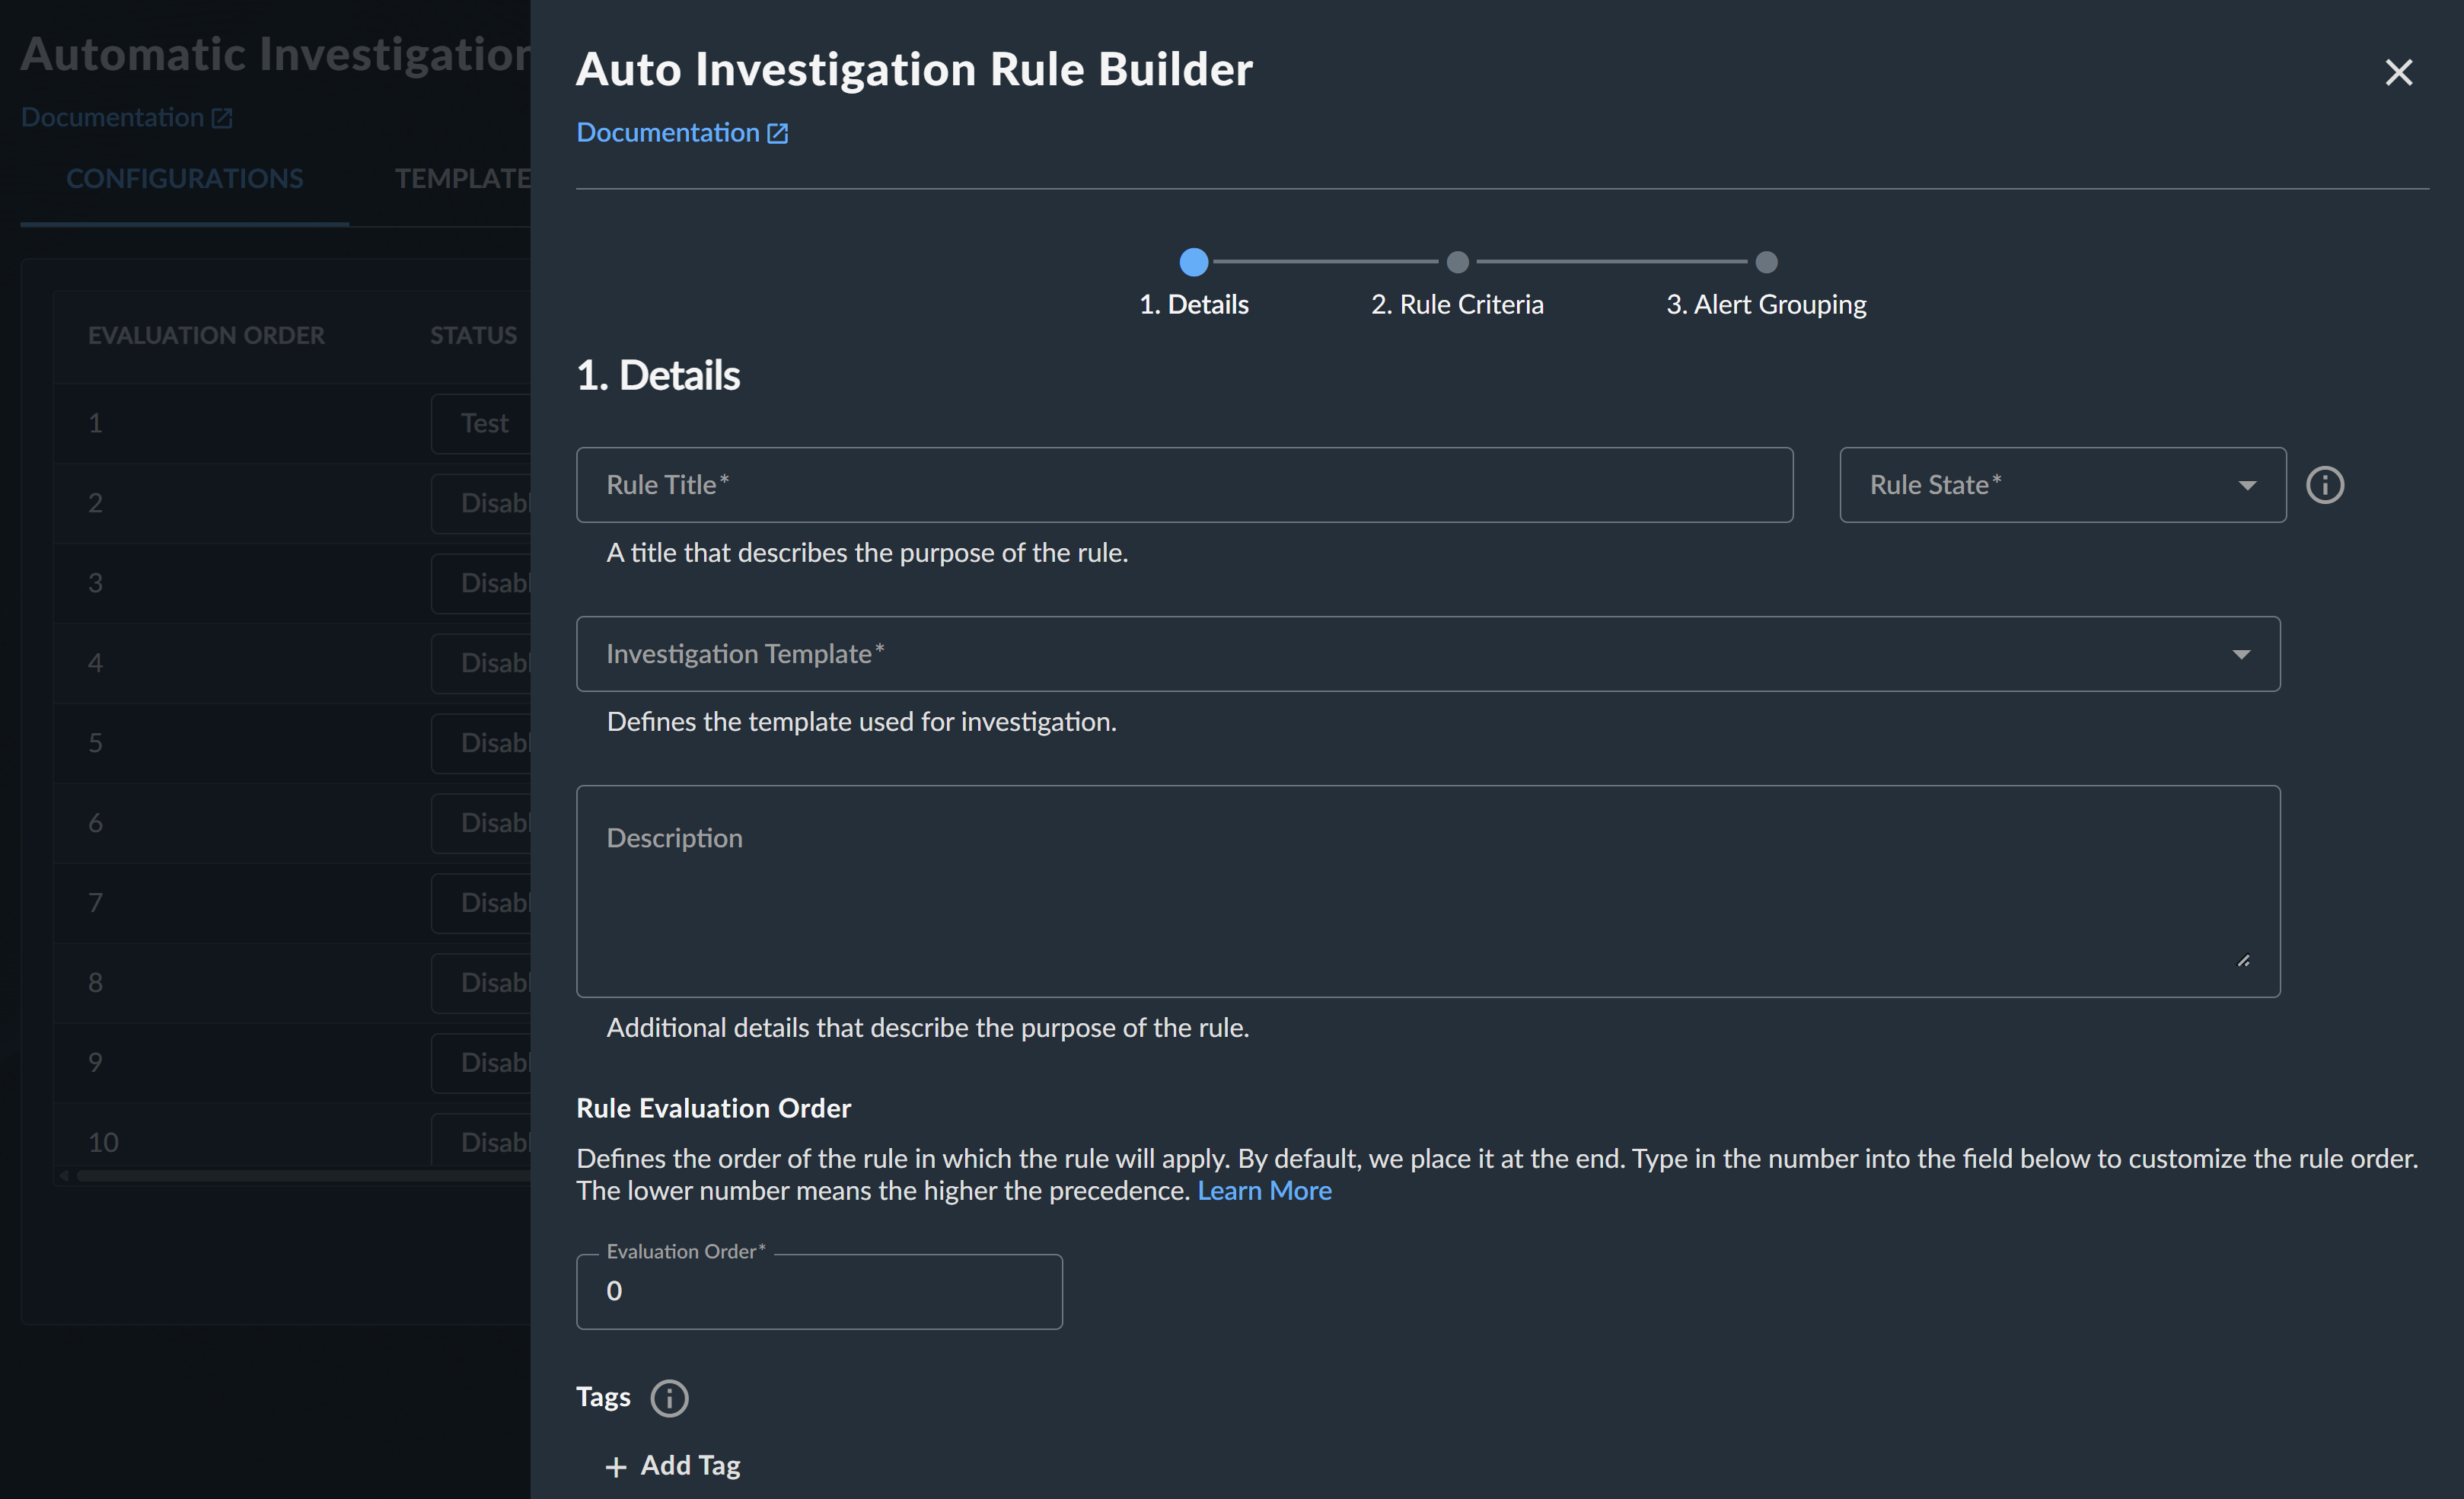
Auto Case Rule Builder Details
Define the Rule Details🔗
- Enter a title that describes the purpose of the rule.
-
Select one of the following rule states from the drop-down:
- Disabled: The rule doesn't do anything.
- Test: Generates logs only for verification purposes.
- Enabled: Creates a new case or appends detections to an existing case.
- Append: Appends detections to an existing case only, but doesn't create a case.
-
Select a template from the Case Template drop-down. For details, see Case Templates.
- (Optional) Enter a description of the rule.
- Set the rule evaluation order. Lower numbers have higher precedence and are evaluated first. For details, see .
- (Optional) Add one or more tags to organize the rule.
- Click Continue.
Determine the Rule Criteria🔗
Configure the rule criteria as follows:
- Add a XDR query language statement that filters for the detections you want the rule to apply to. For more on XDR’s query language, see Query Editor.
- If you want the user to be able to append detections to cases created by this rule, add a XDR query language statement to find the detections you want to append. For more on XDR’s query language, see Query Editor.
- (Optional) Select Ignore Detection Prioritization to make the rule ignore a detection’s Threat Score and execute the rule regardless of whether the system automatically deprioritized the detection in question. This option is off by default.
- Click Continue.
Configure Detection Grouping🔗
-
Using Common Expression Language (CEL), define if detections should be appended to an existing case and which case detections should be appended to. For more information, see Group By.
Note
This field is mandatory to create the Auto Case rule. You must specify at least one detection attribute.
-
In Criteria Count, enter the minimum number of detection attributes you defined that must match for the detection to be grouped.
- Click Submit.
Rule Evaluation🔗
The following are taken into account when rules are evaluated:
- Only medium and higher severity detections trigger Auto Case rules; low and informational detections are excluded from triggering rules.
- Newly-created detections are evaluated against the set of rules defined at the child tenant level first followed by the MSSP partner level in the order which they are defined.
- Rule evaluation stops on the first match. To match a rule, the detection must match both the rule query as well as contain the specified grouping attributes.
- When a rule is matched, all of the resulting values returned by the Group By clause are used to look up existing cases that have at least the specified group count of matching attributes.
- If a match is found, the detection is appended to the case and if specified in the rule, a comment is generated and added to the case.
- If no match is found, depending on the state of the rule, a new case is created. When a new case is created, the system performs a detection search over recent detections that match the rule query and appends any with matching Group By attributes to the new case.
- When a case is manually created, the system evaluates the genesis detections associated with the newly-created case and matches against any defined rules.
- If a rule matches and the case is created by a user that is a member of the tenant that defined the rule, the system performs the same detection search as defined above for additional matching detections that are auto-appended to the case.
Rule Monitoring and Testing🔗
Rules can be put into a Test state in which rules are evaluated but not actually appended to cases. Metrics are collected and logs generated as though the action was actually performed. See Define the Rule Details.
Rule Processing🔗
Important
Rules defined at the child tenant level are executed first before MSSP partner rules; use caution if you are a Taegis MDR customer or have services provided by a Secureworks MSSP partner.
Rule Order🔗
Rules are processed in the order defined by the order value on the rule—lower value is processed first. Rule processing stops after the first match. Tenant rules are processed before partner rules.
Group By🔗
The Group By values on a rule determine if a detection should be appended to an existing case using Common Expression Language (CEL). When a rule is matched, group_by criteria are evaluated. If an existing open case is found matching any of the results returned by the group_by expressions, the detection is added to the existing case rather than creating a new one.
Each expression may return either a single result or a list. If more than one expression is defined, the entire set of results is combined into one flattened OR list.
For example, the following returns a list of usernames identified as entities associated with the detection. If an existing open case contains a detection with any one of the resulting usernames, the detection would be added to the existing case.
To enforce that all of the usernames within the detection must match, the list of usernames needs to be converted into a single string value. This can be done using the join macro:
In a more complex example, the following returns a list of IPs identified as entities associated with the detection that do not match the specified addresses (127.0.0.1 or 0.0.0.0). If an existing open case contains a detection with any one of the resulting IPs, the detection would be added to the existing case.
The following example defines a single group_by clause that joins multiple detection attributes into a single value for the group_by clause. All of these attributes must then match an existing open case before the detection would be appended:
By default, any rule can append to any open case if the group_by values match. You may add the name of the rule to the group_by value to ensure that only this rule can append to cases created by itself:
Note
Group By matches are not rule-specific. This means any rule can append to any case if the Group By values match.
Each distinct row in the Group By list can result in a match. The matches are evaluated using an OR condition. To match with an AND condition, one must define a single row. In some cases, it may be possible to use the Group By count to result in an AND condition.
Adding Detections🔗
Rules are evaluated against the detections associated with a case when that case is created or detections are added to the case. If a rule matches a detection that is associated with the case, then additional detections may be added to the case as defined by the append filter on the rule.
Notes🔗
- Only the first 100 detections associated with the case are evaluated.
- If a rule has no append filter, then the rule filter is used to search for related detections to append.
- The following criteria are always appended to the query before execution and cannot be overridden. In order to be appended to the case, detections must meet these criteria:
- Detection severity of 0.6 and above
- Detection status of OPEN (detection must not be associated with another case already)
- Earliest/latest timestamp of +/- 4 hours from detection created at timestamp
- Up to 100 detections can be automatically appended.
- Detections that are automatically appended are used for future evaluation of detections (Group By matches).
Detection Processing🔗
Medium and higher severity detections are processed in a sequential fashion as they are created or published. For each detection, the rules are evaluated and a case is either created or appended to for the first rule that matches the detection. The filter on the rule is used to match the detection, but note that detections are also evaluated against the append_filter and can be appended to a case if both the append_filter and group_by criteria match the detection.
Rules that have an append state or an append_filter defined continue to be evaluated in order until both the filter or append_filter and group_by match. If a detection matches the filter, but the group_by doesn’t, then the detection is evaluated against the next rule in the ordered list of rules.
Edit Automatic Case Rules🔗
To edit a rule, click the Pencil icon in the Actions column for the desired rule. Edit the details, rule criteria, or detection grouping criteria and then select Submit to save.
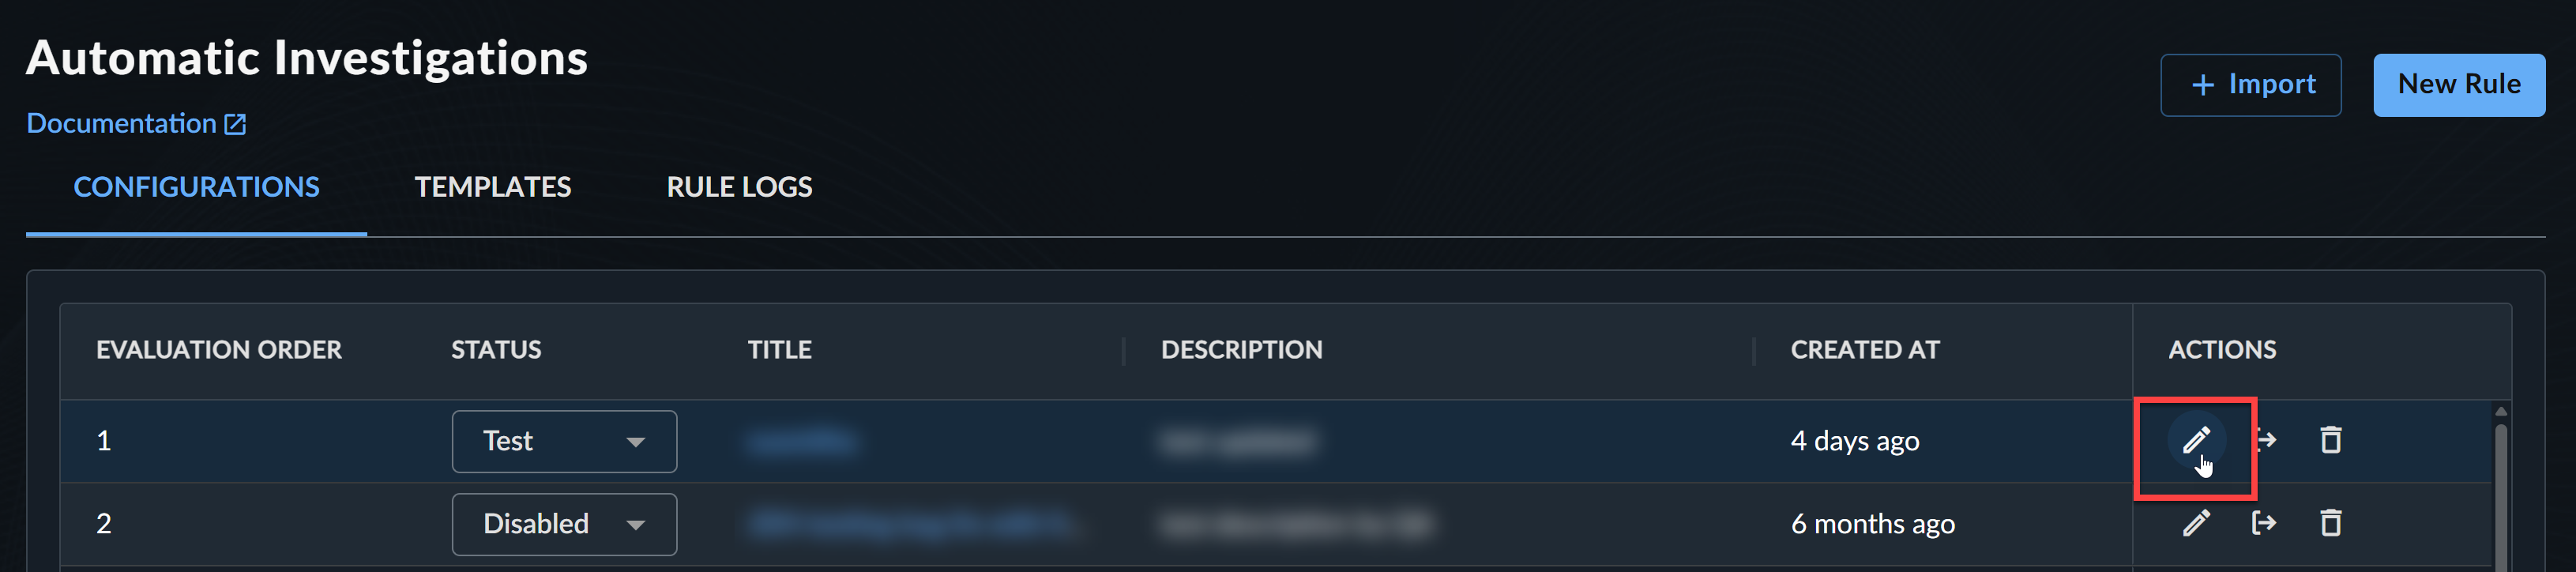
Export and Import Automatic Case Rules🔗
-
To export a rule, click the Export icon in the Actions column for the desired rule. The rule configuration exports in YAML format.
-
To import a rule configuration in YAML format, click + Import from above the table and choose the file.
Delete Automatic Case Rules🔗
To delete a configured rule, select the Trash icon in the Actions column for the desired rule and confirm your action by selecting Delete.
Rule Logs🔗
The Rule Logs tab lets users view logs of any changes to Auto Case rules or templates, as well as actions taken on detections by Automatic Cases. It includes a filterable table, initially empty.
Use the filters and input one of the following identifiers: Rule ID, Case ID, Detection ID, or Template ID to return a log of actions.
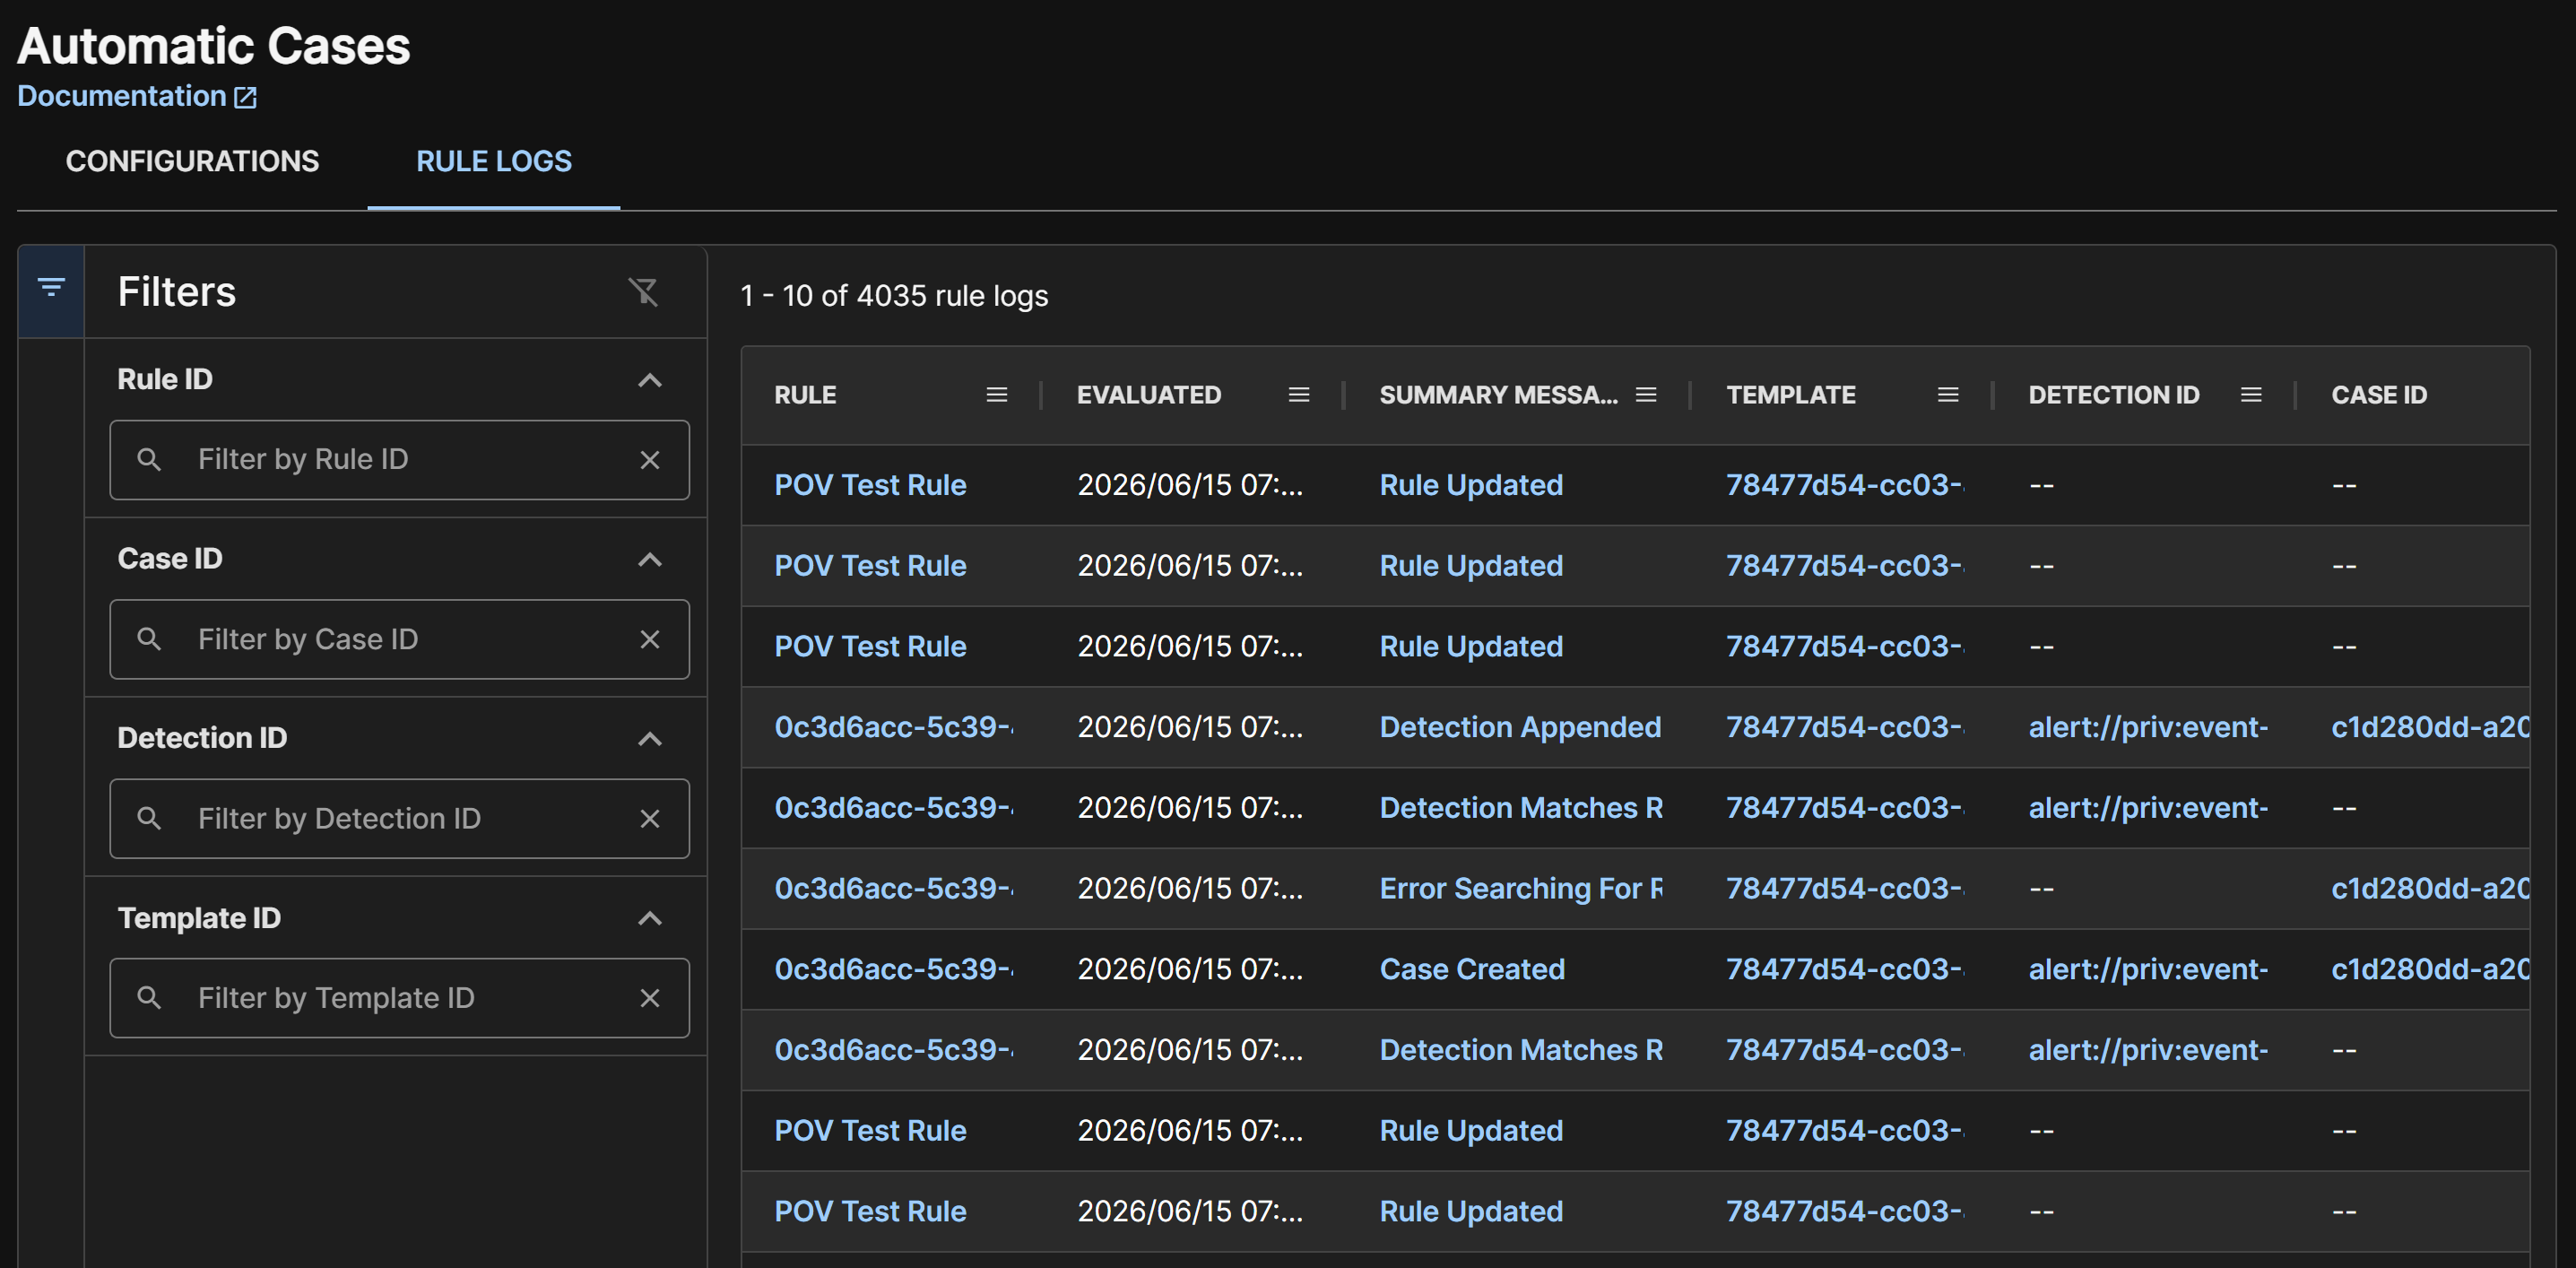
Select a log from the Summary Message column to view further details of the action and a JSON view of associated metadata.

Tip
Find Rule, Case, Detection, or Template identifiers in the URL when accessing individual instances.
<taegis_xdr_url>/cases/<case_id>/summary